Create a Curl Noise Effect
Curl noise is a type of procedural noise that is often used in computer graphics and simulations to create swirling, vortex-like patterns. It is especially popular for creating natural-looking fluid and smoke effects.
Set up your VFX environment
After you've created a new project in Effect House, you will need to set up a VFX environment. You can utilize one of the two methods outlined below. For more information on the VFX Editor, check out the VFX Editor Overview.
Method 1
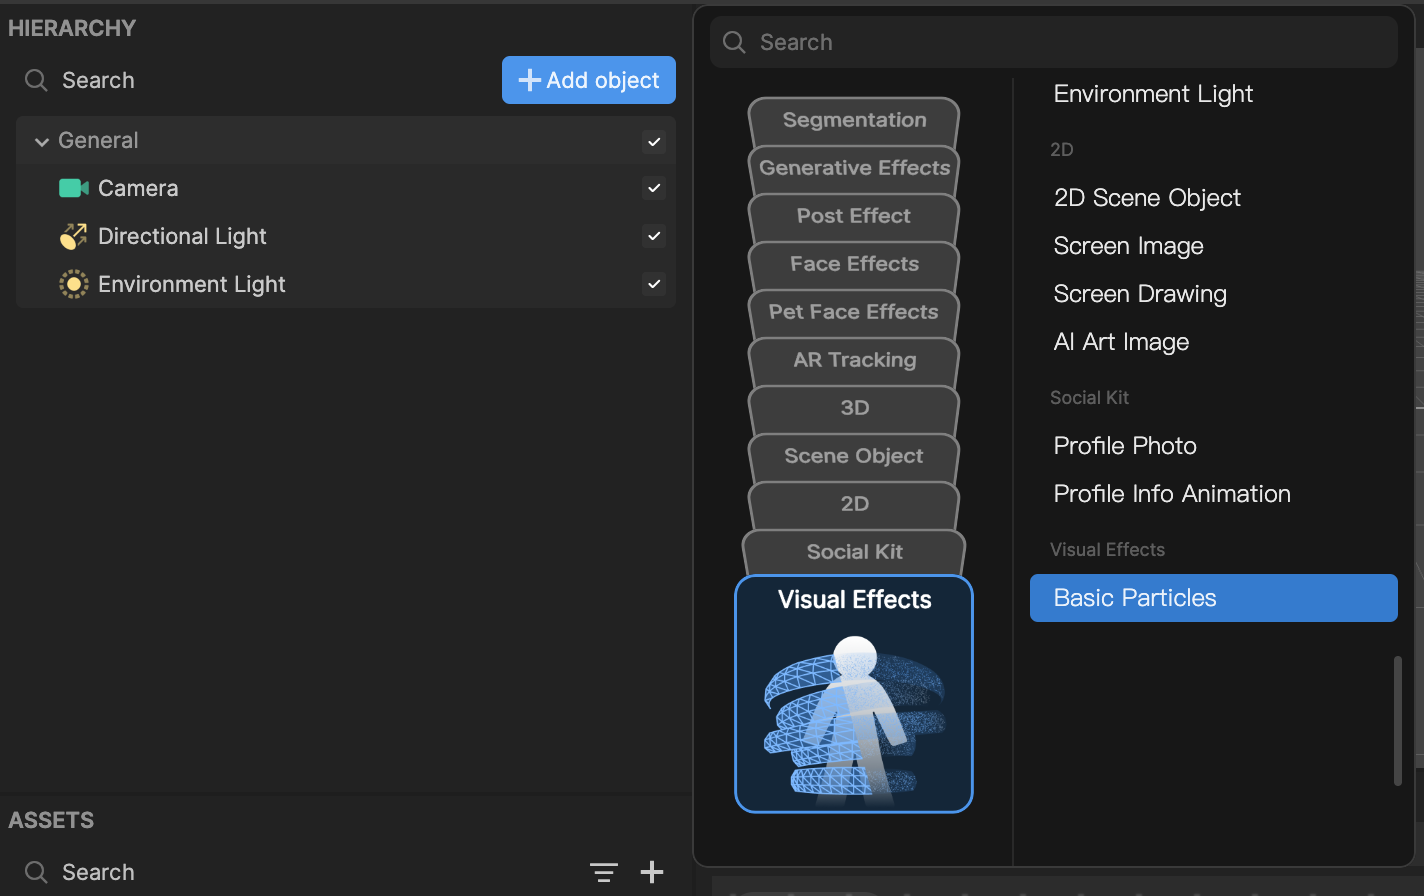
- Go to the Hierarchy panel
- Click the Add object button [+]
- Go to Visual Effects
- Select Basic Particles
Method 2
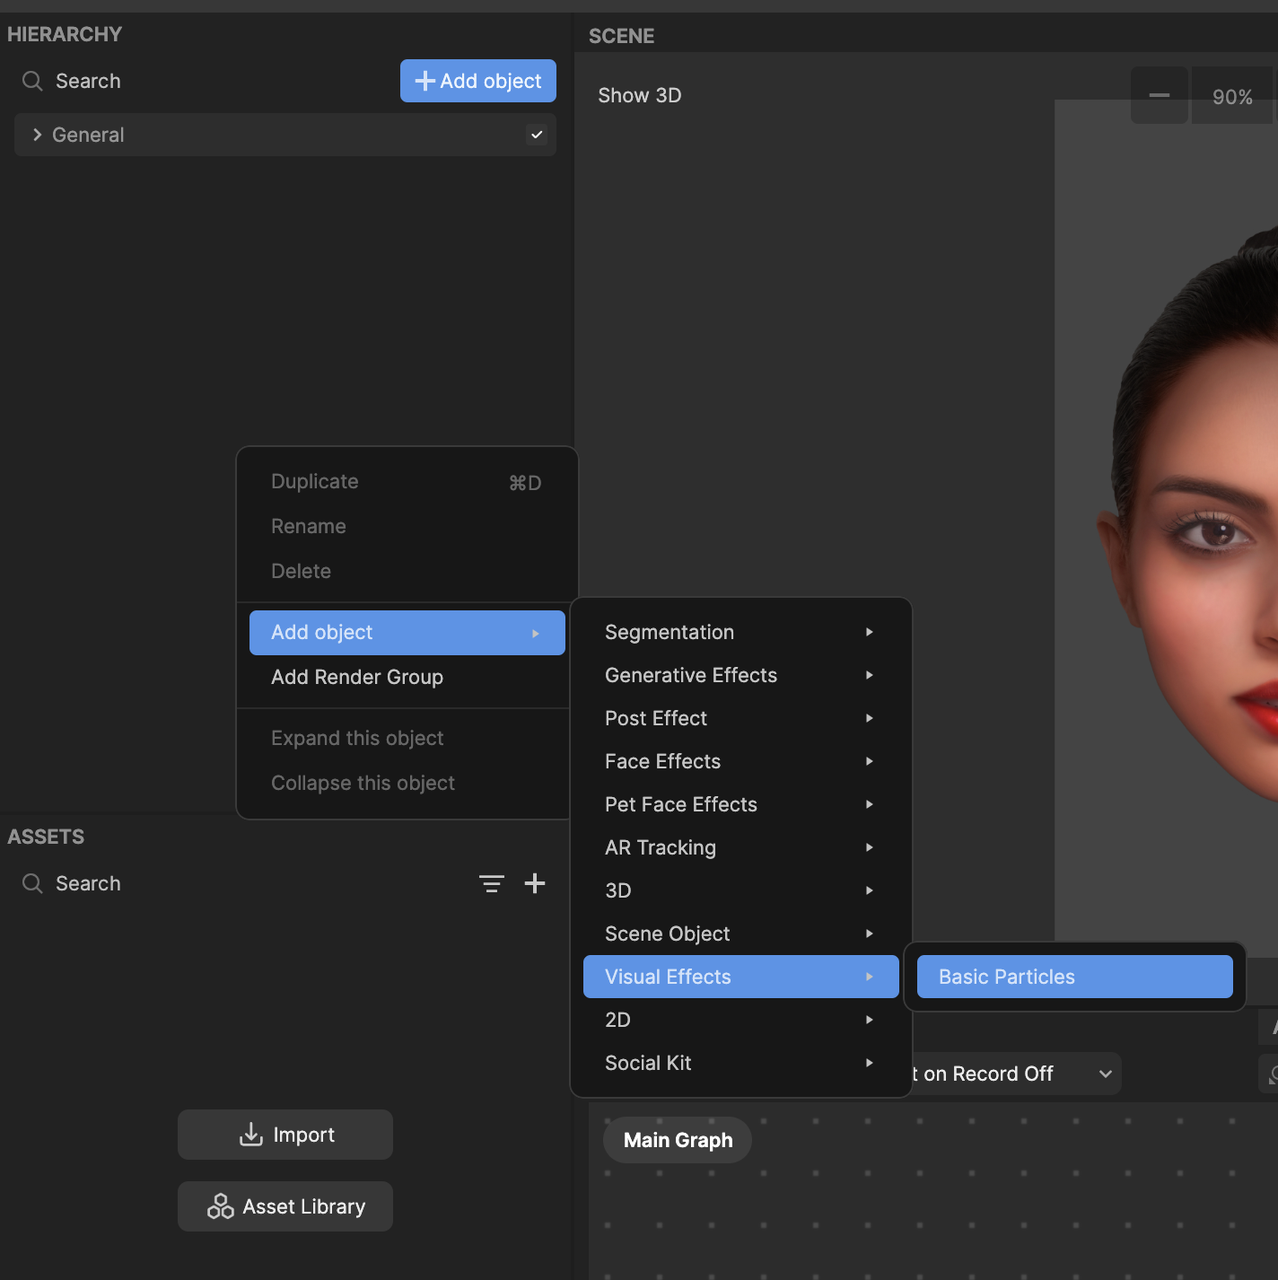
- Go to the Hierarchy panel
- Right click on the panel to view the menu popup window
- Navigate to Add object
- Go to Visual Effects
- Select Basic Particles
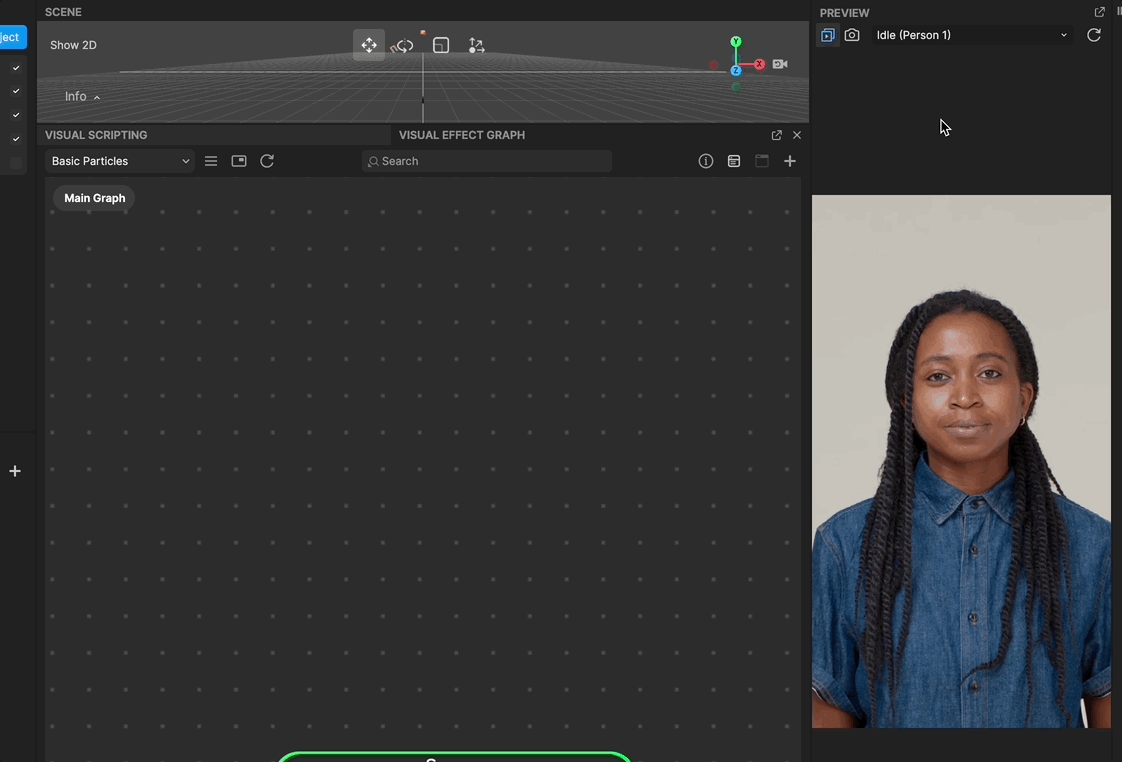
Once you've added the Basic Particles object, you will see the Visual Effect Graph. You should also notice white particles moving in the Preview panel.
To see your changes immediately as you make them, enable the Auto Compile option by clicking the Auto Compile button. If this option is not enabled, you’ll need to manually click the Compile button after each update to view your changes.
Import a 2D texture
You will need 2D texture assets for this effect. Download the following zip file to get started:
To import a 2D texture asset:
- Go to the Assets panel
- Click the Add asset button [+]
- Go to Import and click From Computer
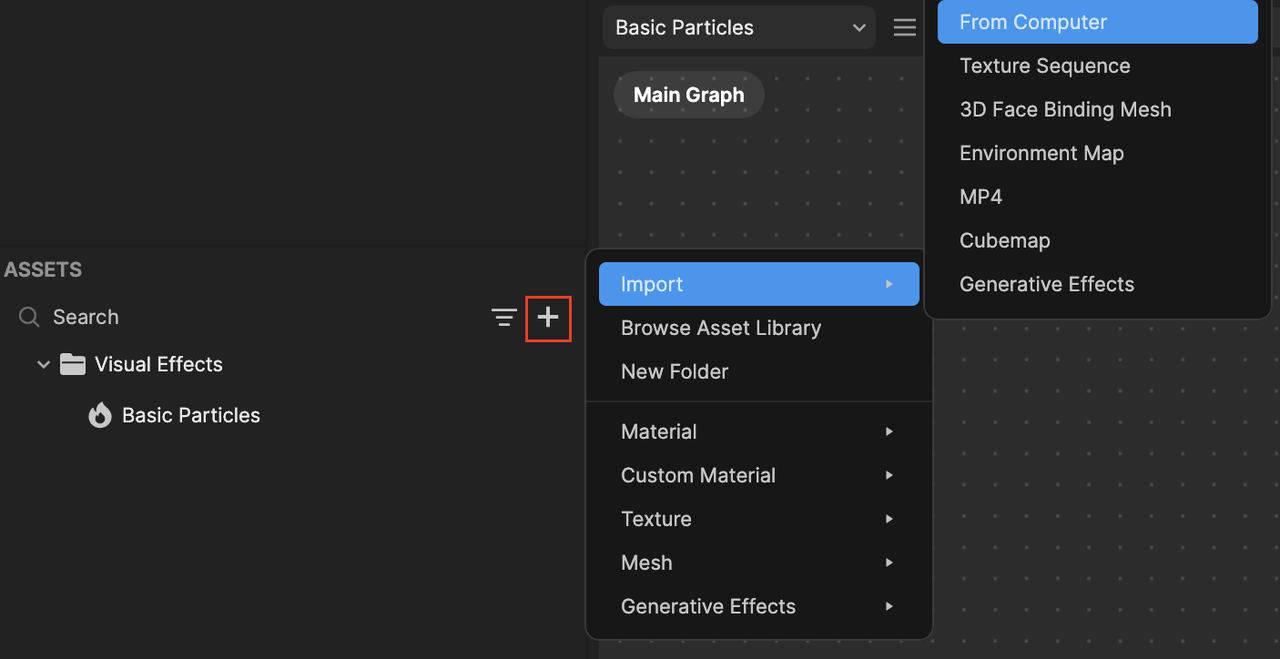
- Select the image that was included in the zip file and click Open. We'll use it in the next few steps.

Import a black background image to the Preview panel
To better visualize the effect, we will import a black background image to the preview screen.
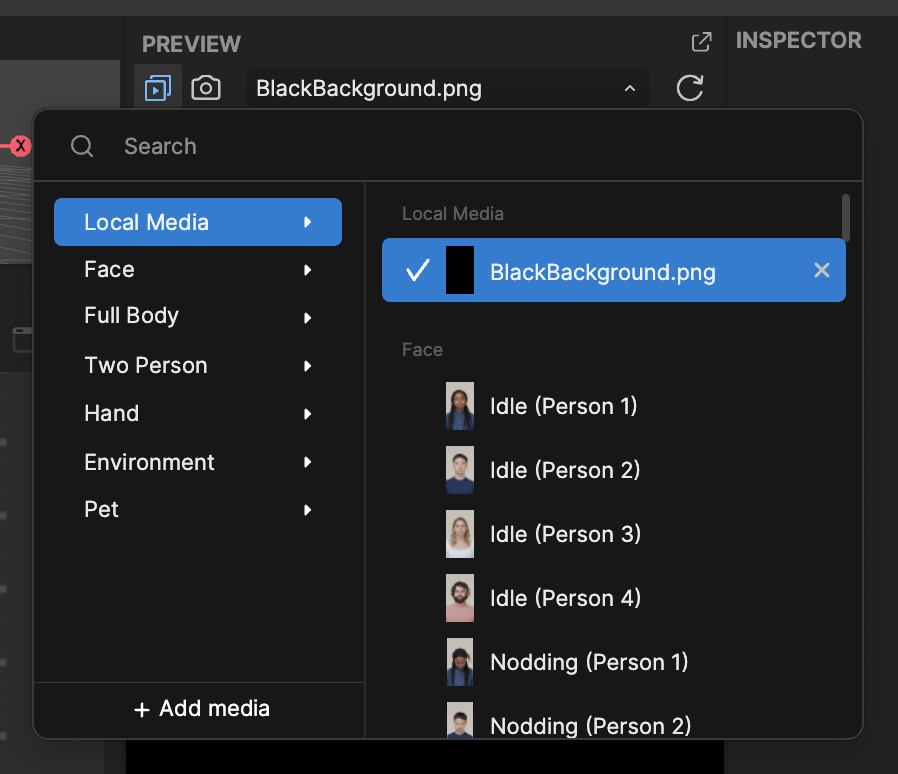
- Go to the Preview panel
- Select Idle (Person 1)
- Click + Add Media
- Select the BlackBackground.png file and click Open. The black background image is now applied to the Preview panel.
Curl Noise node in the VFX editor
The Curl Noise node samples a noise value within a specified range and generates a turbulent noise.
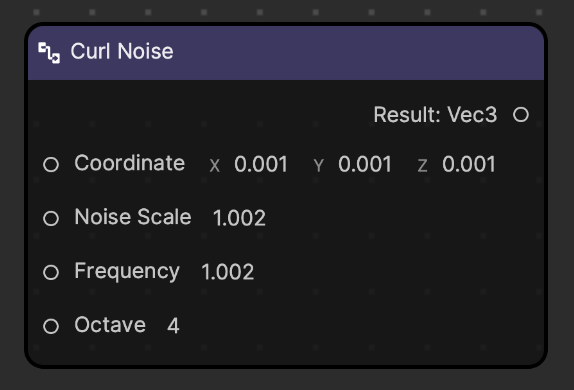
| Property | Description |
|---|---|
| Coordinate | Defines the location in the noise field |
| Noise Scale | The scaling factor that is applied to the noise field coordinates |
| Frequency | The period in which the noise is sampled. A higher frequency results in more frequent noise changes. |
| Octave | The number of layers of noise. More octaves create a more varied look, but require more resources to calculate. |
| Result | The noise value at the specified coordinate (x,y,x) |
Test a simple Curl Noise
To display several particles on the screen:
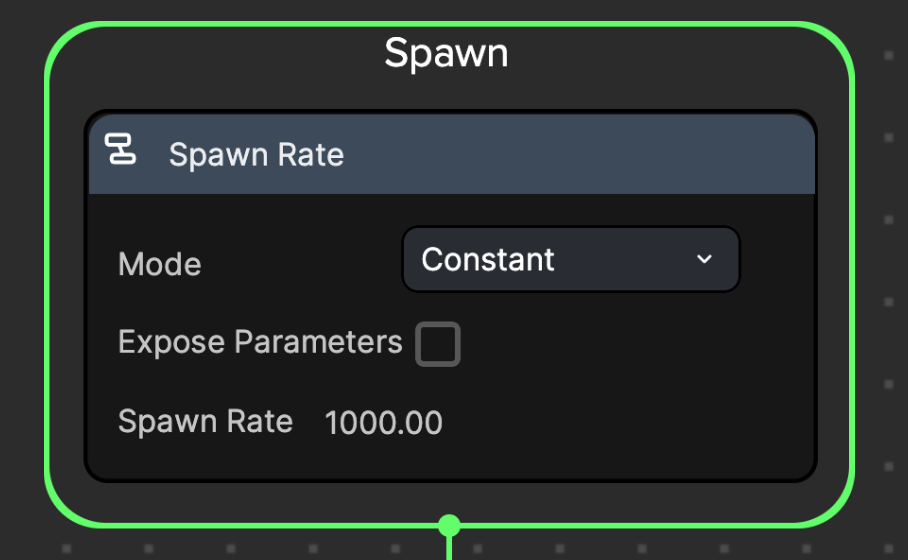
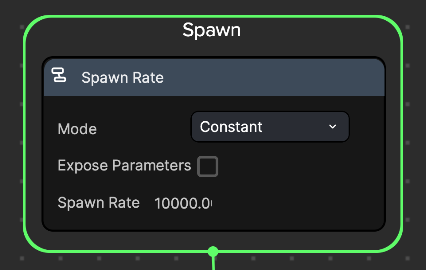
- Go to the Spawn logic
- Change Spawn Rate to 10,000

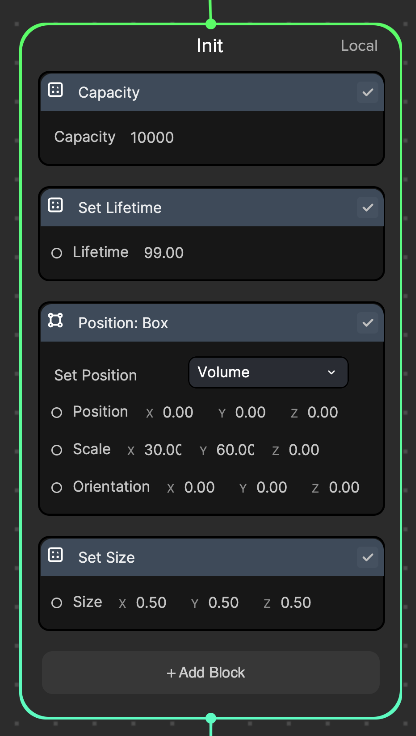
- In the Init logic:
- Delete the Set Random Velocity node
- Change Set Capacity to 10,000. This caps the maximum allowed particle count.
- Change Set Lifetime to 99. This enables particles to stay on the screen for a long time.
- Add a Position: Box node and set the Scale: (30, 60, 0). This node maintains the particle's spawn location within a box shaped area.
- Setting the position to (0, 0, 0) allows the particles to be spawned from the center of the screen
- Setting the scale to (30, 60, 0) creates an invisible rectangular box that covers the entire preview screen where particles will be spawned within
- Add a Set Size node and set the Size: (0.5, 0.5, 0.5). This will assign each particle a specific size.

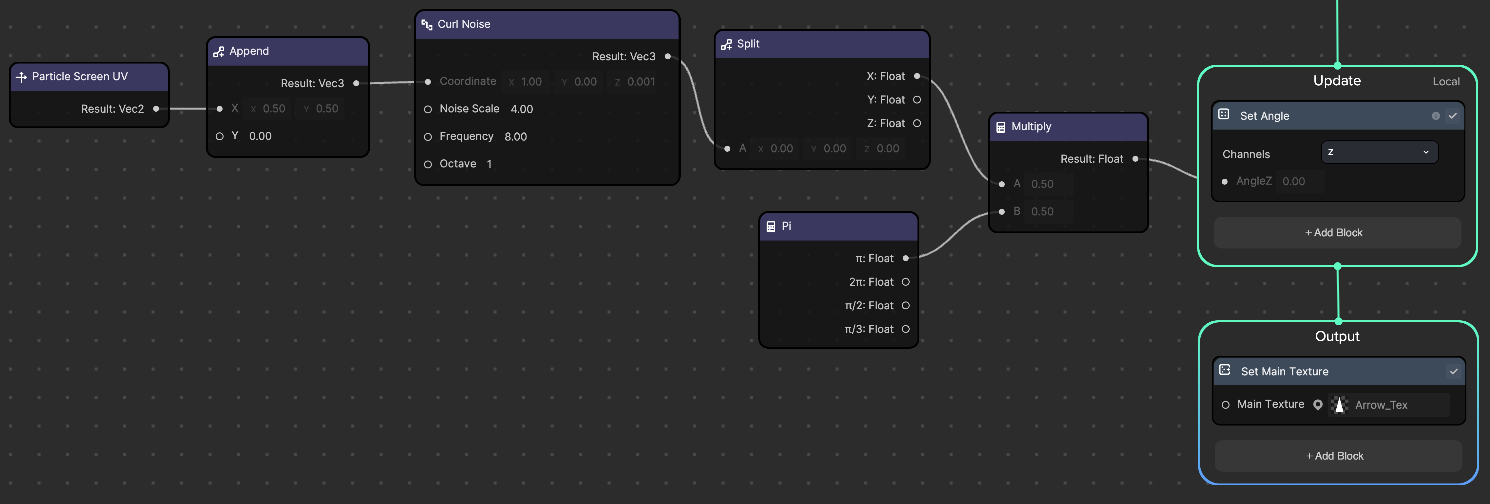
- In the Update logic:
- Add Set Color block node
- Add Particle Screen UV, Append, and Curl Noise operator nodes
- Connect Particle Screen UV to Append, Append to Curl Noise, and Curl Noise to Set Color, as shown in the screenshot below.
- Set Y to 0.0 in the Append node
- In the Curl Noise node
- Set Noise Scale to 4
- Set Frequency to 8
- Set Octave to 1

- In the Output logic, change the blend mode from Additive to Alpha to see the actual color displayed on the screen.
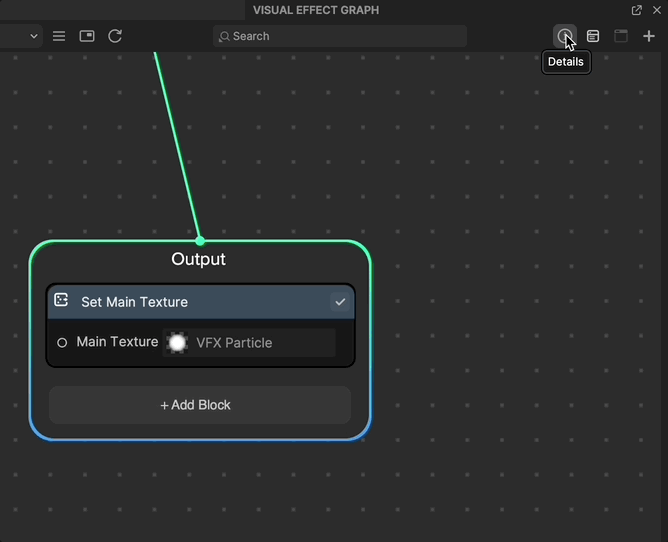
- Go to the Visual Effect Graph panel
- Click Details
- Select the Output context node
- Go to Blend Mode and choose Alpha
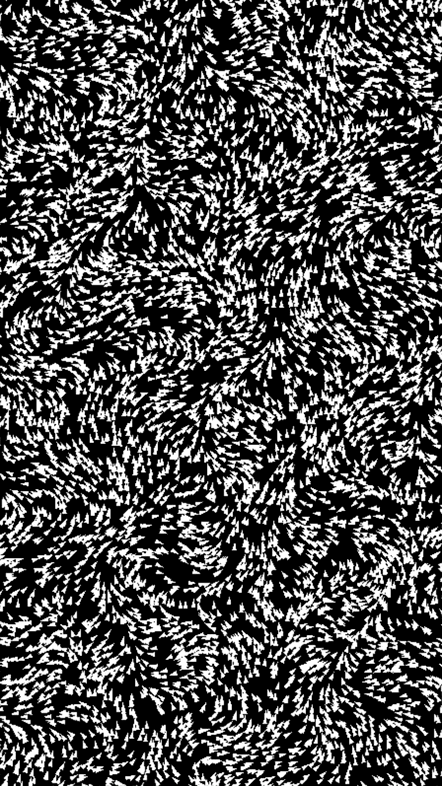
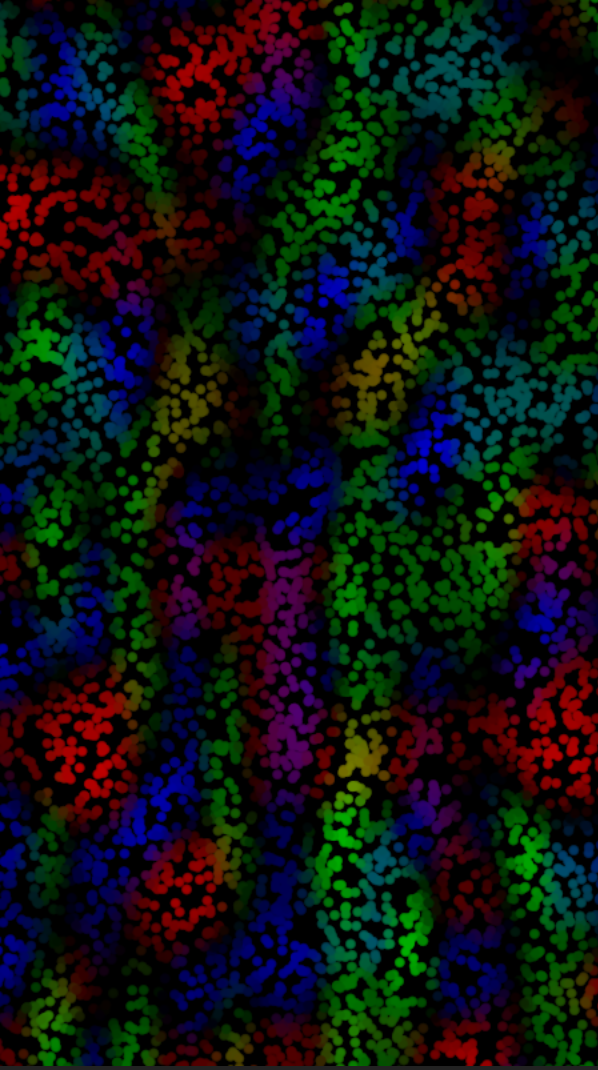
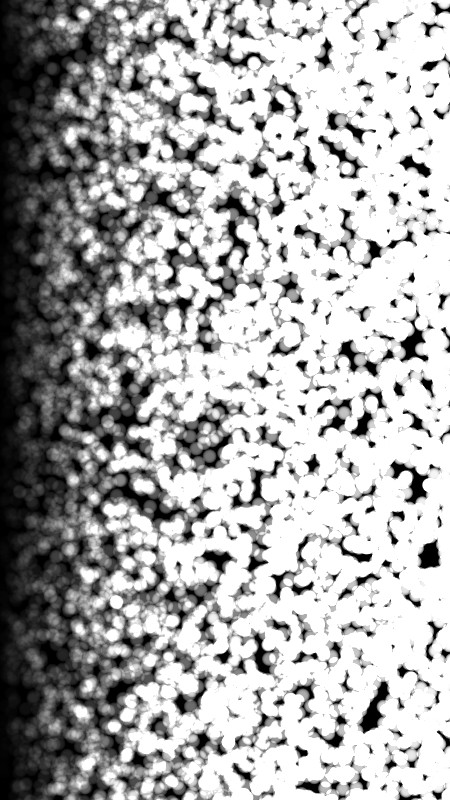
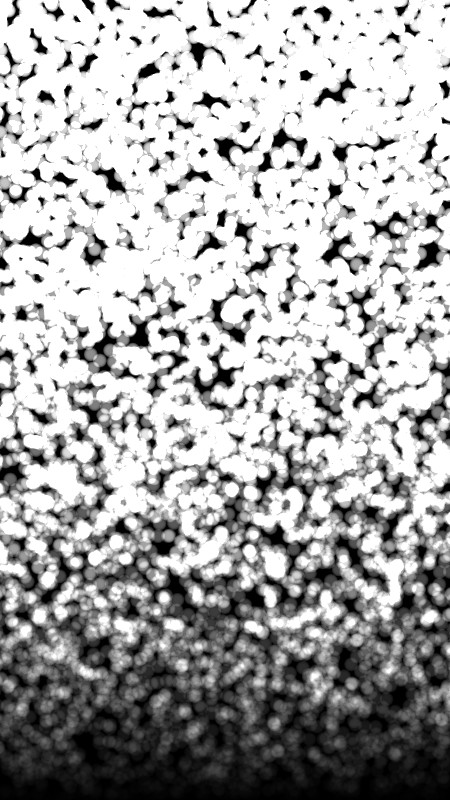
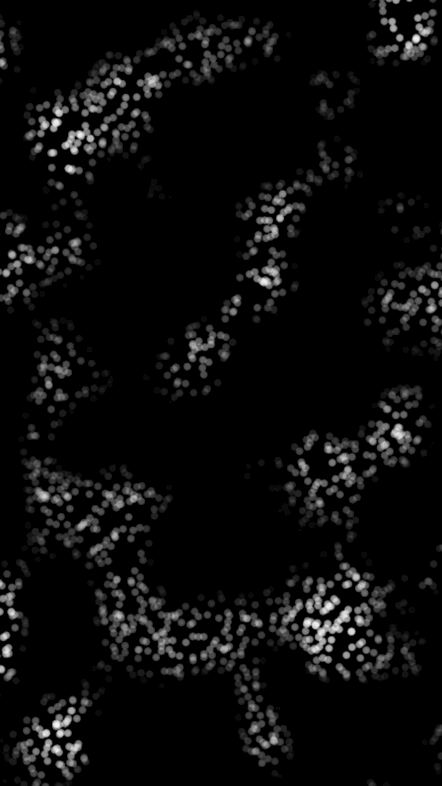
You should now see multiple colors in clusters on the screen.
Interested in learning more about how this result was accomplished? Let's continue to dive in and break it down.
Understanding the logic
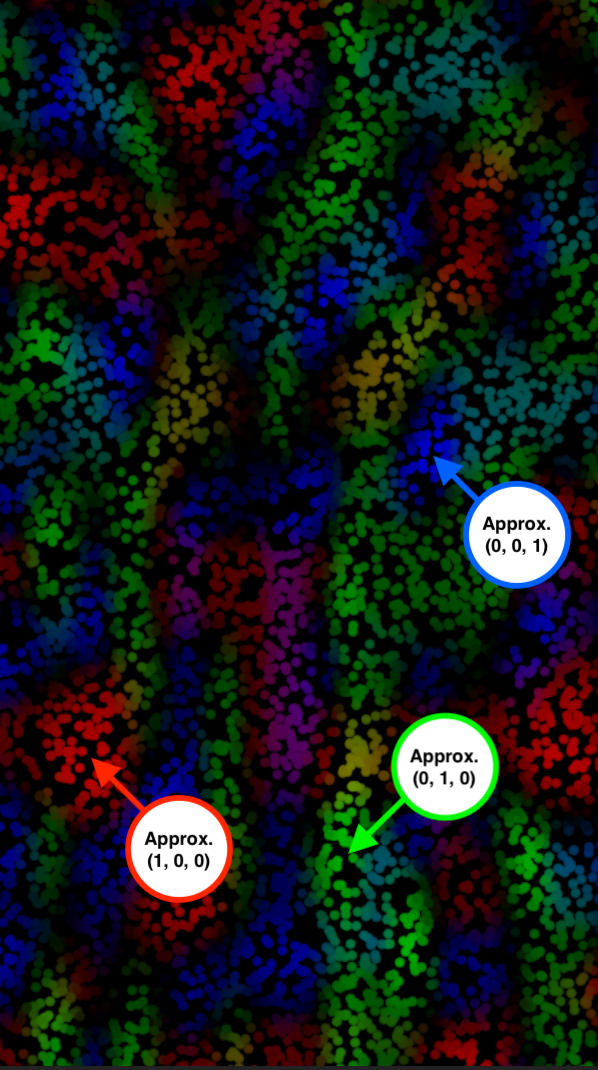
The Particle Screen UV node will return the screen coordinate (x, y) values between 0 to 1 for the given position of each particle.
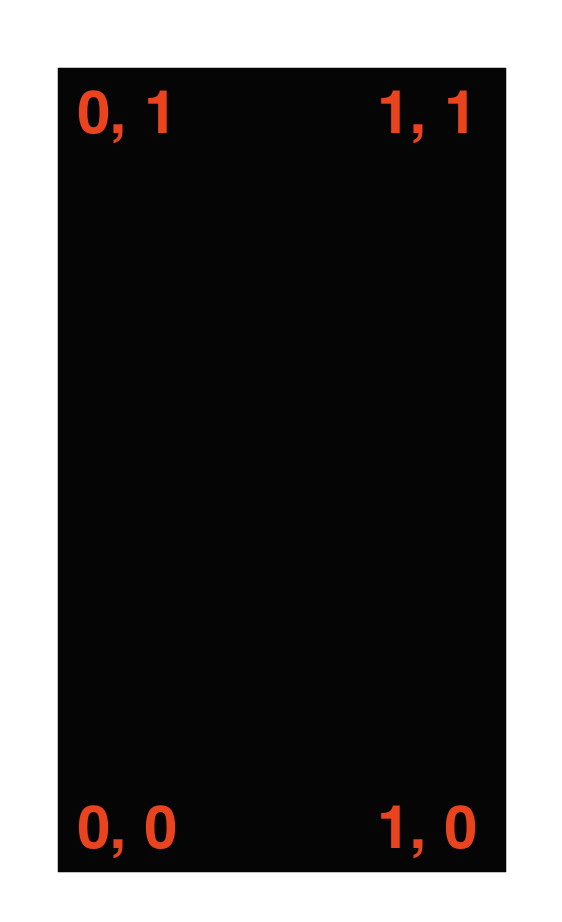
| Position | Coordinates |
|---|---|
| Bottom left screen | (0, 0) |
| Bottom right screen | (1, 0) |
| Top left screen | (0, 1) |
| Top right screen | (1, 1) |
When adding the following nodes, for the x-coordinate, particles become less transparent from the left to the right side of the screen. For the y-coordinate, particles become less transparent from the bottom to the top of the screen.
Next, append another value of 0 to this Vec2 (x, y), which will return a Vec3 (x, y, 0).

Pass this Vec3 value as a coordinate in Curl Noise.

Curl Noise will essentially convert this Vec3 value and generate a scalar noise field. It will return Vec3 values in a range between -1 to 1. This can then be used to set the color (r, g, b). Note that values below 0 will output as 0.
You'll see various ranges of colors in clusters that blend together based on the generated noise.
Usage examples
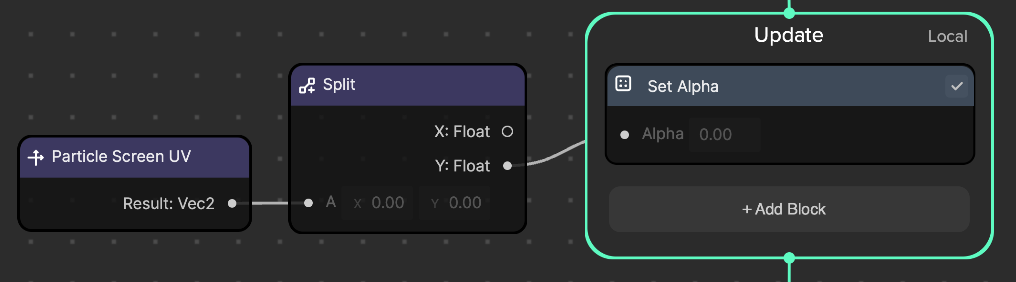
Example 1 - Use Set Alpha

- Instead of passing Vec3 values from Curl Noise to Set Color, pass them to Split instead so we can separate them into individual float values.
- Then, pass each float value to Set Alpha.
- For demonstration purposes, we will use the x value (r, or red) that was used previously.
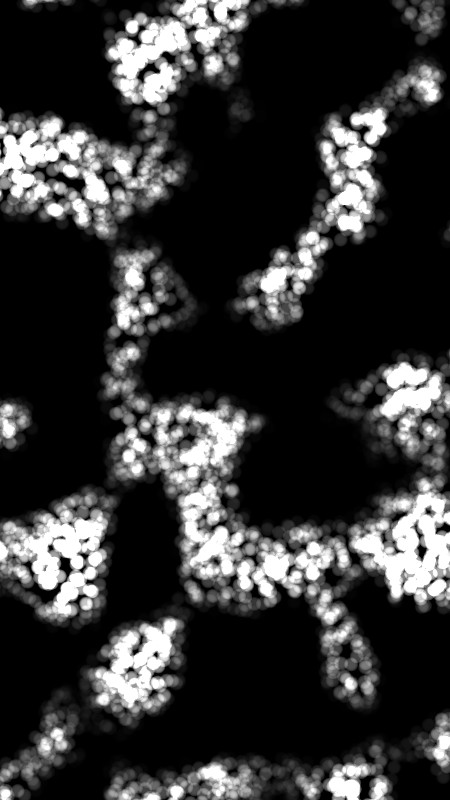
- You'll see white particles that have an alpha gradient instead.
Iteration 1 - Add simple movement using Get Time
Let's add some movement to the effect by implementing the following:

- Add the Get Time, Const Vec2, Divide, and Add operator nodes
- The Get Time node will output a float value for the current time
- Connect Get Time to X in Const Vec2, Const Vec2 to A in Divide, Divide to B in Add, Particle Screen UV to A in Add, and Add to X in Append, as shown above
- In the Const Vec2 node, set Y to 0
- In the Divide node, set B to 5. This will reduce the x value from Get Time by 1/5, so the number does not increase too quickly.
- This setup will increase the x value of the coordinate that is passed on to Curl Noise by the current time
- You'll now be able to see horizontal movement. If you'd prefer to have vertical movement, pass the y value in the Const Vect2 node instead.
Iteration 2 - Add randomized movement using Get Particle ID
To add randomized movement:

- Keep the previous Get Time, Const Vec2, and Divide operator nodes. Then add the Get Particle ID, Int to Float, and Const Vec2 operator nodes.
- Get Particle ID will output a unique integer value that was assigned to each particle
- Connect Get Particle ID to Int to Float, Int to Float to X and Y in Const Vec2, Const Vec2 to A in Add, Divide to B in Add, and Add to X in Append, as shown above.
- The Get Particle ID node is used to create a unique coordinate to be used in the Curl Noise node. This coordinate increases over run time, due to the Get Time node.
- You'll notice a sparkle effect is generated.
Iteration 3 - Create a sparkle effect using Get Particle ID
In Iteration 2, we created a simple sparkle effect. Let's modify it to make it even cooler!
In the Spawn logic, change Spawn Rate to 1,000 to display many particles on the screen.
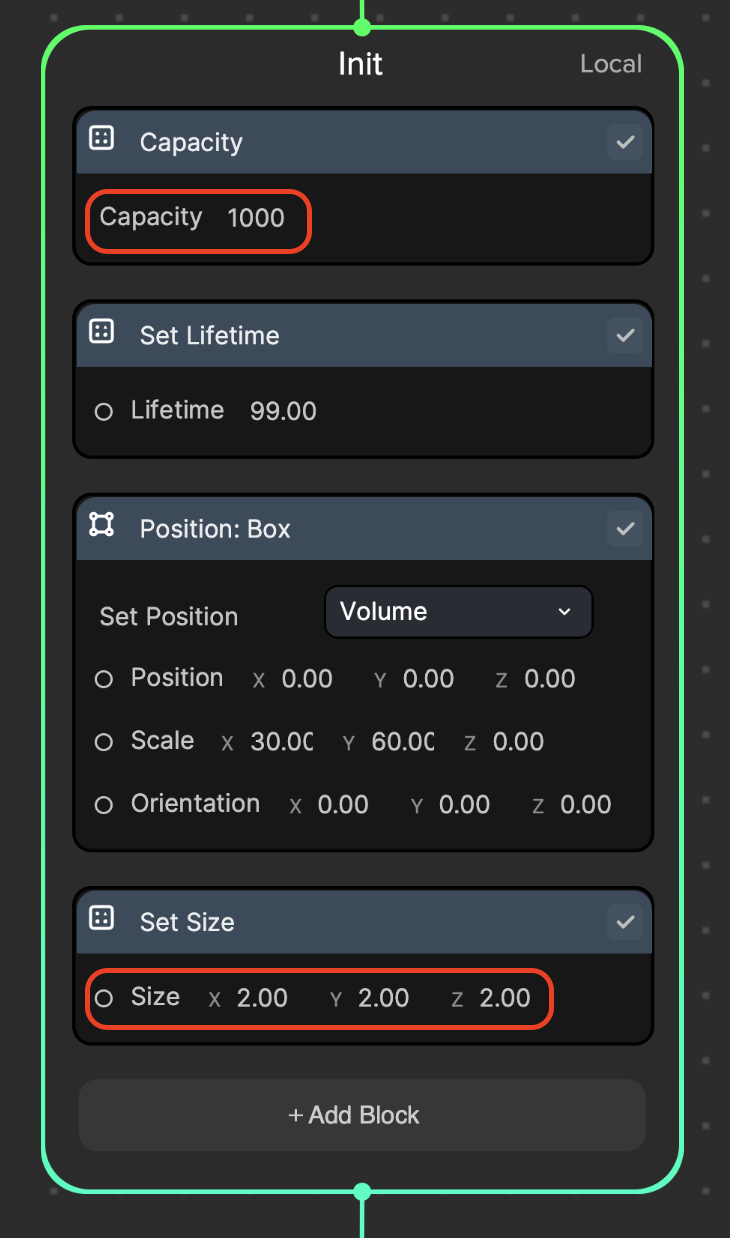
In the Init logic:
- Change Set Capacity to 1,000, which caps the maximum allowed particle count
- Add a Set Size node and set the Size: (2, 2, 2) to have larger particles
In the Update logic, keep the same settings from Iteration 2 above.

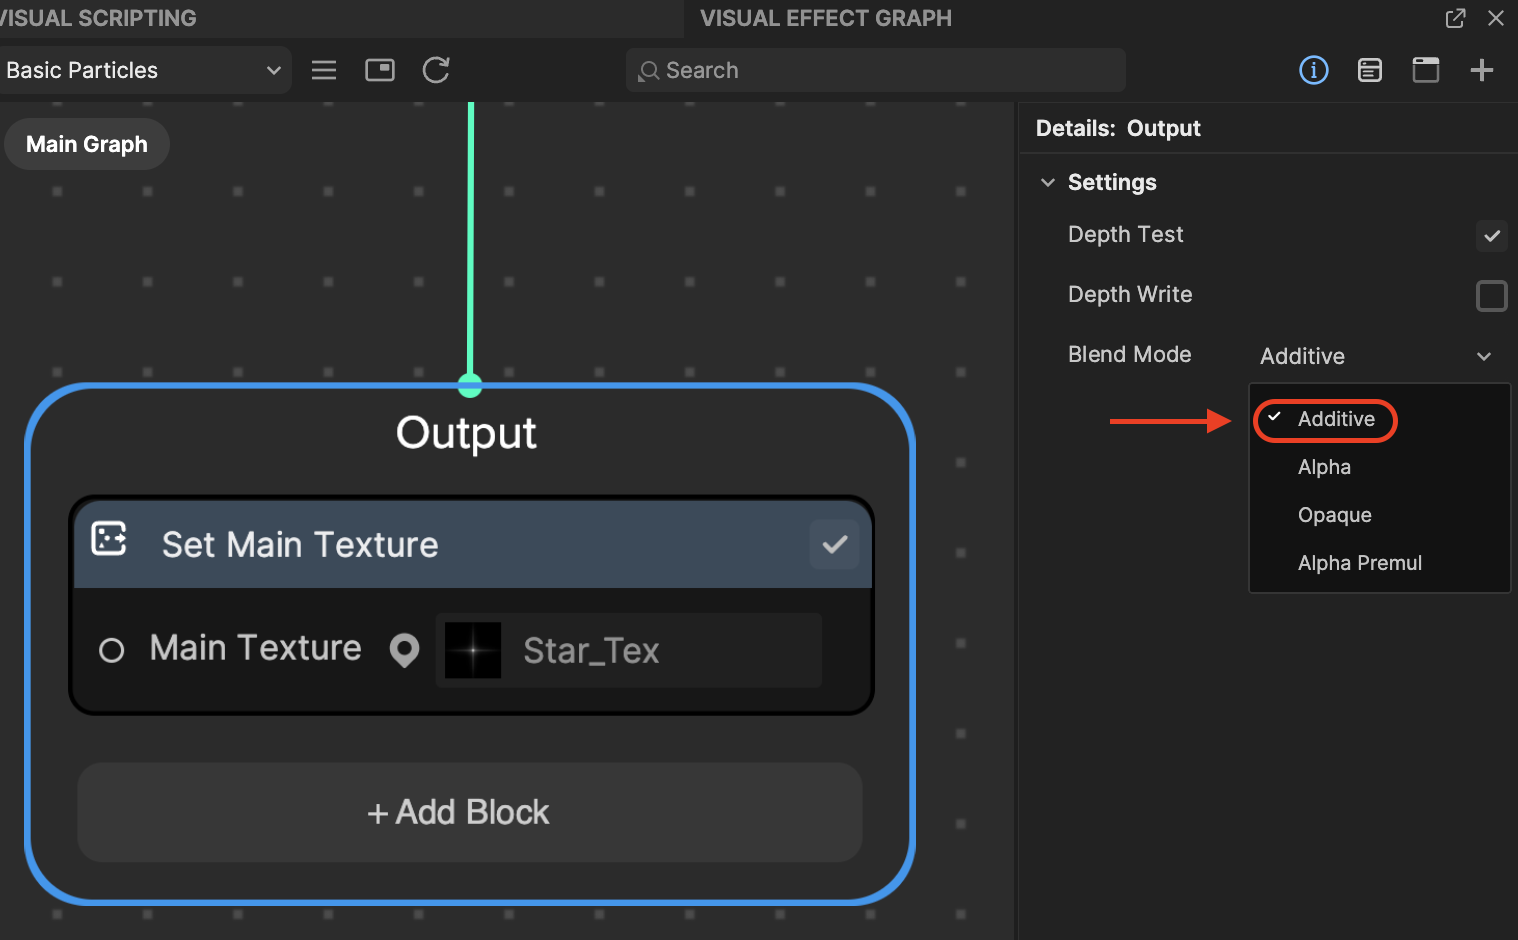
In Output logic,
- Set Main Texture to Star_Tex
- Change the blend mode from Alpha to Additive, which will add the material pixel colors to the background pixel color. This will render a fully transparent, black background.
- Go to the Visual Effect Graph panel
- Click Details
- Select the Output context node
- Go to Blend Mode and choose Additive
You should now see the sparkle effect.

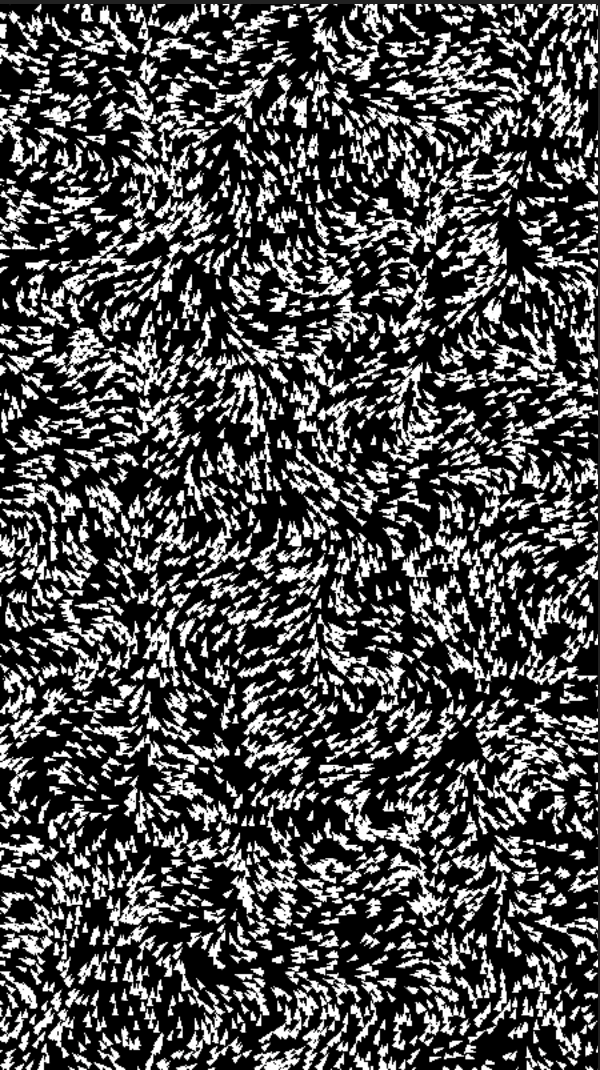
Example 2 - Use Set Angle
In this example, we will apply Curl Noise Vec3 values to Set Angle.
In the Spawn logic, change Spawn Rate to 10,000 to display many particles on the screen.
In the Init logic:
- Remove the Set Random Velocity node
- Change Set Capacity to 10,000, which caps the maximum allowed particle count
- Change Set Lifetime to 99, so that particles will stay on screen for a long time
- Add a Position: Box node and set the Scale: (30, 60, 0). This node maintains the particle's spawn location within a box shaped area.
- Setting the position to (0, 0, 0) allows the particles to be spawned from the center of the screen
- Setting the scale to (30, 60, 0) creates an invisible rectangular box that covers the entire preview screen where particles will be spawned within
- Add a Set Size node and set the Size: (0.5, 0.5, 0.5). This will assign each particle a specific size.
In the Update logic,
- After splitting the Curl Noise Vec3 values into x, y, and z, multiply one of its values to Pi (π). This will return a float value ranged between -180° (-1 x π = -π) to +180° (1 x π = π).
- Add a Set Angle node, with Channels set to Z. This will accept input for the angle on the z-axis.
- Pass the float value to Set Angle
In the Output logic, change Main Texture to Arrow_Tex in the Set Main Texture node.
In the Preview panel, make sure BlackBackground.png is selected under the Local Media category.
You should now see white arrows with various angles.
| Arrow | Angle |
|---|---|
| Arrow pointing up | 0° |
| Arrow pointing left | -90° |
| Arrow pointing right | +90° |
| Arrow pointing down | -180 or +180° |
Add some movement using the Get Time node.

- Add the Get Time, Const Vec2, Divide, and Add operator nodes
- Get Time node will output a float value starting from 0 to up per second.
- Connect Get Time to X in Const Vec2, Const Vec2 to A in Divide, Divide to B in Add, Particle Screen UV to A in Add, and Add to X in Append, as shown above.
- In the Const Vec2 node, set Y to 0
- In the Divide node, set B to 5. This will reduce the x value from Get Time by 1/5, so the number does not increase too quickly.
- This increases the x value of Vec3 (x, y, z) that gets passed to Curl Noise in run time.
You can now see horizontal movement applied to the arrows. To apply vertical movement, simply pass the y value in the Const Vect2 node instead.
