Create an Effect Using Sample Skinned Mesh
In this tutorial, you will learn how to use the Sample Skinned Mesh node to create an effect in the Visual Effects (VFX) Editor!

Set Up Your VFX Environment
After you've created a new project in Effect House, you will need to set up a VFX environment. You can utilize one of the two methods outlined below. For more information on the VFX Editor, check out the VFX Editor Overview.
Method 1
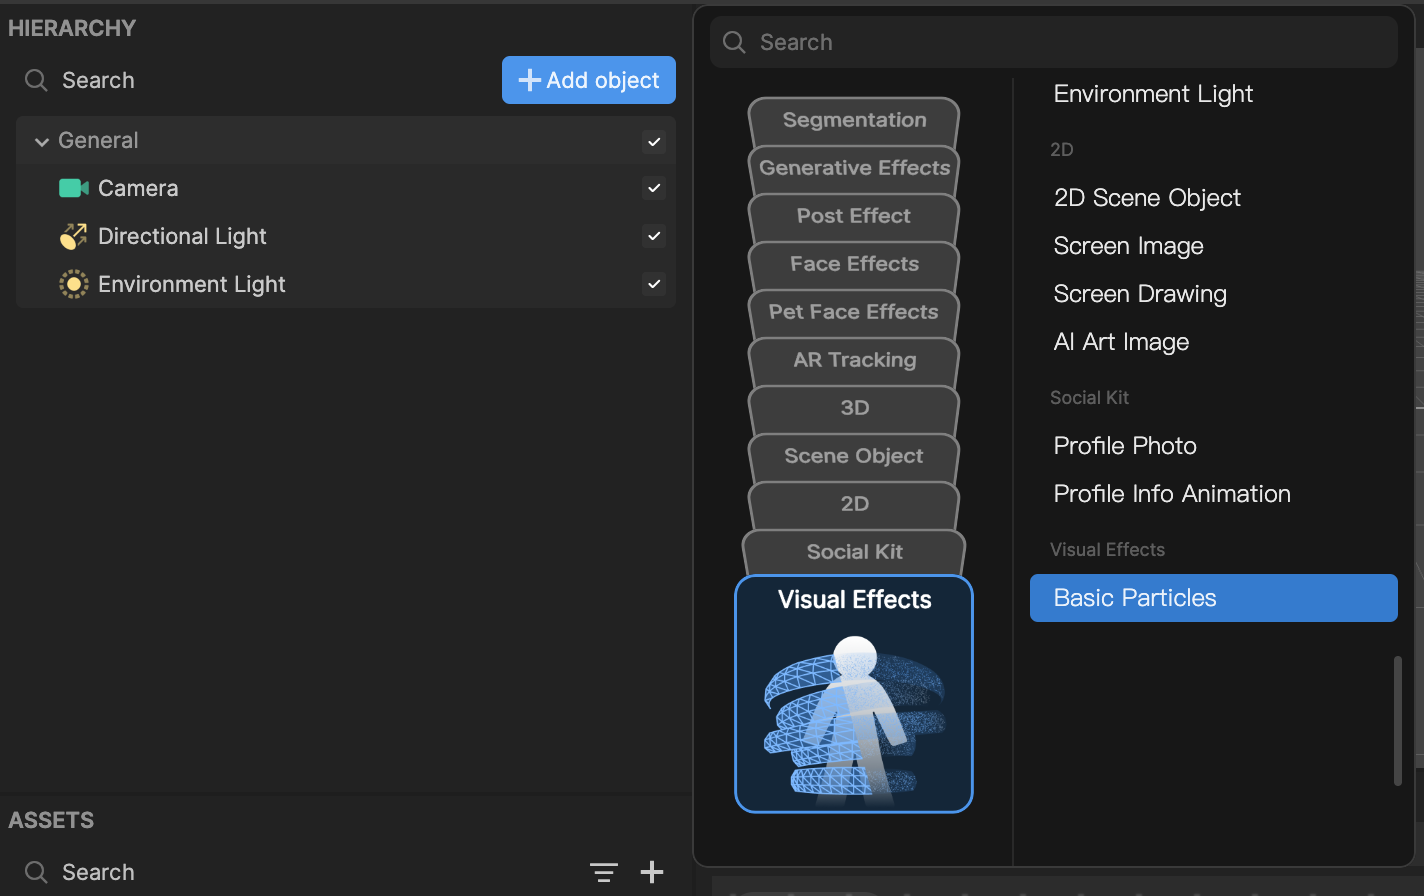
- Go to the Hierarchy panel
- Click the Add object button [+]
- Go to Visual Effects
- Select Basic Particles
Method 2
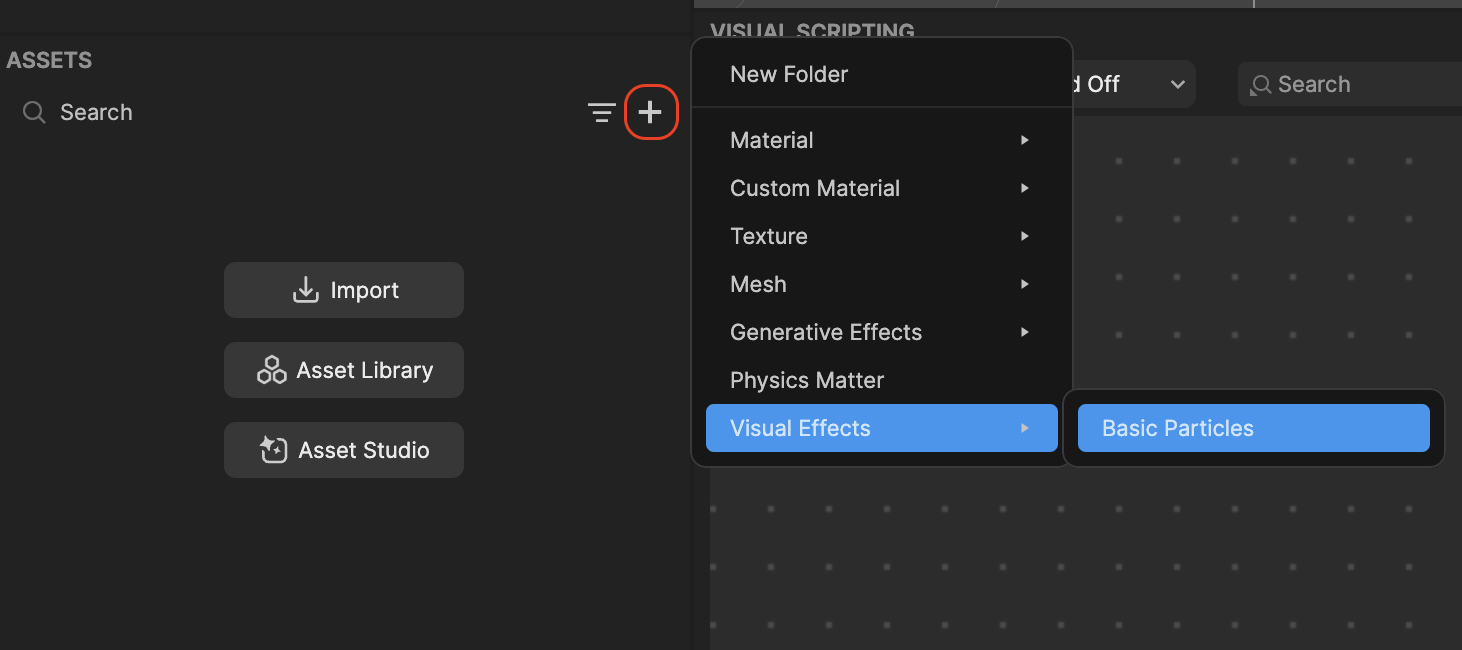
- Go to the Hierarchy panel
- Right click on the panel to view the menu popup window
- Navigate to Add object
- Go to Visual Effects
- Select Basic Particles
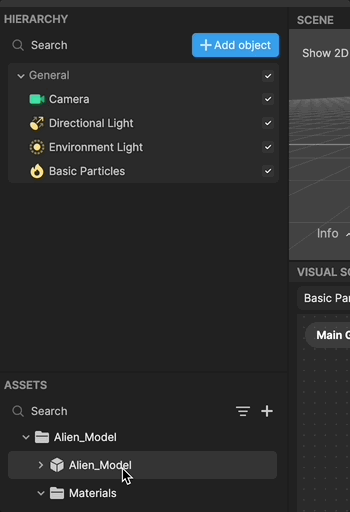
Once you've added the Basic Particles object, you will see the Visual Effect Graph. You should also notice white particles moving in the Preview panel.
To see your changes immediately as you make them, enable the Auto Compile option by clicking the Auto Compile button. If this option is not enabled, you’ll need to manually click the Compile button after each update to view your changes.

Import assets
In order to use the Sample Skinned Mesh node, you will need a 3D rigged model. The following zip file contains a 3D alien model with textures and a heart shaped 2D image. Download this to follow along.
- Go to the Assets panel
- Click the Add asset button [+]
- Go to Import
- Select From Computer
- Select all the materials to download into Effect House

To add the alien 3D model to the scene, select the Alien_Model under the Assets panel and drag it into the Hierarchy panel.
Once you have the files imported, rename the material to be something more readable, such as Alien_Mat.
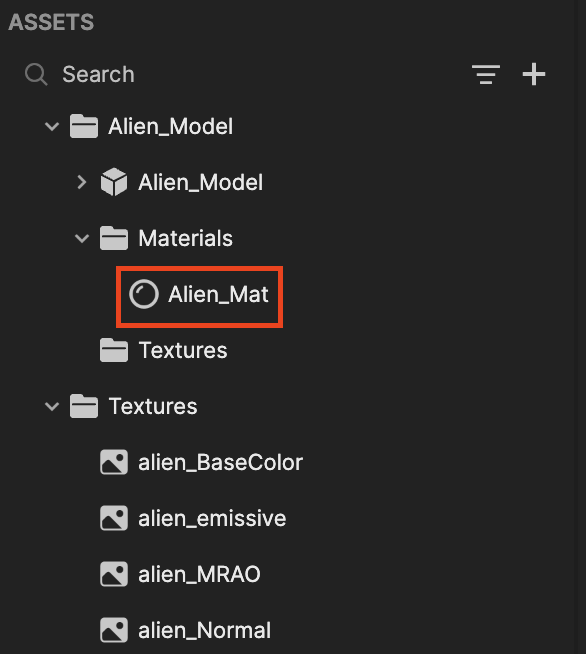
- Select the Alien_Mat material in the Assets panel.
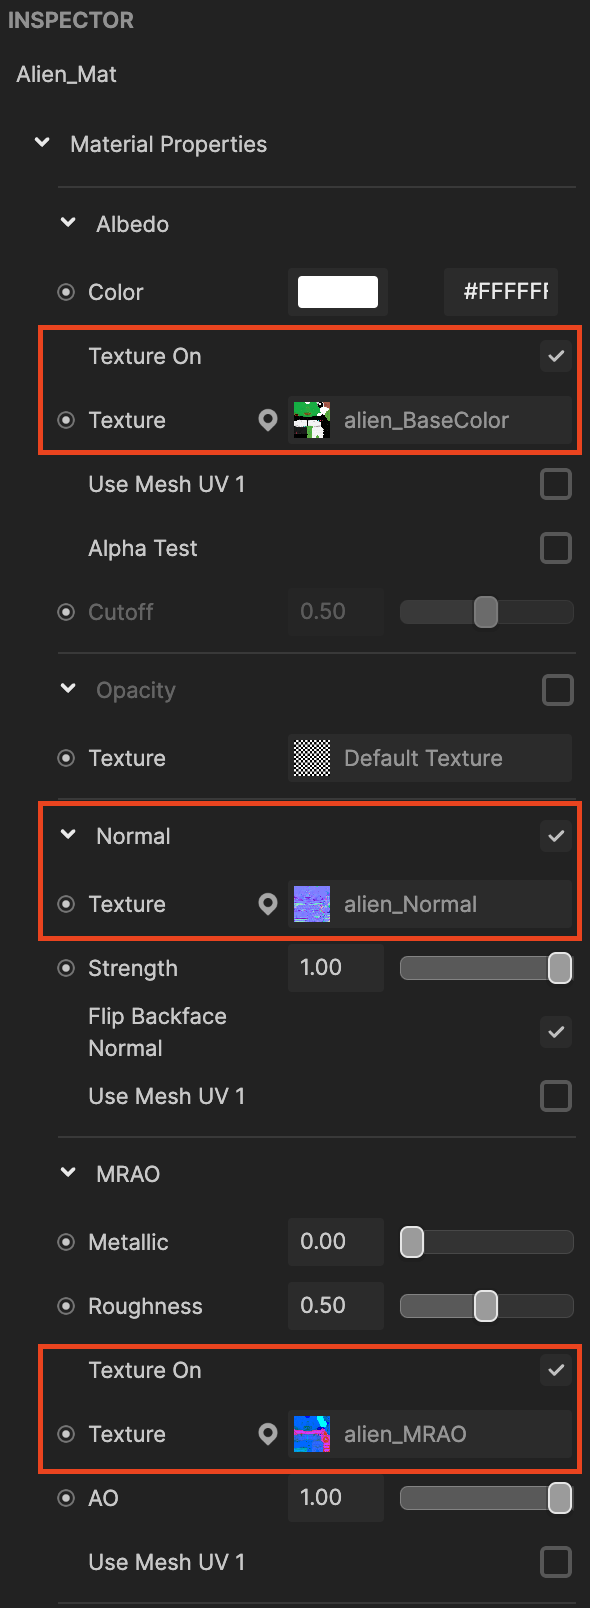
- Go to the Inspector panel to load the 4 textures that were provided in the zip file above.
- In the Albedo property:
- Select the Texture On checkbox
- Replace Texture with alien_BaseColor
- In the Normal property:
- Select the Normal checkbox
- Replace Texture with alien_Normal
- In the MRAO property:
- Select the Texture On checkbox
- Replace Texture with alien_MRAO
- In the Emissive property:
- Select the Emissive checkbox
- Replace Texture with alien_emissive
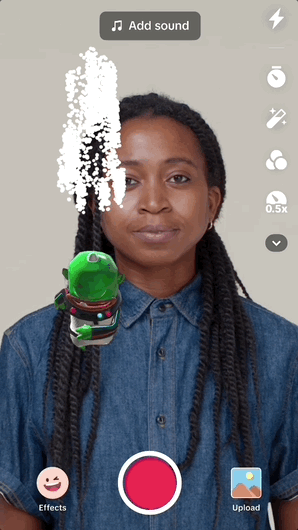
The alien appears too large and cropped out in the Preview panel. Let's adjust its position and scale.
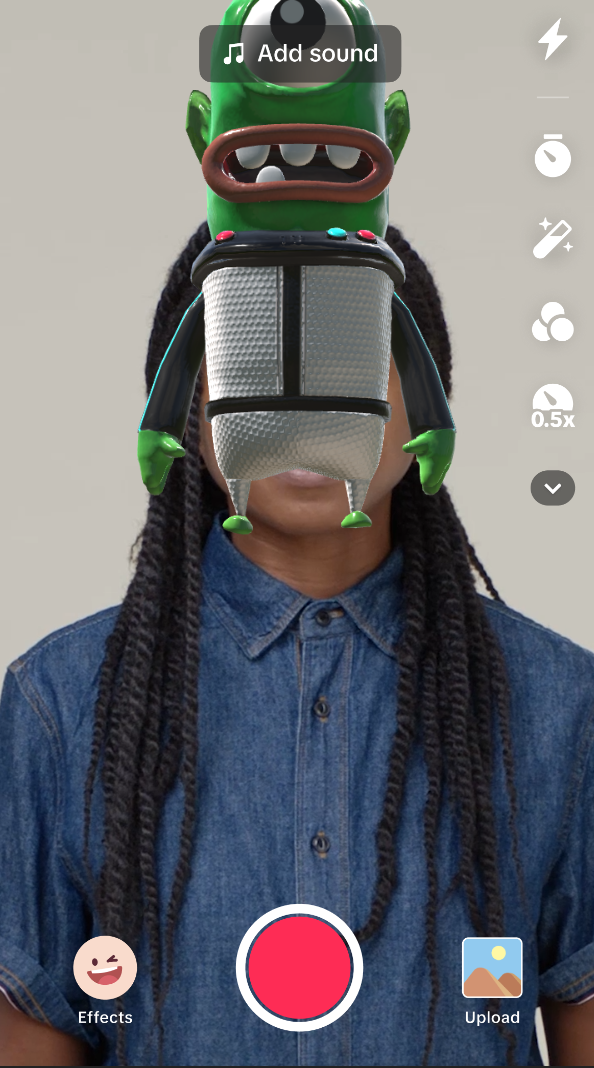
- Select the Alien_Model scene object in the Hierarchy panel.
- Set Position: (3, -3, 7), Rotation: (0, 17, 0), Scale: (0.5, 0.5, 0.5).
- Adjust the lights to brighten up the alien:
- For Directional Light, set position to (-30, 20, -20) and rotation to (315, 35, 280).
- For Environmental Light, set position to (0, 30, 0) and rotation to (0, 90, 0).
The alien is now shown in the right center of the screen, with better lighting.
 ## Initial set up for the Sample Skinned Mesh node
Let's test out to see how the Sample Skinned Mesh node works.
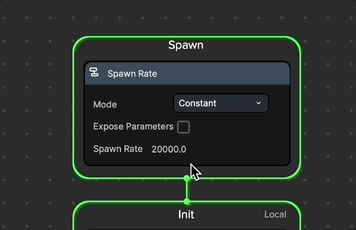
- In the Spawn node:
- In the Spawn Rate node, set Spawn Rate: 20,000, to quickly generate particles in a split second.
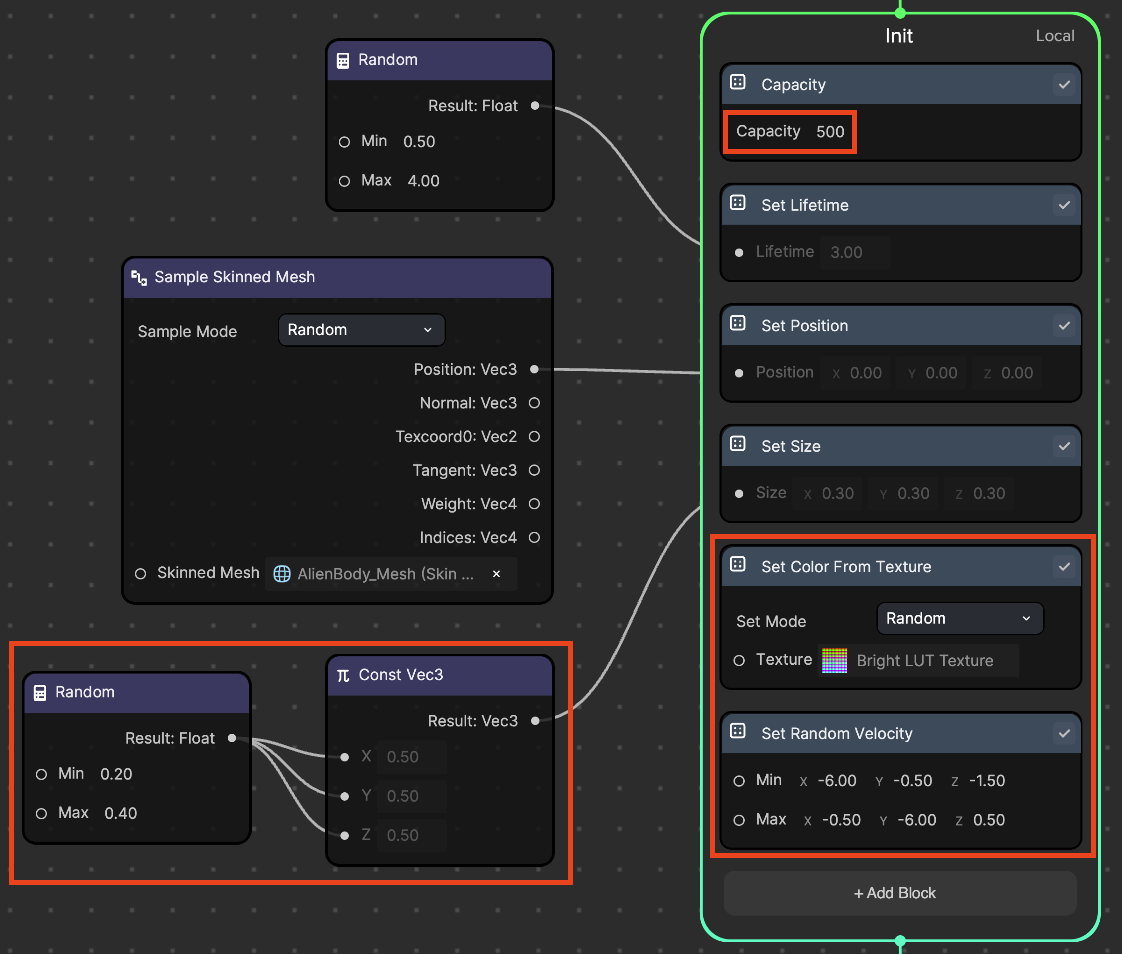
- In the Init node:
- In the Capacity node, set Capacity: 2,000, which defines the maximum allowed particles in the simulation.
- Remove the Set Random Velocity node.
- In the Set Lifetime node, set Lifetime: 3 so that each particle will disappear after 3 seconds.
- Add a Sample Skinned Mesh operator node and a Set Position block node. Then:
- Set Sample Mode: Random
- Set Skinned Mesh as AlienBody Mesh
- Connect Position: Vec3 with Set Position.
- Add a Set Size node and set Size: (0.2, 0.2, 0.2). This will create small particles.
- Add a Set Velocity node and set Velocity: (0, 5, 0)

As you can see from the result below, this setup samples random vertex information to initialize the particles on the mesh. Then, the particles move upward due to the velocity.
Refine the effect
Now that we've gone through the basics of how the Sample Skinned Mesh node works, let's make the effect more interesting!
- In the Init node:
- In the Capacity node, reduce Capacity down to 500
- In the Set Lifetime node, create a Random node with Min: 0.5, Max: 4
- Remove the Set Velocity node and add the Set Random Velocity node instead. Set Min: (-6, -0.5, -1.5) and Max: (-0.5, -6, 0.5)
- Add the Random and Const Vec3 operator nodes, then connect to the Set Size node, as shown in the image below. In the Random node, set Min: 0.2 and Max: 0.4.
- Add the Set Color From Texture node and replace the texture with Bright LUT Texture, which will give a variety of particle colors.
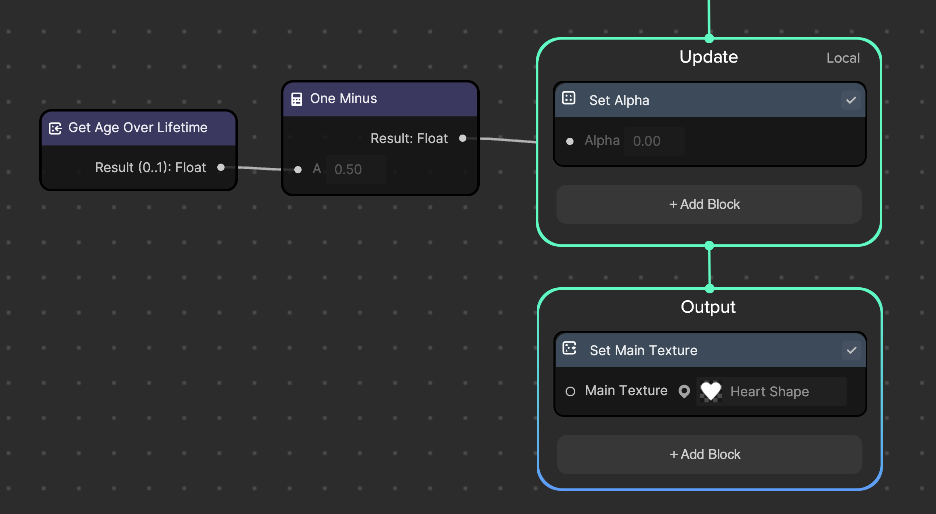
- In the Update node:
- Add the Get Age Over Lifetime, One Minus, and Set Alpha nodes and connect them as shown in the image below.note
This will set a particle's alpha (transparency) value to be 1 (fully opaque) at the beginning of its lifespan, then decrease the alpha value to 0 (fully transparent) at the end of its lifespan.
- Add the Get Age Over Lifetime, One Minus, and Set Alpha nodes and connect them as shown in the image below.
- In the Output node:
- Replace Main Texture with Heart Shape texture
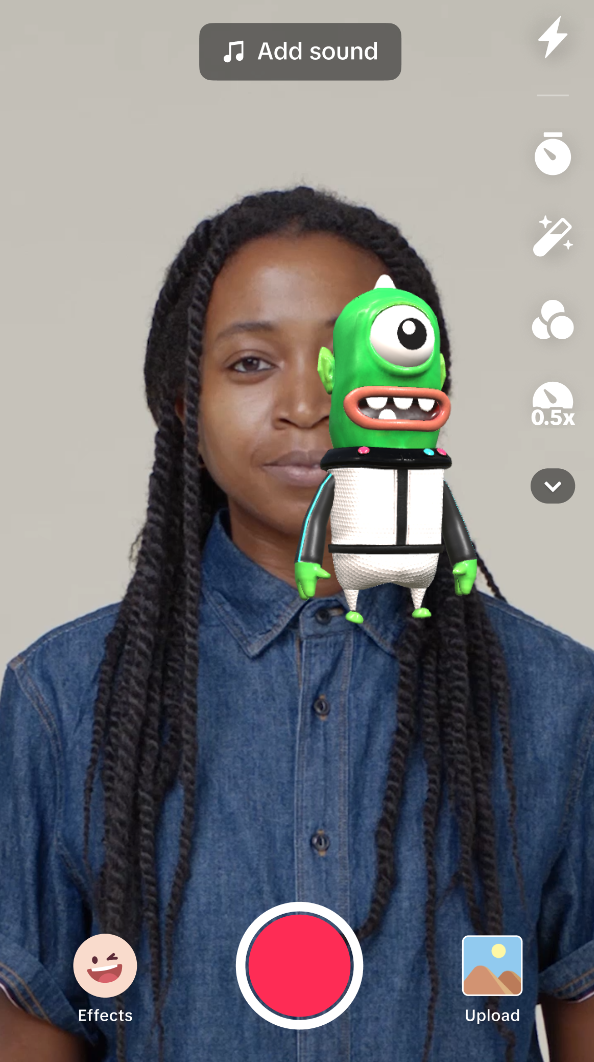
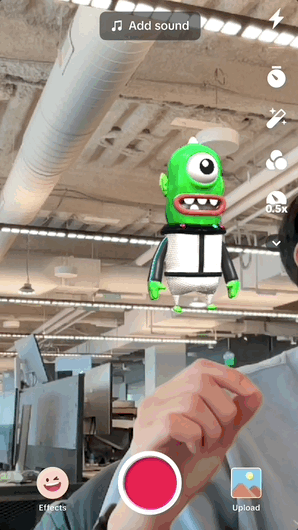
Now we have colorful heart particles spawning from the alien!

Add an interaction using Visual Scripting
Initial set up
Currently, the particles spawn every 3 seconds. Let's add an interaction using Visual Scripting to spawn the particles when a finger-heart is detected on the screen.
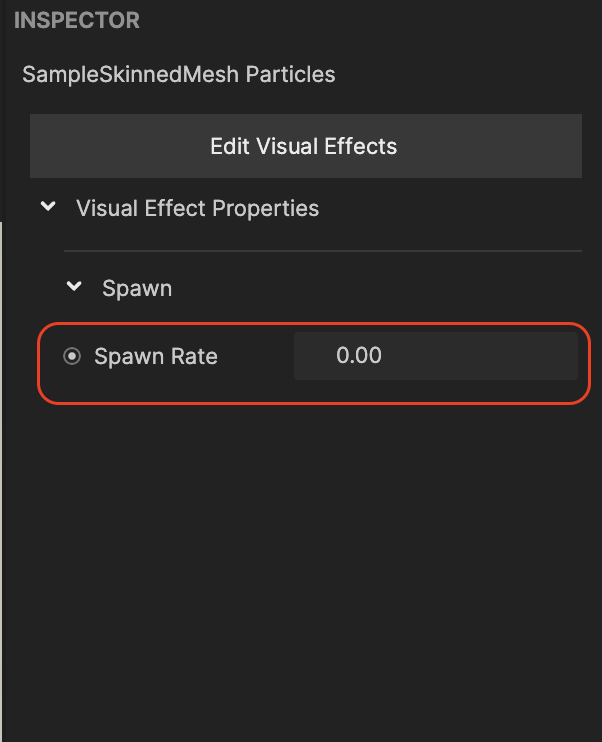
To have control over the Spawn Rate from the VFX Graph in the Visual Scripting graph, you will need to expose the parameter by checking the Expose Parameter option in the Spawn context node.
Select Basic Particles in the Assets panel, then navigate to the Inspector panel. You can now see the Spawn Rate parameter in the Inspector panel. Set its value to 0, so that you don't spawn particles at the beginning of the effect.
Select the Visual Scripting tab to switch to the Visual Scripting graph.
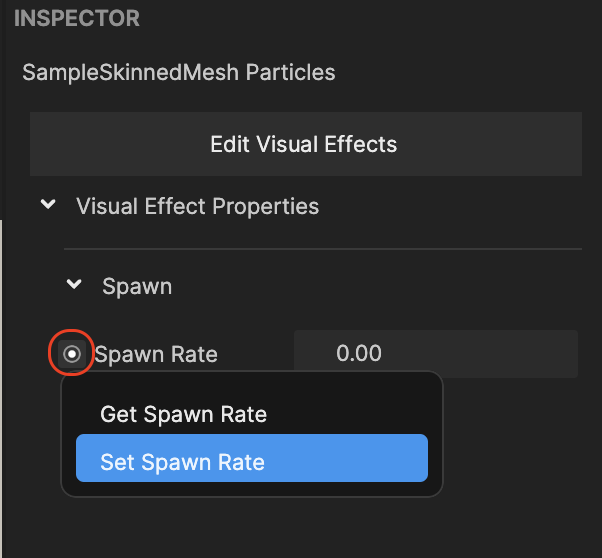
- Select Basic Particles in the Assets panel
- Click on the icon to the left of the Spawn Rate property in the Inspector panel
- Select the Set Spawn Rate node
When creating get/set nodes from the VFX Graph to the Visual Scripting graph, make sure that the Visual Scripting graph tab is selected. Otherwise, get/set nodes from the VFX Graph will NOT be created.
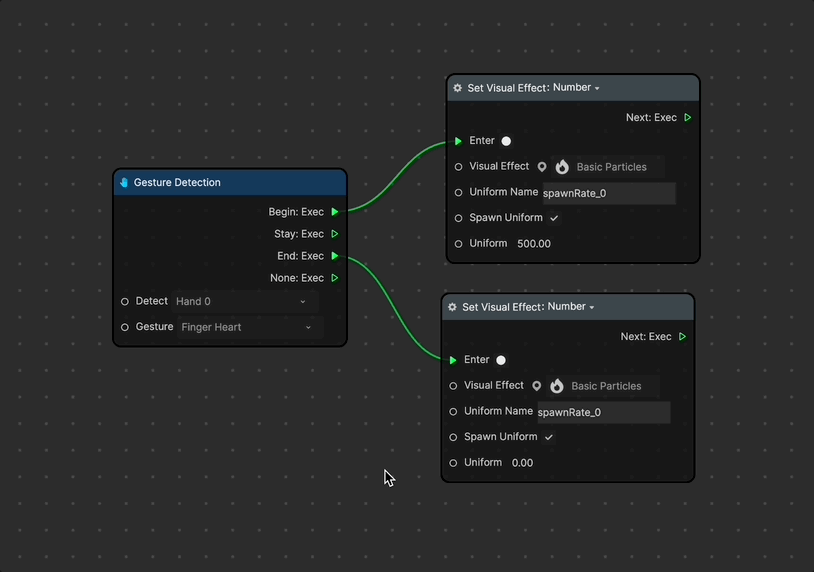
To build out the finger-heart trigger:
- Duplicate the Set Visual Effect: Number node. This is the Set Spawn Rate node we just created above.
- Click the Add node [+] button
- Go to the Hand category
- Select the Gesture Detection node
- Connect the nodes as shown in the image below.
- Set Gesture: Finger Heart in the Gesture Detection node (or choose your own!)
- Set Uniform: 500 in one of two Set Visual Effect: Number nodes and set Uniform: 0 in the other.
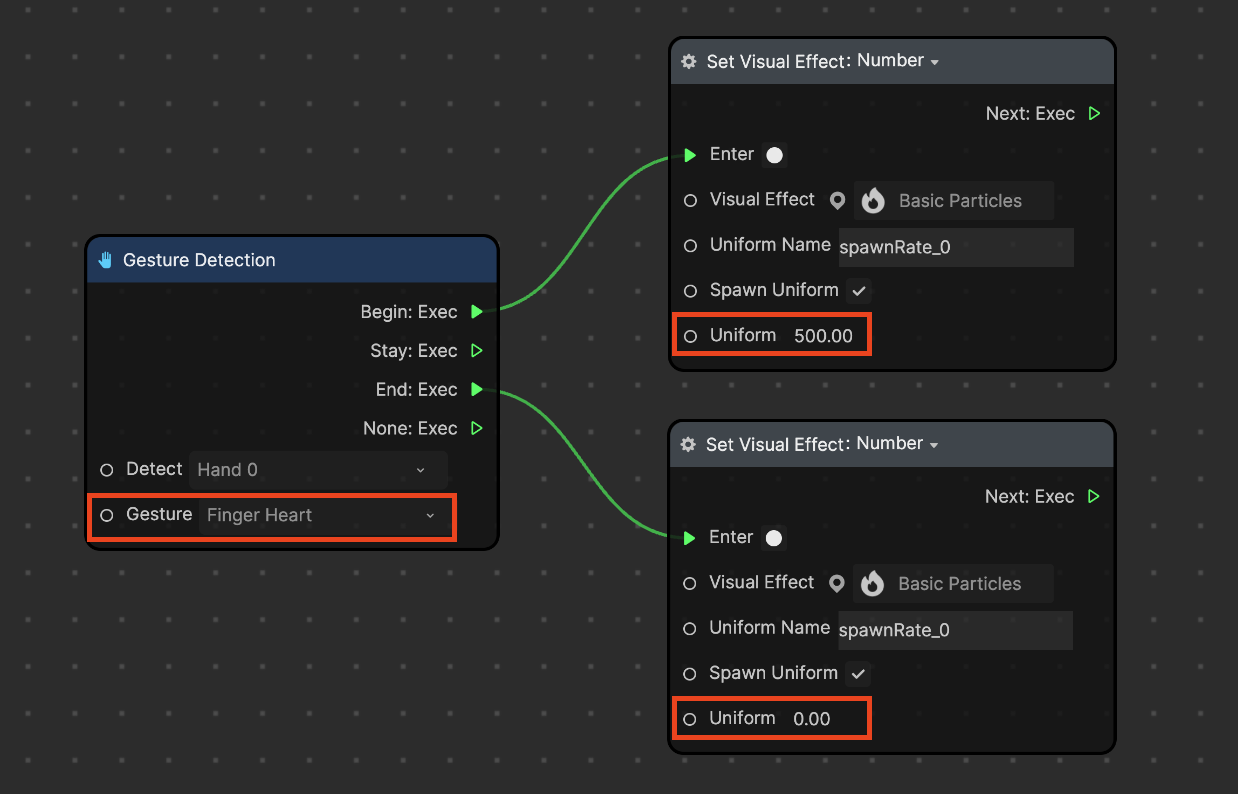
Now the particles are spawned when a finger-heart gesture is detected.

Final touches
Regardless of the hand gesture interaction, the alien animation continuously plays. Let's make some changes so that the animation is only triggered when the hand gesture is detected.
First, we should disable the animation at the start of the effect.
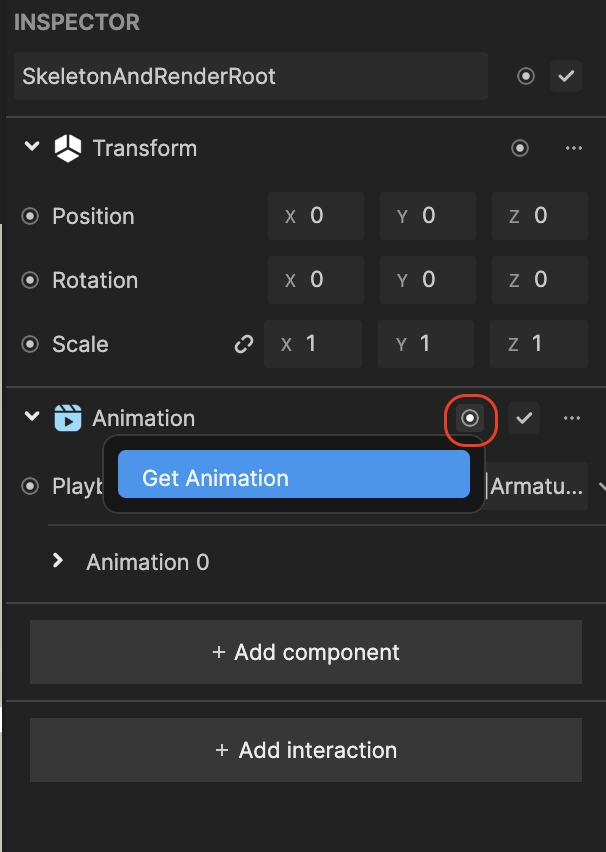
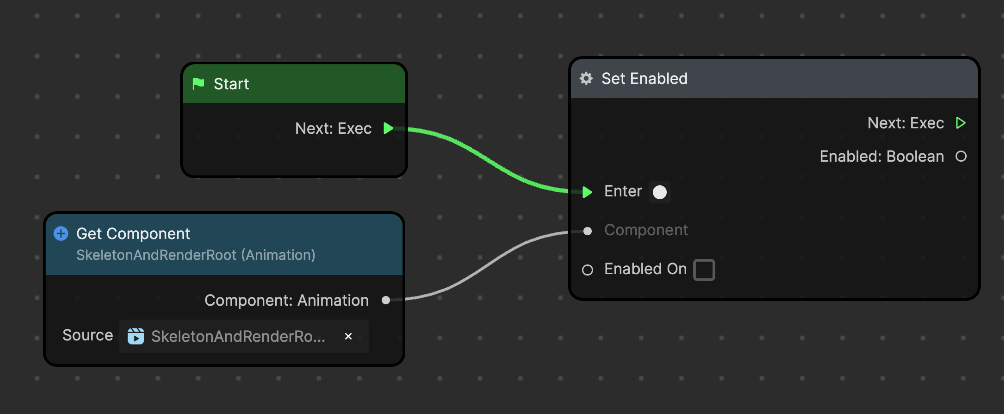
- Select the SkeletonAndRenderRoot scene object in Hierarchy panel
- Click the small white circular icon next to Animation in the Inspector panel and select Get Animation. This will create a Get Component node for the animation.
- In the Visual Scripting panel: 2. Click the Add node [+] button 3. Go to the Utility category 4. Select the Set Enabled node 5. Connect the Start, Get Component, and Set Enable nodes, as demonstrated below. Make sure that Enabled On is turned off in the Set Enabled node.
Next, we should look into the animation setup for the finger-heart gesture detection.
- Remove the connections between the Gesture Detection and two Set Visual Effect: Number nodes.
You can press shift + mouse left-click to cross over the connected lines to remove them.
- Add a Set Enabled node and turn on *Enabled On8
- Add the 3D Animator Controller and Wait for Seconds nodes
- Duplicate the Get Component node that we created earlier
- Connect the nodes to match the image below
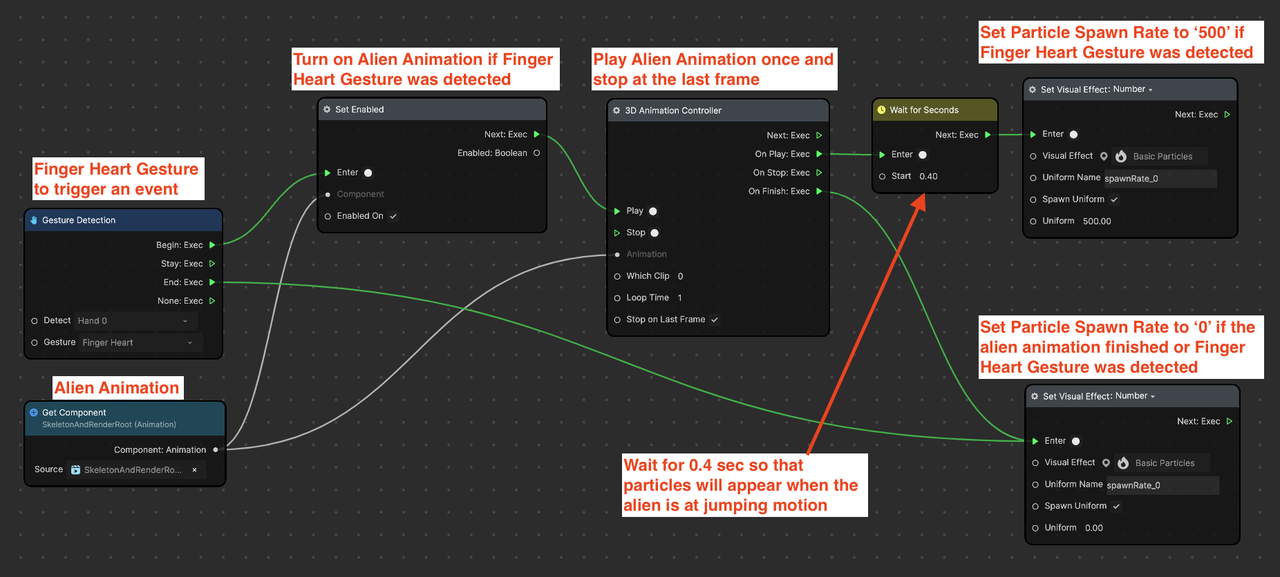
In other words, if the finger heart gesture (Gesture Detection) was detected:
- Enable the alien animation (Set Enabled + Get Component)
- Then, play its animation (3D Animation Controller) only once (Loop Time: 1) and stop on the last frame
- Once the animation starts, wait for 0.4 seconds before spawning the VFX particles. By doing so, the particles will appear when the alien is in the jumping motion, which looks more natural.
- When the animation is complete, stop spawning particles by setting Uniform: 0 under the Set Visual Effect: Number node
There you have it! We've made an interactive effect using Sample Skinned Mesh!
Completed Project File
↓ vfx_sample_skinned_mesh_with_3d_alien.zip
BONUS - Advanced usage of Sample Skinned Mesh & Body Avatar Drive
If you are interested in learning about a more advanced effect that combines Sample Skinned Mesh and Body Avatar Drive, check out the zip file below.
↓ vfx_sample_skinned_mesh_with_avatar_3d.zip