Create a Fireworks Effect
In this tutorial, you will learn how to create fireworks using the Visual Effects (VFX) Editor!
Set Up Your VFX Environment
After you've created a new project in Effect House, you will need to set up a VFX environment. You can utilize one of the two methods outlined below. For more information on the VFX Editor, check out the VFX Editor Overview.
Method 1
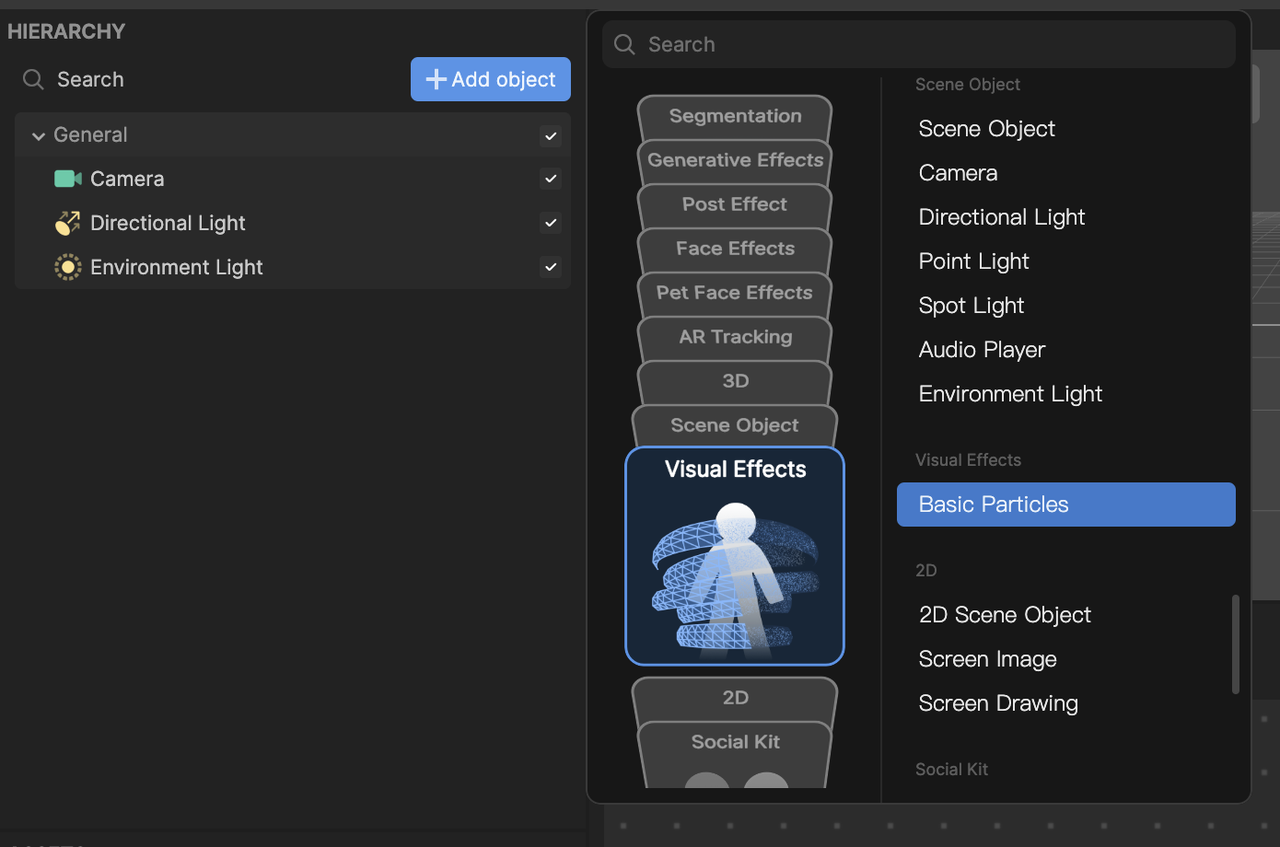
- Go to the Hierarchy panel
- Click the Add object button [+]
- Go to Visual Effects
- Select Basic Particles
Method 2
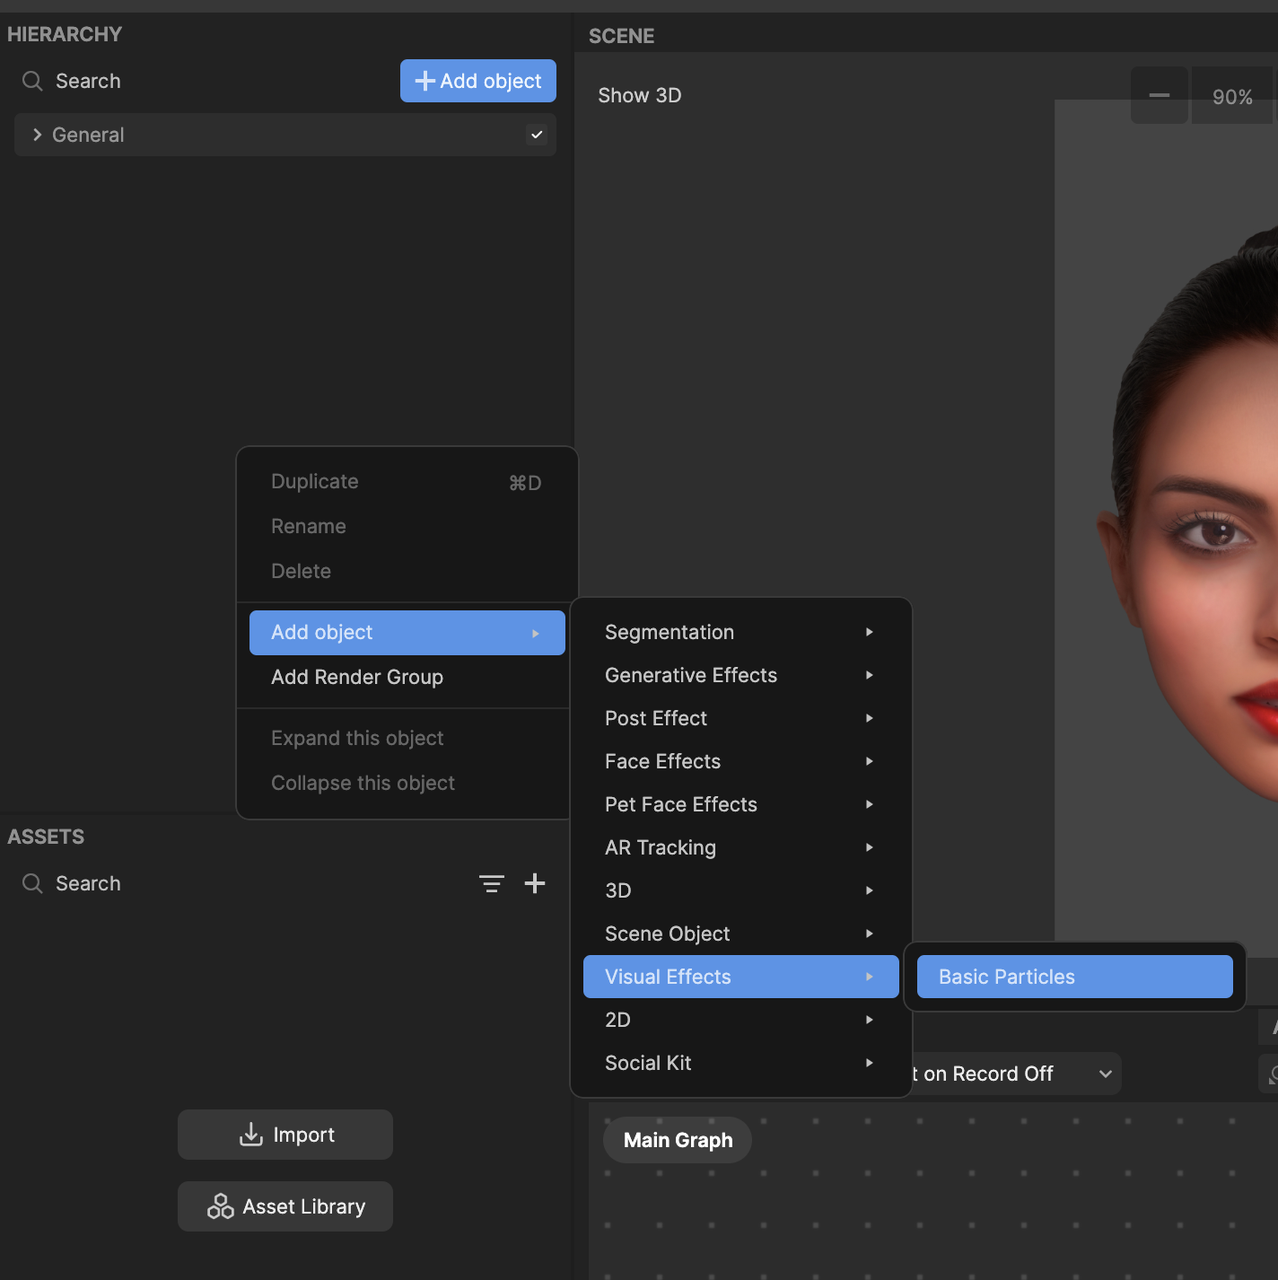
- Go to the Hierarchy panel
- Right click on the panel to view the menu popup window
- Navigate to Add object
- Go to Visual Effects
- Select Basic Particles
Once you've added the Basic Particles object, you will see the Visual Effect Graph. You should also notice white particles moving in the Preview panel.
To see your changes immediately as you make them, enable the Auto Compile option by clicking the Auto Compile button. If this option is not enabled, you’ll need to manually click the Compile button after each update to view your changes.
Overall logic
There are a total of 4 different types of particles that need to be set up.

In the beginning, a particle (1) with accompanying trails (2) will shoot up vertically from the bottom to the top of the screen. Then, after a certain period of time, this particle will disappear and trigger a large cluster of particles (3) with respective trails (4) to explode from the location where the initial particle disappeared from.
1 & 2 - Initial Individual Launch with Particle Trails
3 & 4 - Large Cluster of Particles with Particle Trails
Now that we understand the overall logic of how fireworks work, let's deep dive into the details.
If you are new to the VFX editor, refer to the Effect House VFX Editor Overview guide to gain a better understanding of the VFX node structure.
Set up the Spawn node
The Spawn node controls both the frequency and the amount of particles that are being created. There are a total of 3 modes that come with the Spawn node: Constant, Random, and Periodic Burst. In this case, for fireworks, Random mode is the optimal choice in order to be able to spawn particles randomly.
Make the following changes to the Spawn node:
- Set the mode to Random
- Set Count Min to 1 and Count Max to 2
- Set Delay Min to 0.3 and Delay Max to 1.9
After a certain period of time, specified by the Delay Min and Delay Max values, a random amount of particles, specified by the Count Min and Count Max values, will occur. In this case, after 0.3-1.9 seconds, 1-2 particle(s) will be spawned.

Create the initial firework particles using the Init node
As the particles are spawned, their behaviors and characteristics also need to be specified. This will be done in the initial stage, using the Init node.
Make the following changes to the Init node:
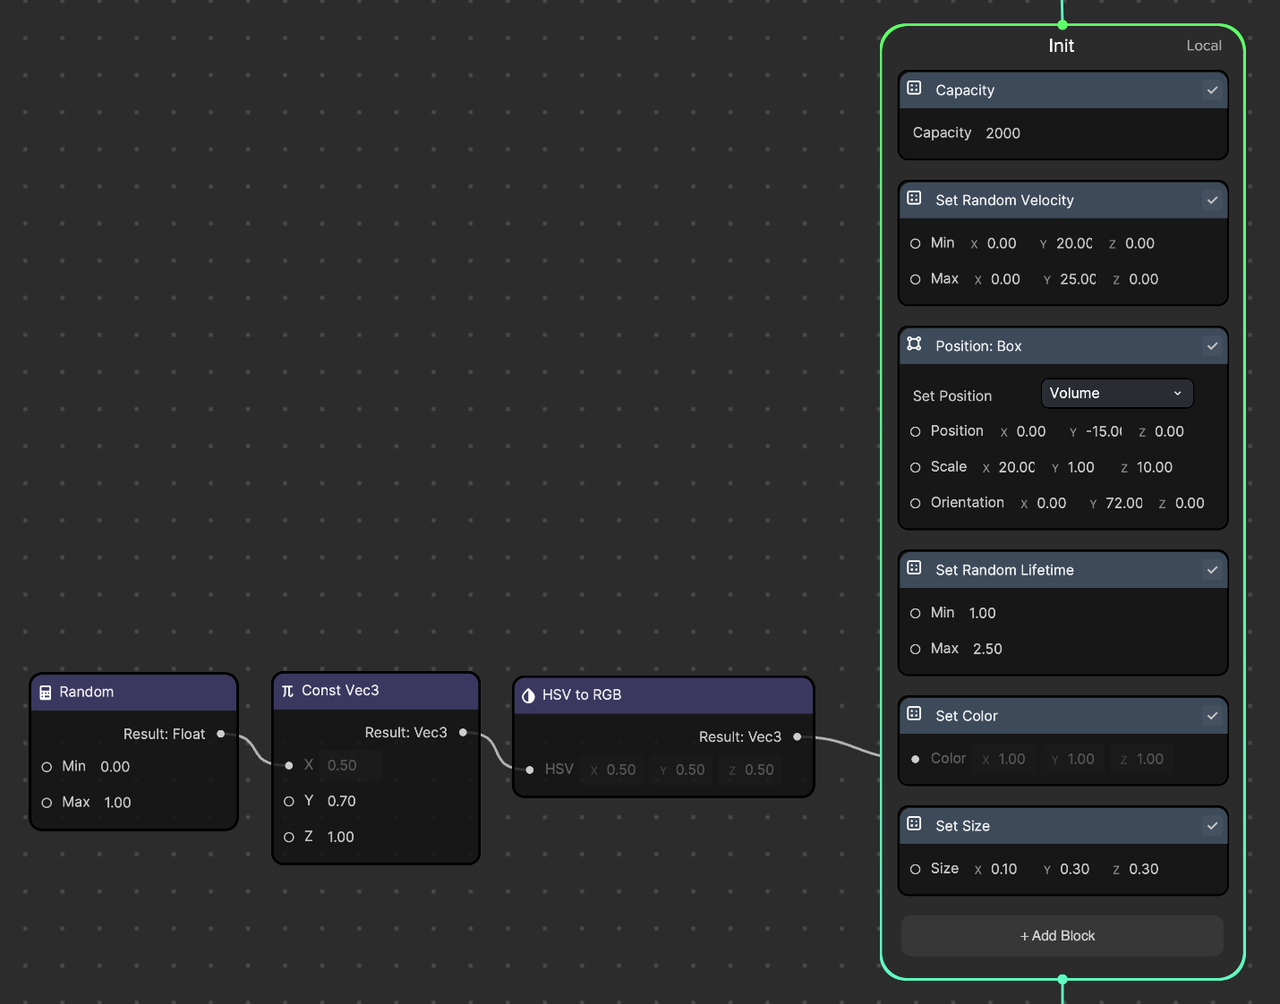
- Set Capacity to 2,000. This is a way to set the maximum allowed spawned particles.
- Set Random Velocity to Min: (0, 20, 0) and Max: (0, 25, 0). Each particle will have an upward speed between 20 to 25.
- Add a Position: Box node and set the Position: (0, -15, 0) and Scale: (20, 1, 10).
- This maintains the particle's spawn location within a box shaped area.
- Setting the position to (0, -15, 0) allows the particles to be spawned from the bottom of the screen.
- Setting the scale to (20, 1, 10) creates an invisible, horizontally aligned rectangular box where particles will be spawned within.
- Add a Set Random Lifetime node and set it to Min: 1 and Max: 2.5. This will set each particle's lifespan to be between 1 and 2.5 seconds.
- Add Set Color node.
- Add Random, Const Vec3, and HSV to RGB nodes. Their respective values are shown in the screenshot below.
- Connect the output port of HSV to RGB to the input port of Set Color.
- This setup will output an HSV value between (0, 0.7, 1) and (1, 0.7, 1) and convert it into an RGB value. As a result, a random color, from the full range of the color spectrum, will be generated.

More on HSV: HSV stands for Hue, Saturation, and Value.
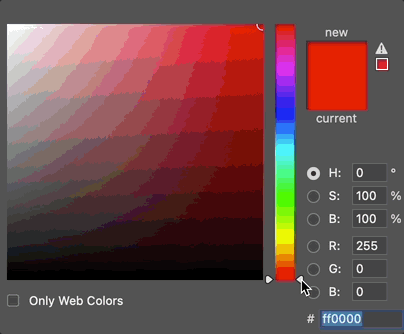

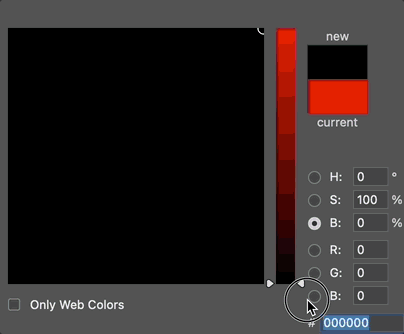
Hue is represented in degrees (°) from 0 to 360, which controls the full color spectrum, as shown below.
Saturation is represented by a percentage (%) from 0 to 100, which describes the amount of gray in a particular color.
Value (or Brightness) is also represented by a percentage (%) from 0 to 100, which describes the brightness or intensity of the color.
- Add a Set Size node and set to Size: 0.1, 0.3, 0.3. This will make each particle appear stretched and look almost like a capsule.
Now you have created particles that move from the bottom to the top of the screen!
Reduce the velocity of each particle in runtime with the Update node
Currently, the particles move upward at a consistent speed. To make the firework particles look more realistic, let's reduce the speed as they travel upward.
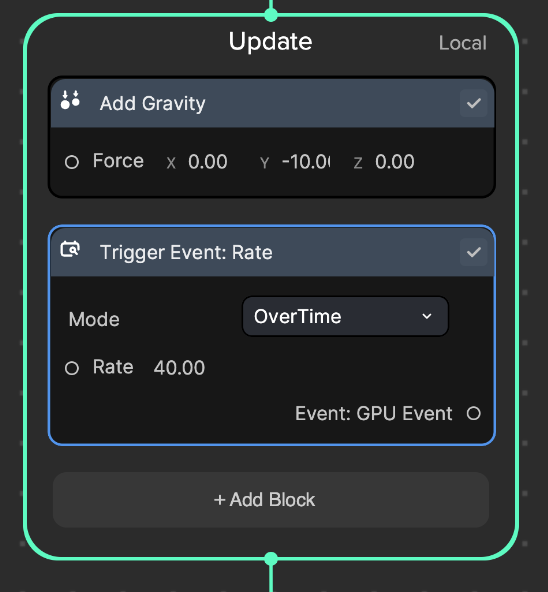
- In the Update node, create Add Gravity and set the Force: (0, -10, 0).
- This will add a downward force to each particle, allowing them to decelerate gradually.
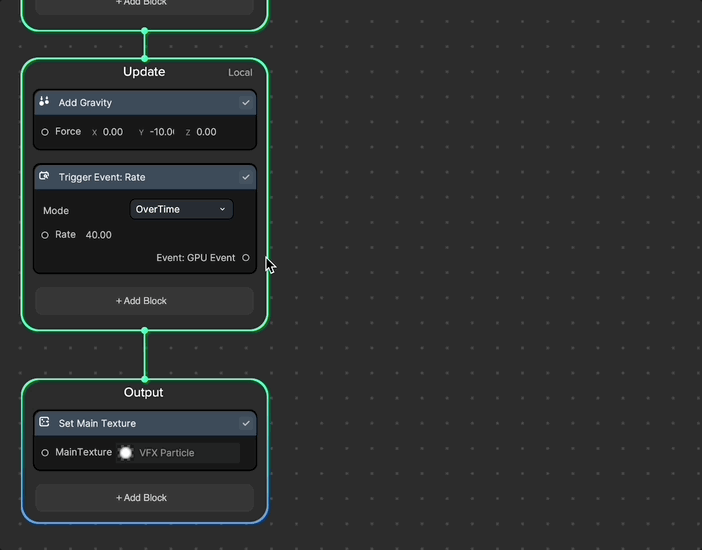
- In the Output node, there should be a Set Main Texture node already created. Leave this as is.
Create a trailing particle effect
Fireworks usually leave a trail as they are launched from the ground. Let's add that trail to the current effect.
- In the Update node, add a Trigger Event: Rate node. This node will create another particle system at a specific rate per second. It comes with 2 modes: OverTime and OverDistance. Use OverTime and set the rate to 40. This will create 40 particles per second from each firework.
- Click and drag out the output port of Event: GPU event. Click the SpawnGPU node, which will spawn another particle.
- Then, click and drag out the small green dot beneath the SpawnGPU node to add the Init node.
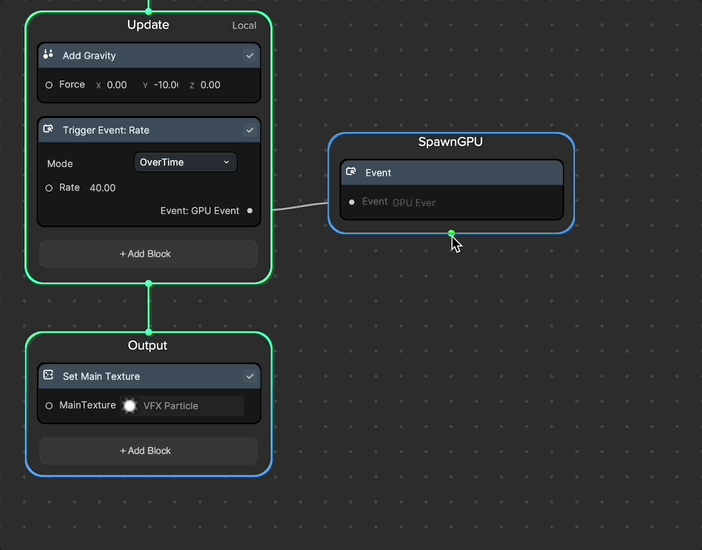
- Drag out from the Init node and add the Update node. Then, drag out from the Update node and select the Output node. Now, you have created a basic particle system that you can modify to create a trail effect.
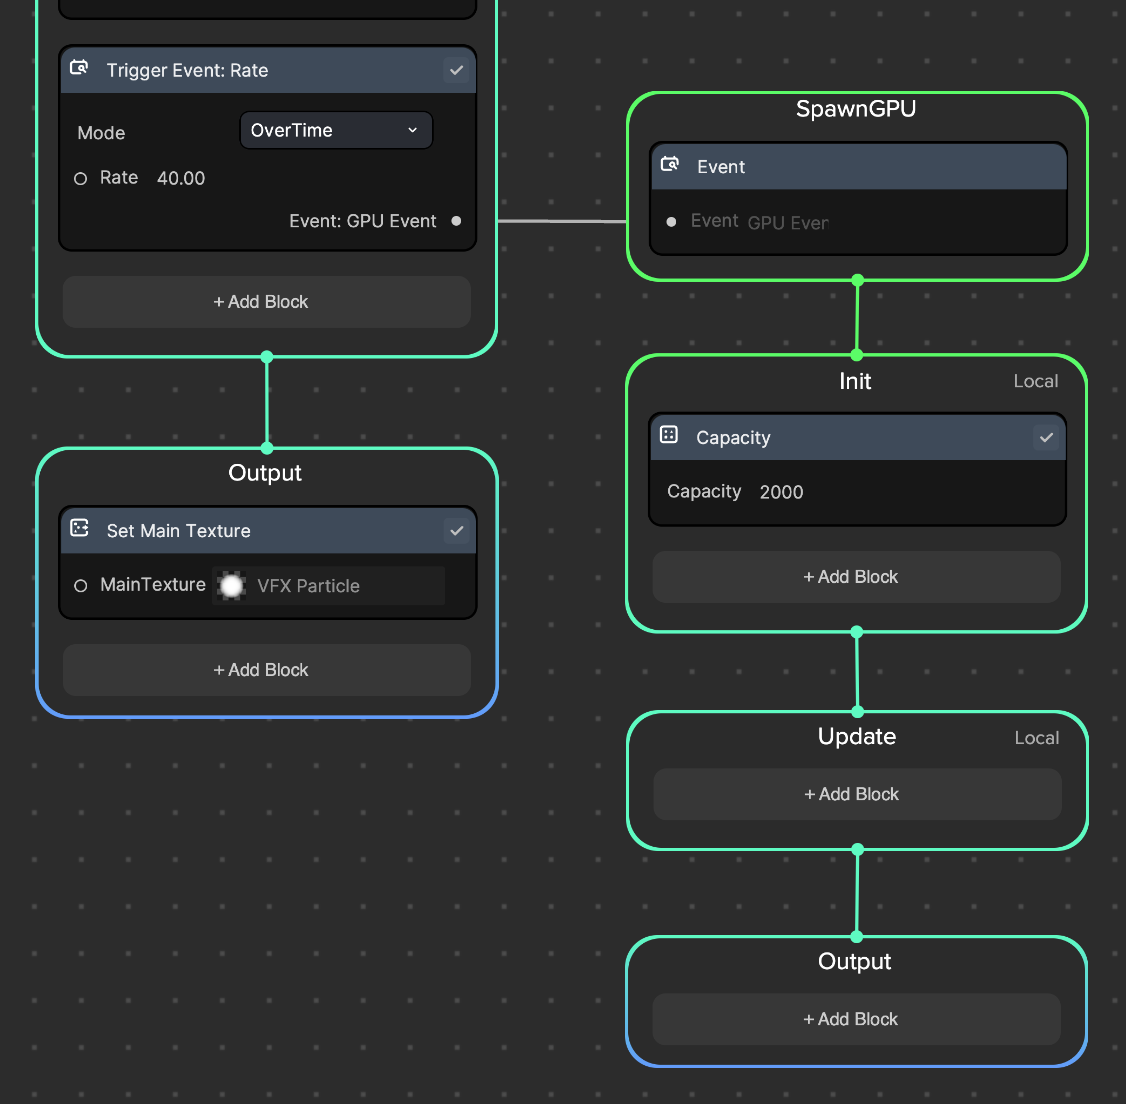
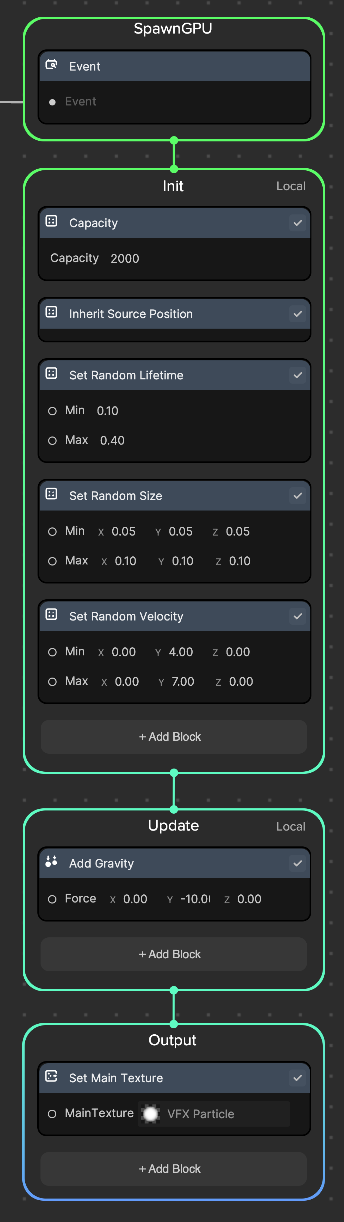
- In the Init node:
- Add the Inherit Source Position node so that this trailing particle can be generated at the same position as the particle from the first particle system.
- Add a Set Random Lifetime node and set Min: 0.1 and Max: 0.4. Each particle's lifespan is between 0.1-0.4 seconds.
- Add a Set Random Size node and set Min: (0.05, 0.05, 0.05) and Max: (0.1, 0.1, 0.1). Each particle's size is between 0.05-0.1.
- Add a Set Random Velocity node and set Min: (0, 4, 0) and Max: (0, 7, 0). Each particle's speed is between 4-7.
- In the Update node:
- Add an Add Gravity node and set Force: (0, -10, 0). Each particle will have a downward force, allowing them to decelerate gradually.
- In the Output node:
- Add a Set Main Texture node. It should come with a default texture VFX Particle, which has a circular shape.
You should now see small particle trails created for each of the particles.
Create an exploding firework effect
To create an exploding firework effect, you will need to create a new particle system.
- In the Update node, from the original particle system, add a Trigger Event: On Die node and set Count: 200.
- This event node gets triggered when each particle disappears, consequently spawning x amount of particles. In this case, it will spawn 200 particles each time a particle disappears.
- Then, click and drag out the output port of the Event: GPU event to create another particle system, just like how you did previously.
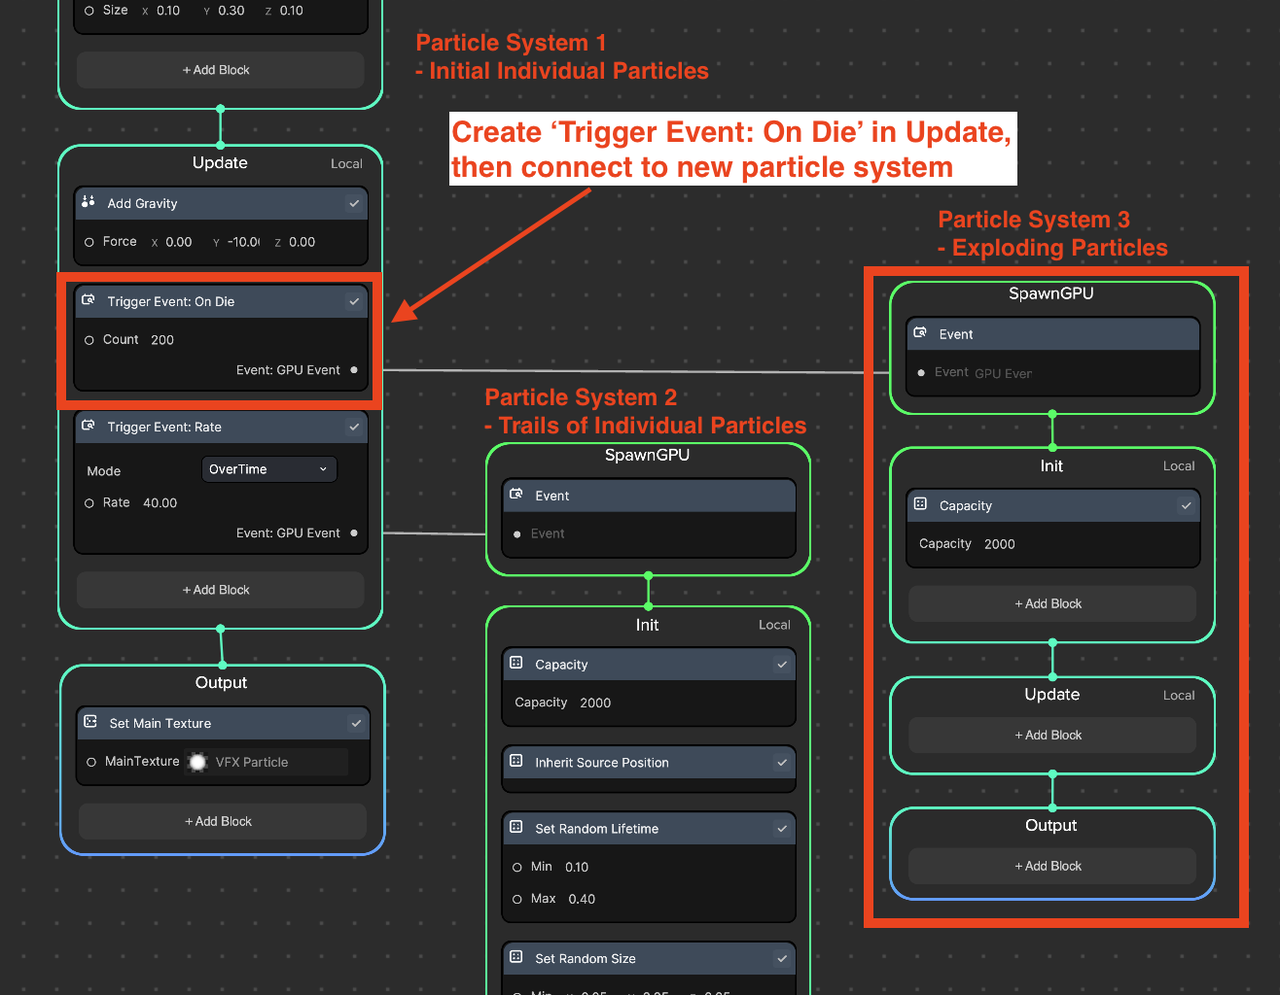
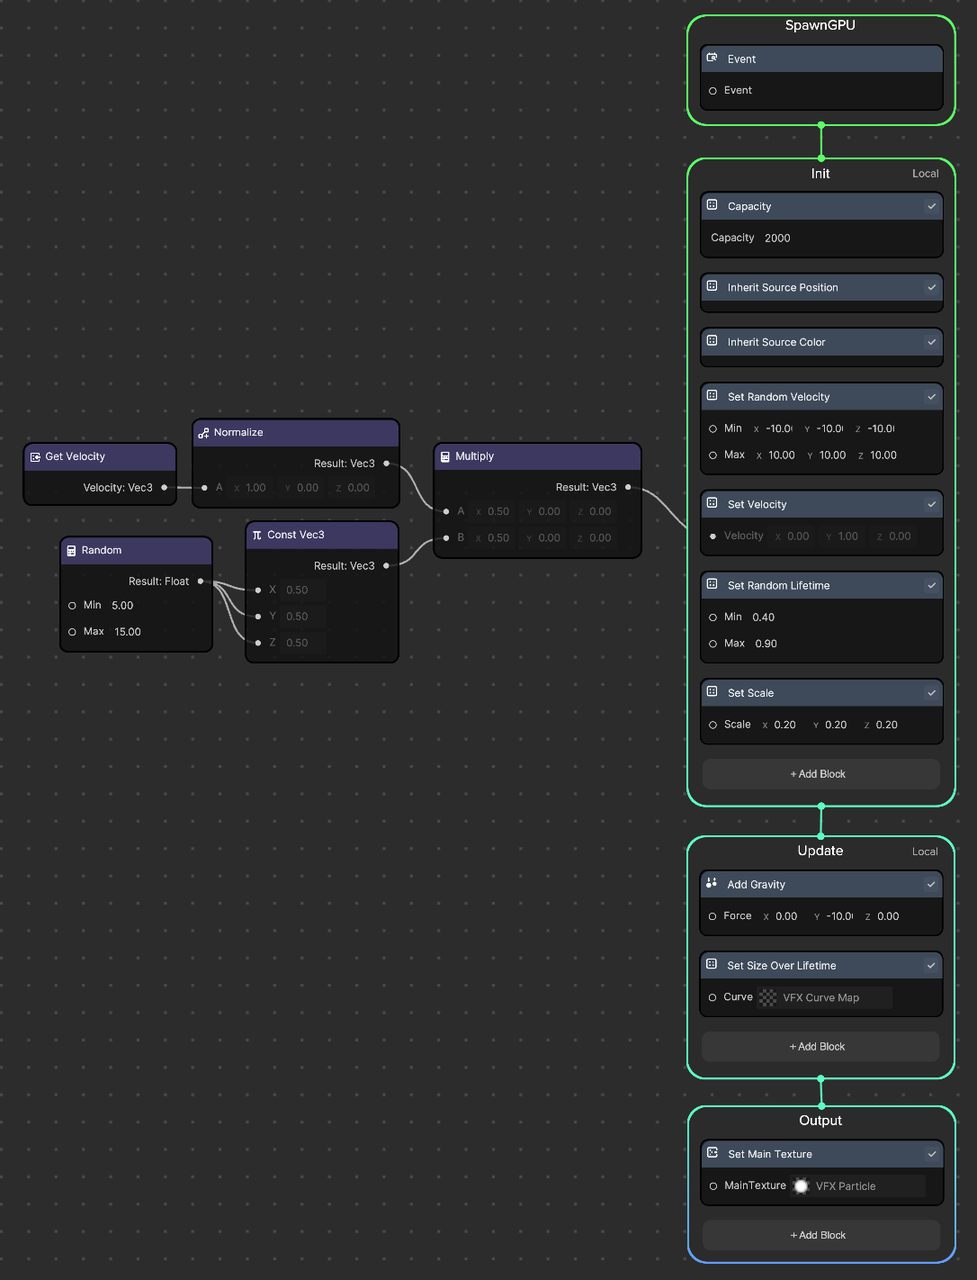
- In the Init node:
- Add an Inherit Source Position node so that the exploding particles can be generated at the same position as the particle from the first particle system.
- Add an Inherit Source Color node so that the exploding particles can inherit the particle color from the first particle system.
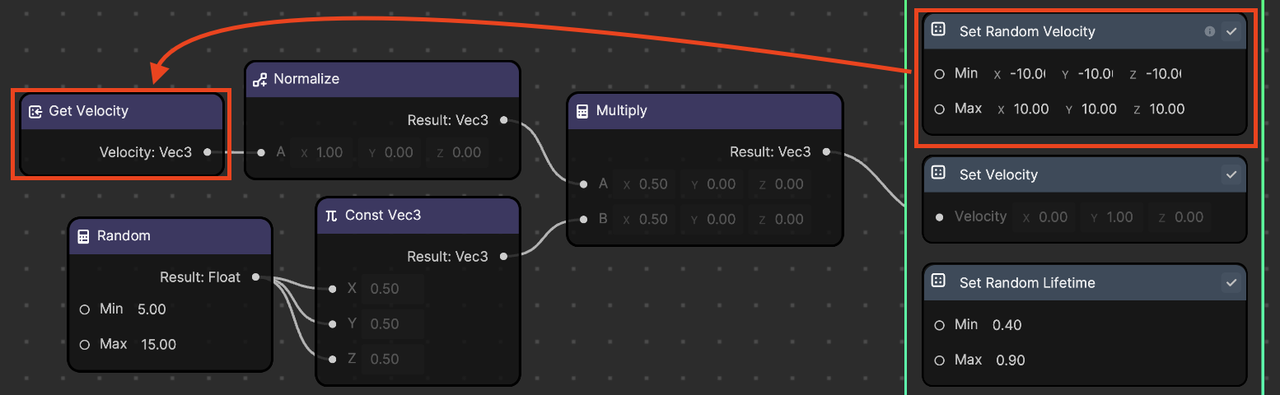
- Add a Set Random Velocity node and set Min: (-10, -10, -10) and Max: (10, 10, 10). This means the particles can move in any direction.
- Add Get Velocity, Normalize, Random, Const Vec3, and Multiply. Connect them to the Set Velocity node in the Init node, with custom values as shown in the screenshot below.
- If this step is not added, the firework explosion will create a square shape. To form a circular shape, obtain and normalize the initial velocity vectors from the Set Random Velocity node. Then, multiply these vectors with a random range between 5-15. The particles will then form a more natural and less uniform shape.
- Add the Set Random Lifetime node and set Min: 0.4 and Max: 0.9. Each particle's lifespan will be between 0.4-0.9 seconds.
- Add the Set Scale node and set Scale: (0.2, 0.2, 0.2).
- In the Update node:
- Add the Add Gravity node and set Force: (0, -10, 0). The exploding particles will draw in a downwards arc.
- Add the Set Size Over Lifetime node. It comes with the default texture VFX Curve Map, which will increase the particles' sizes in the middle of their life span, then gradually reduce them down towards the end of their life cycle.
- In the Output node:
- Add the Set Main Texture node. It should come with the default texture VFX Particle, which has a circular shape.
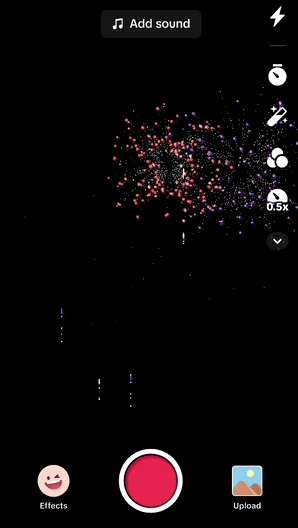
The final setting will look like the following:
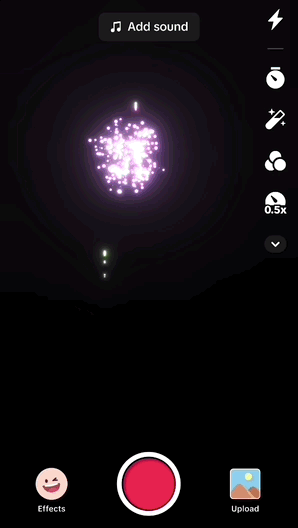
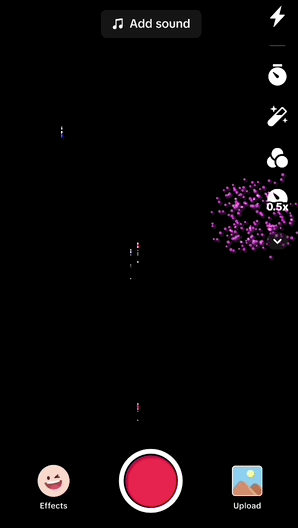
You should get the following result:
Add trails to the exploding firework particles
To create a trail effect on the exploding firework particles, you will once again need to create a new particle system.
- In the Update node, from the exploding firework particle system, create a Trigger Event: Always node and set Count: 1.
- This event node gets triggered in each frame (FPS) and creates an x amount of particles. In this case, it will spawn 1 particle per frame on each exploding particle.
- Create a new set of the SpawnGPU, Init, Update, and Output nodes, then connect Trigger Event: Always to Spawn GPU, as shown below.
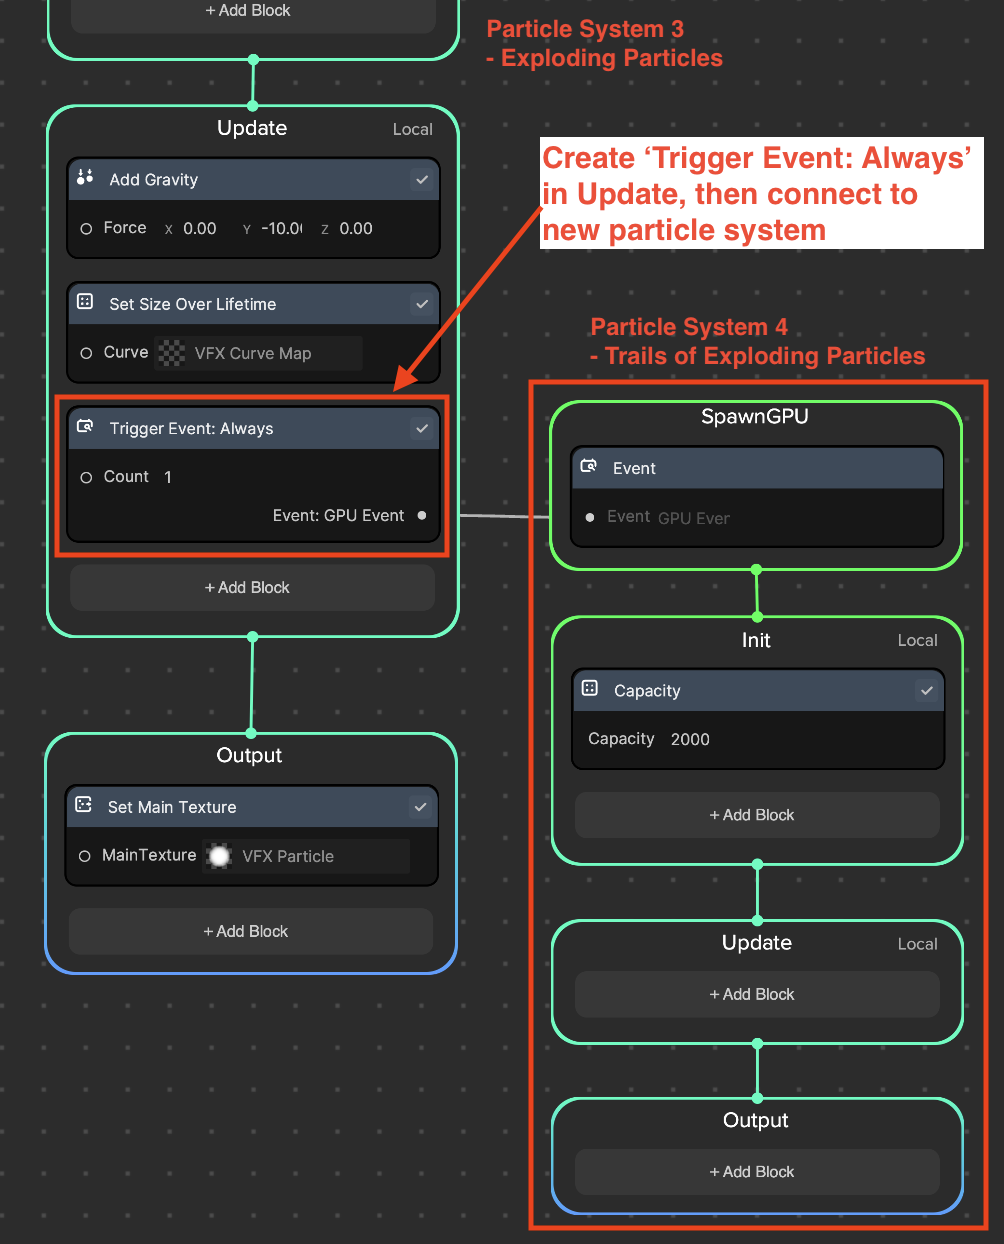
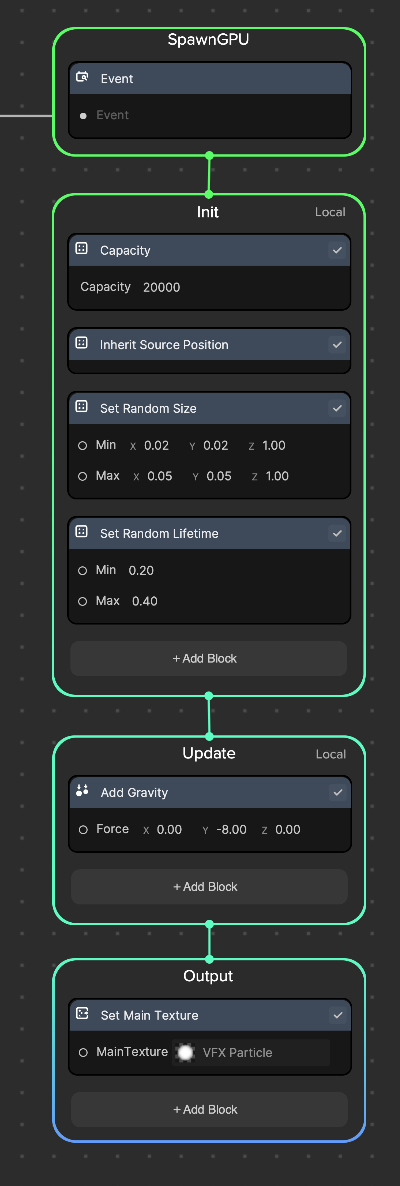
- In the Init node
- Increase Capacity to 20,000 to cover the max number of particles being spawned.
- Add an Inherit Source Position node so that the trail particles can be generated at the same position as the exploding particle from the third particle system.
- Add a Set Random Size node and set Min: (0.02, 0.02, 0.02) and Max: (0.05, 0.05, 0.05).
- Add a Set Random Lifetime node and set Min: 0.2 and Max: 0.4. Each particle's lifespan will last 0.2-0.4 seconds.
- In the Update node:
- Add an Add Gravity node and set Force: (0, -8, 0). The trail particles will draw in a downwards arc.
- In the Output node:
- Add a Set Main Texture node. It should come with the default texture VFX Particle, which has a circular shape.
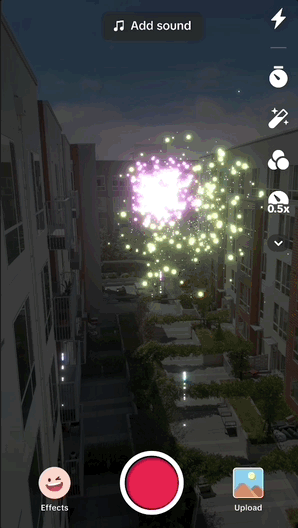
You should get the following result:
Final touches
The current firework effect looks great, but we can add one last feature to make it look even better!
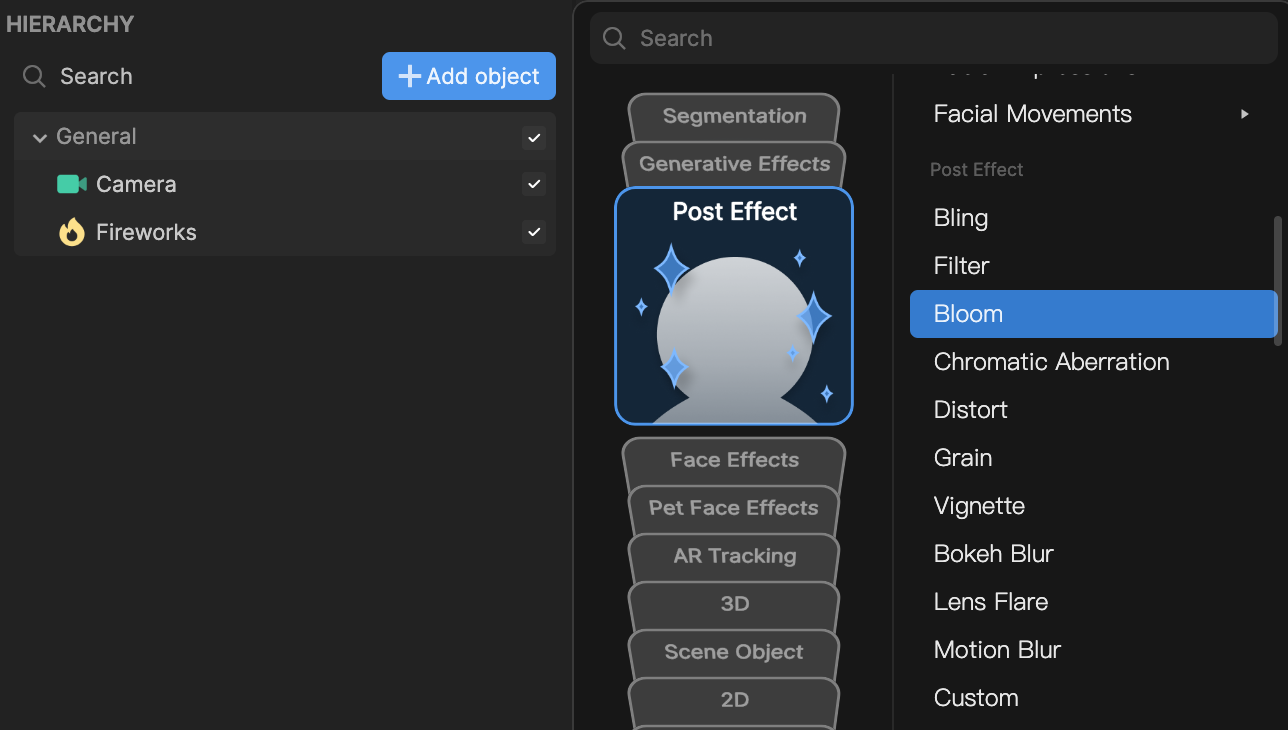
- Go to the Hierarchy panel
- Click the Add object button [+]
- Go to Post Effect
- Select Bloom
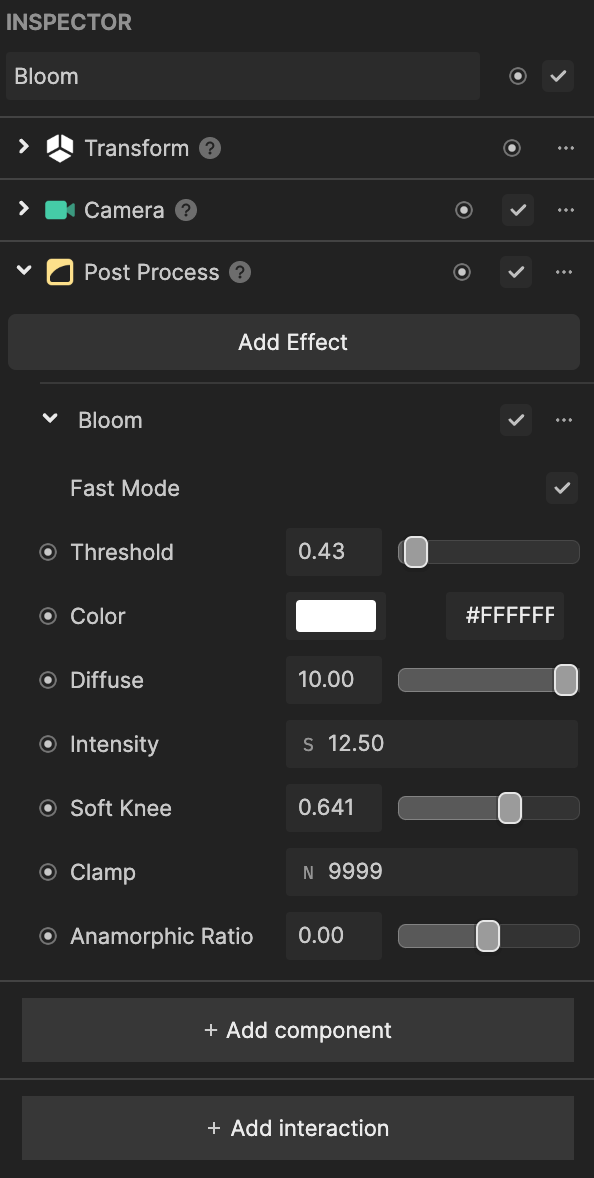
Go to the Inspector panel and make the following changes in Bloom.
Time to celebrate with some fireworks!