Randomizer 2D
This tutorial will show you how to import PNG sequences, attach them to the correct objects, and use the different settings in the randomizer subgraph to create your own randomizer by importing PNGs into the Randomizer 2D template.

Prepare Your Assets
Before we get started, you’ll want to prepare a set of PNGs as a texture sequence. They should all share the same aspect ratio and resolution for best results. As an example from this template, here are the assets we used for the “Which Planet Are You From?” example.
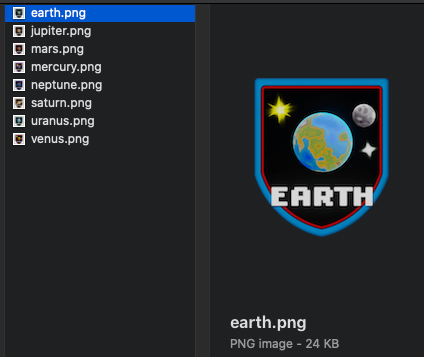
You will also want to prepare a “title” PNG asset. This will be the image that floats above your head. For our example, it prompts the user with a question, “Which Planet Are You From?”, so that the randomizer result can provide an answer to that question.

To get the most out of this template, you should come up with your own prompt question and a set of interesting, dramatic, or hilarious answers!
Open the Template
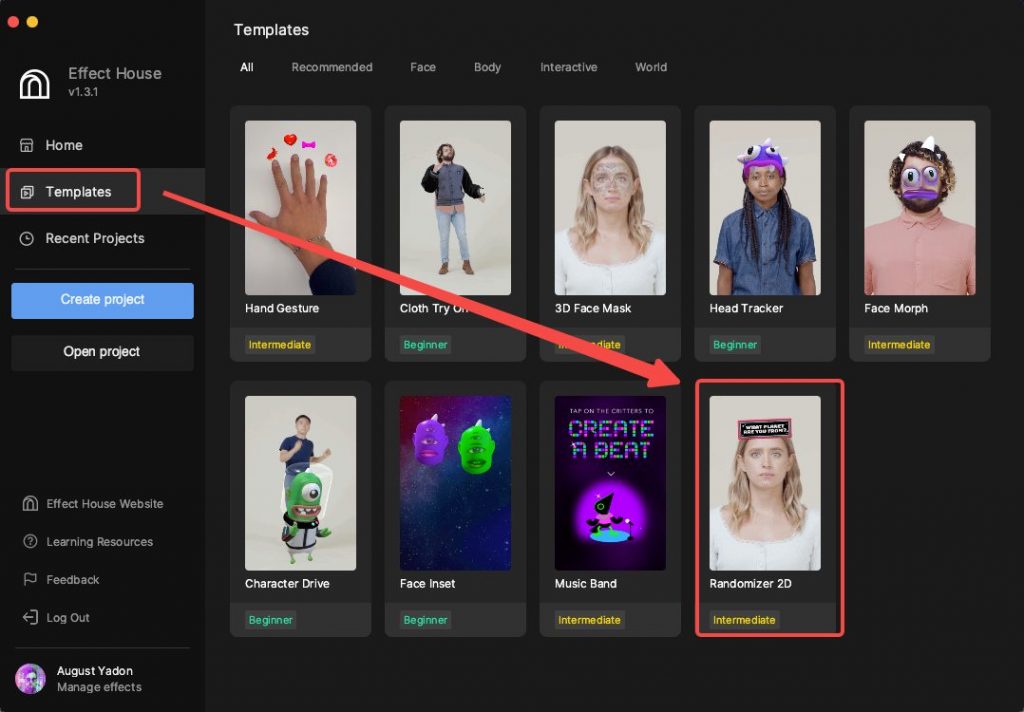
Start by opening Effect House, logging in with the account that you want to use to publish your effect, and find Templates on the left. From here you’ll see some templates under various categories. Select the Randomizer 2D template.
Let the project load and then save it to a folder of your choice.
Import Your Assets
Learn more about limitations and preparing assets outside the scope of this guide by seeing the screen image preparation guide.
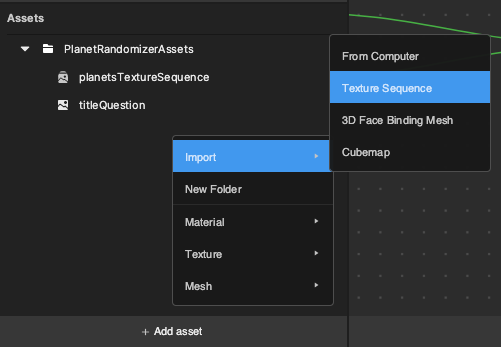
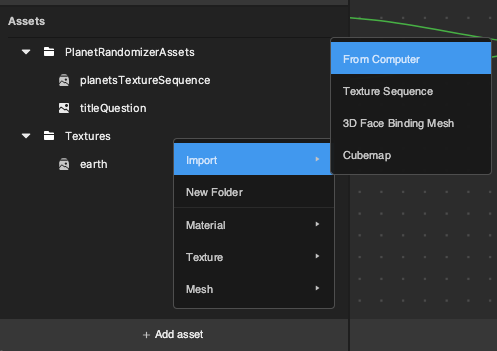
First you should import your new PNG assets in a specific way. Start by clicking the Add button [+] > Import > Texture Sequence in the Assets panel.
Select all answer assets (not the “Title Question” asset) and click Opens.
Import your new Title Question PNG file by clicking the Add button [+] > Import > From Computer in the Assets panel.
At this point, you should have a new Texture Sequence asset and a new Image/Texture asset. Observe the icons next to their names in the Assets panel and feel free to select them and adjust settings in the Inspector panel.

Swap Your Assets
Let’s take a look at the Hierarchy panel to see how this project is set up.

We have two assets that use the Face Sticker component to drive Images to follow a user’s head. Title will be where your Title Question PNG will go, and RandomAnimationSequence will be where we attach the new texture sequence.
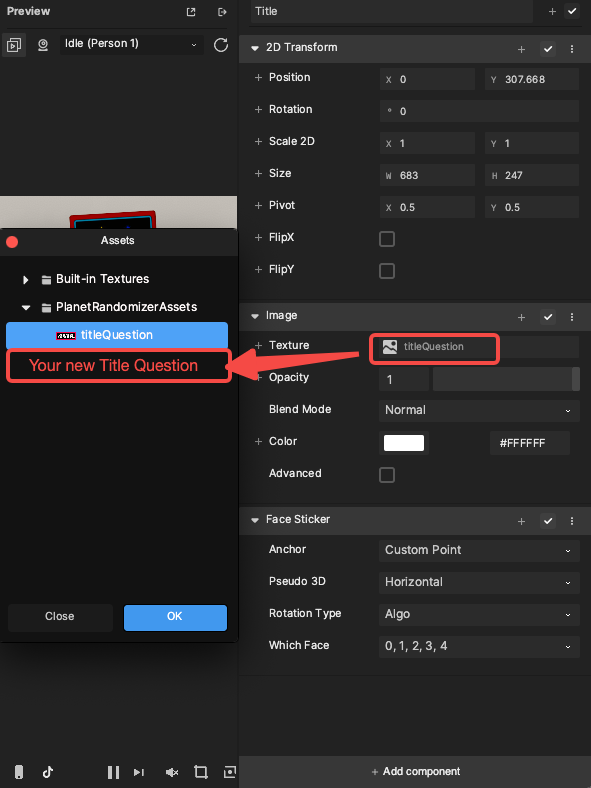
Select Title in the Hierarchy panel and then set a new texture in the Inspector panel.
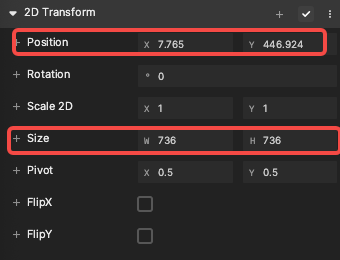
You may need to adjust the Position and Size values of your asset after the texture is changed. You can do this by manually typing new values into the properties in the 2D Transform component, or just use the Scene panel to grab and stretch them.
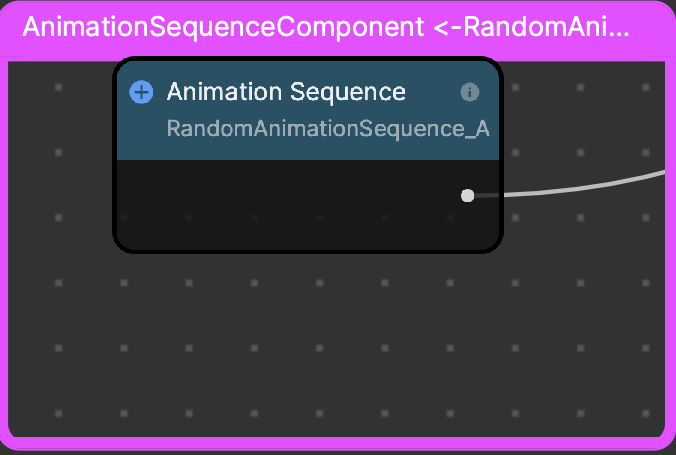
Similarly, select RandomAnimationSequence in the hierarchy and change the Texture Sequence of the Animation Sequence component.
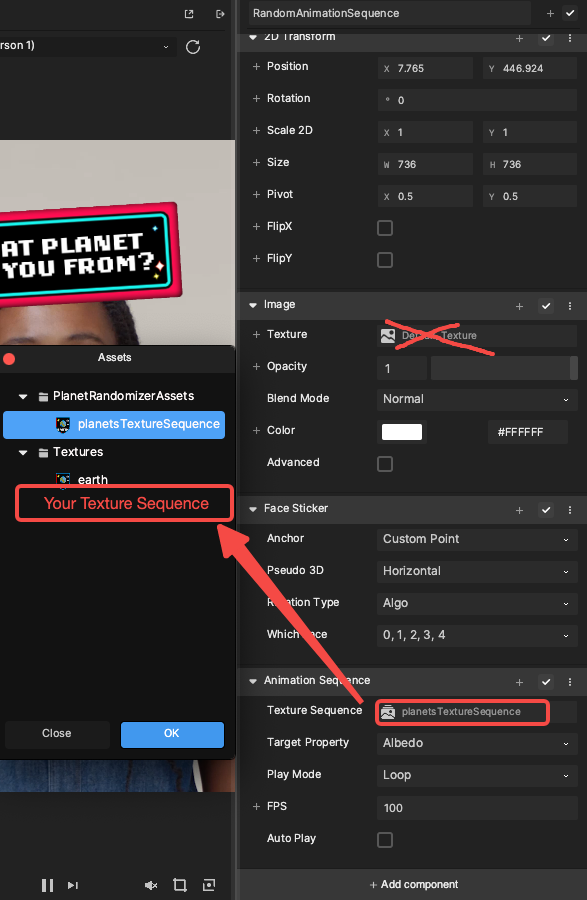
When an Animation Sequence component is present, it will automatically set the Image component’s Texture every frame. If you try to change the Texture property of the Image component, it will immediately be overwritten by the current frame in your texture sequence. That’s why it is crossed out and ignored in the above image.
Configure the Randomizer Subgraph
You're almost done! Most of the randomizer settings can stay the same, but it’s good to know what they do.
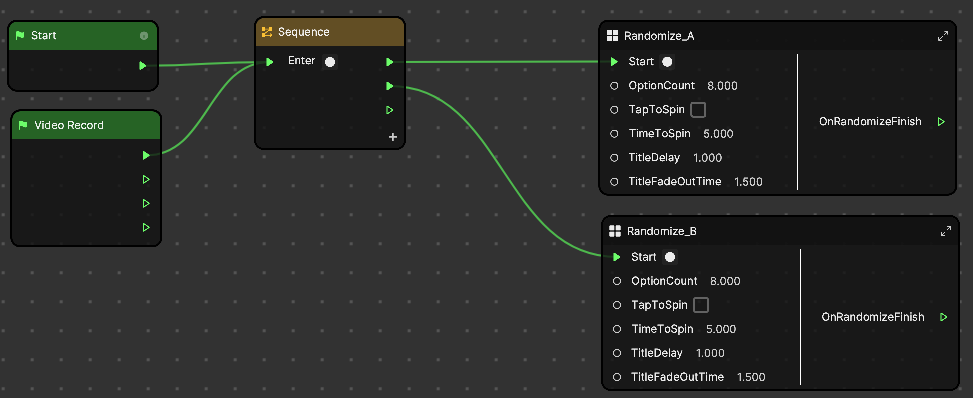
Your Visual Scripting panel should look like this:
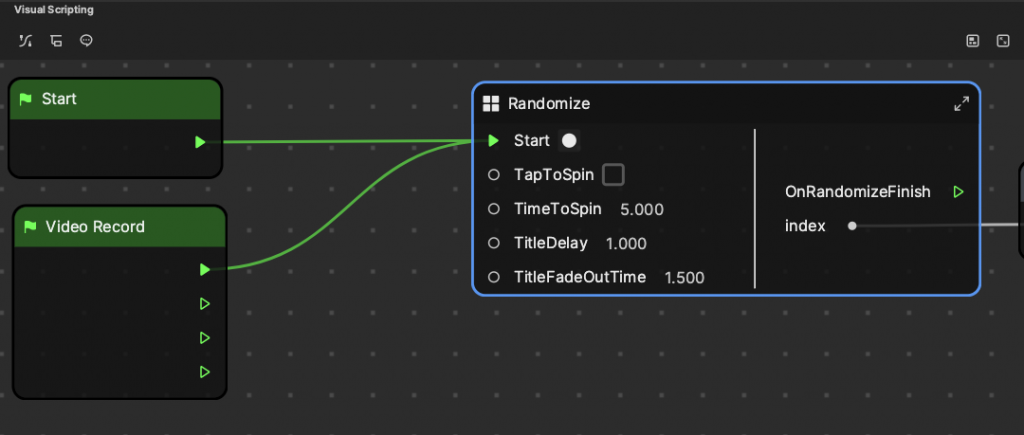
- Start: The Start input is a trigger/signal that will reset the effect and it’s animation back to the Title Question. It can also begin the animation of the title fading out, and the randomizer to start spinning (TapToSpin can change this behavior slightly as well).
- Notice that Start and Video Record Start are both signaling this input. That means that both the Effect Start (when you first open the effect) and the Video Record Start (when you press the record button in TikTok) will trigger this reset process.
- TapToSpin: When this is checked, the person using the effect will need to tap on the screen to start the animation. When it is not checked, the effect animation will begin as soon as the effect is opened and again as soon as the record button is pressed.
- TimeToSpin: The amount of time that Animation Sequence- will spin before it stops on an answer.
- TitleDelay: The amount of time in seconds that the Title will appear before it begins to fade out.
- TitleFadeOutTime: The amount of time in seconds that the Title will take to fade out after the delay time ends. For a long slow fade, choose a longer time. If you want the title to blink straight to spinning, you can set this value to 0.
If you don’t want a title at all, set TitleDelay and TitleFadeOutTime both to 0 and uncheck TapToSpin. This will make it so that as soon as the user pressed record or opens the effect, it will immediately start spinning with no title. Feel free to experiment!
Deep Dive Into the Subgraph
This deep dive into the subgraph will explain how it works and give you some ideas for how to modify and experiment with it.
This subgraph has been constructed in a long sequential format moving from the left to right side of the window so it is more readable as a set of nodes that execute from left to right.
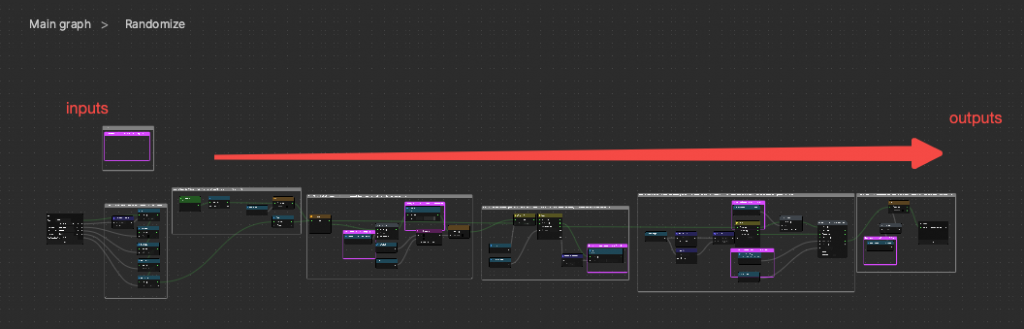
Inputs
If we take a look at the left most side, we’ll see that the first thing that is done is that all of the input parameters coming into the subgraph are saved into subgraph variables. This is a way to keep the subgraph clean and readable.
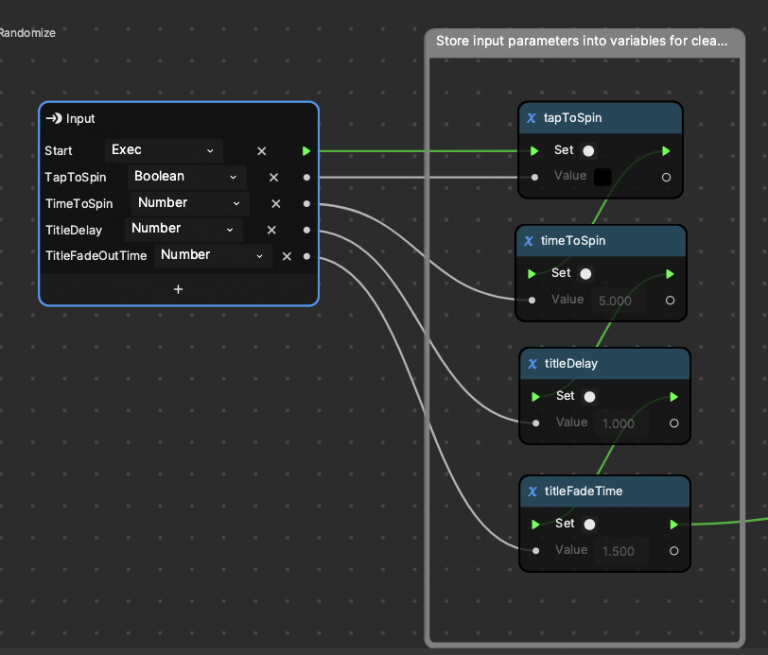
We can then use the variables anywhere we want by just adding a Get Variable node to the graph wherever we need it.
The reason you subtract 1 from index is because in programming, usually indexes start at 0. For instance in our Animation Sequence component.
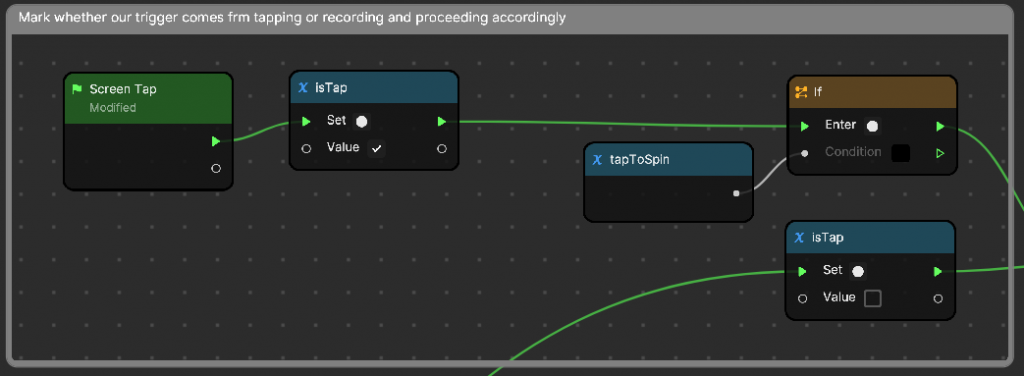
Process Input Signal
We want the subgraph to be relatively flexible so we make it easy to change the effect to use Tap as an input instead of just Recording Started. Because we can switch between using either, we will set a variable to keep track of whether our signal is coming from a tap or just recording started. Notice that if we do not have TapToSpin value set to true, our tap signal will not go past the first if statement and essentially does nothing.
Reset Animation
Next we want to reset the effect whenever a signal comes in, so that it can start the randomize process from the beginning. This is so that the user does not need to re-open the effect every time they want to reset it.
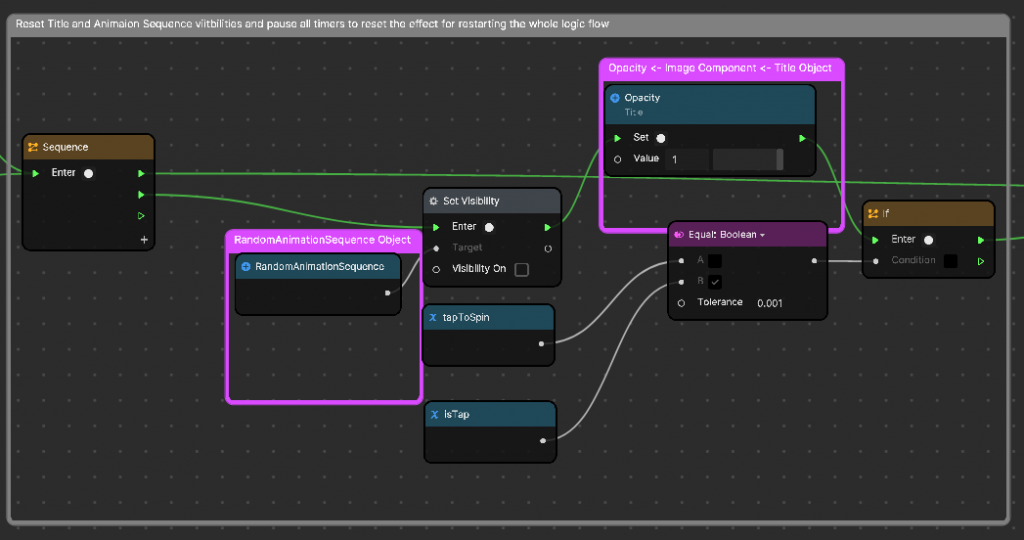
The first thing you’ll see is the sequence node. The sequence node conveniently lets us use one execution signal to do one thing, and then do another thing after within the same frame. This is a way to do multiple things at almost the same time but in a specific order. The first signal will pause a timer from the next section (off screen). We want to pause timers and stop all ongoing processes so that the result of the randomizer doesn’t accidentally proceed anymore until we tell it to.
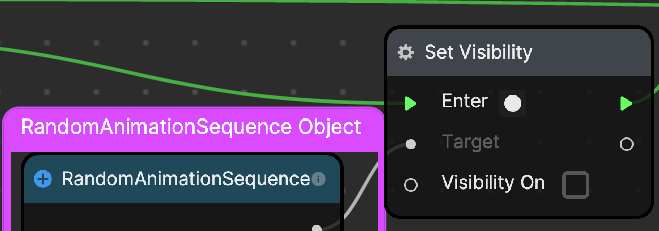
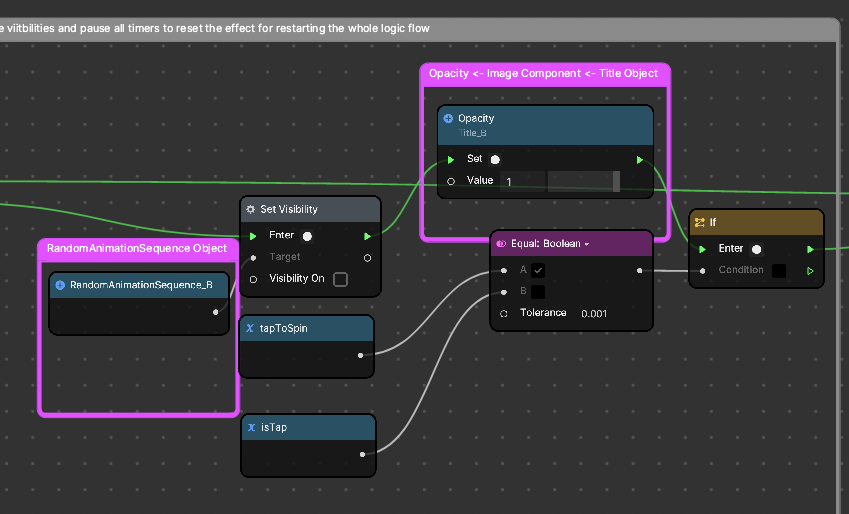
For resetting the next steps we do are turn off the visibility of the RandomAnimationSequence object.
Next we turn the opacity of the Title object all the way up. This is our default starting state, title on, random answers turned off.

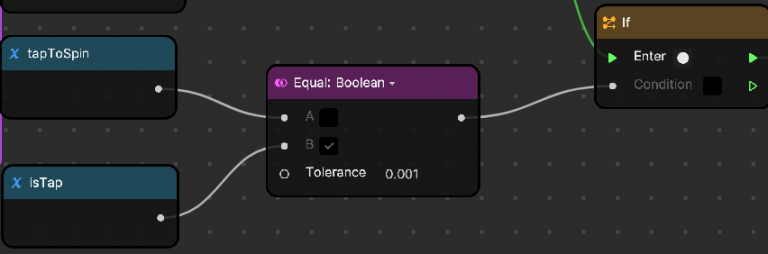
Lastly we check to see if we tapped to create this signal, and if we chose to let taps trigger a spin. We are also checking if we did not use a tap to create the original signal and if we want to let other signals start the spinning instead of taps. When we have our correct signal, the boolean Equal node will output true to the If node, and the next section will start the animation.
Fade Out Title and Start Spin
We let the title display for some number of seconds defined by titleDelay, and then Timer is triggered. During every frame the timer will set the opacity of the title object. The timer, by default, will output a value between 0.0 and 1.0.
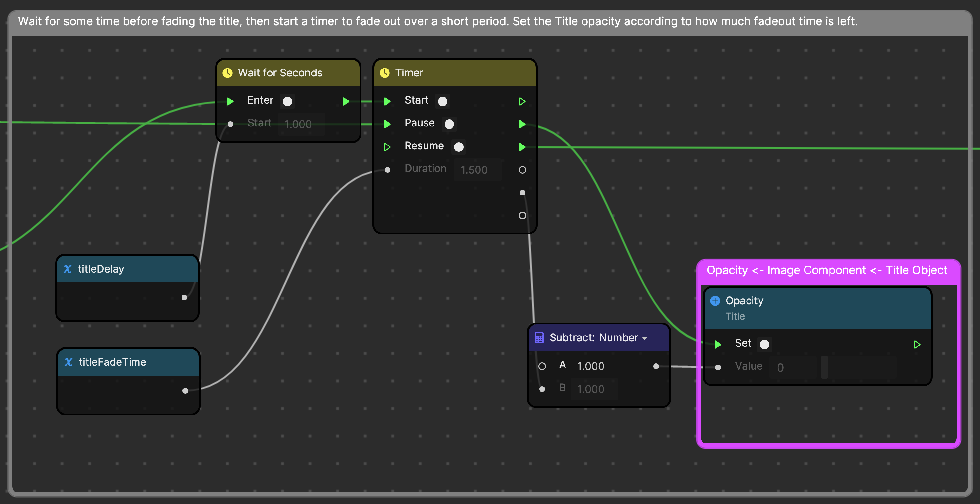
This is just the ratio of time left. We can flip this so that it goes from 1.0 to 0.0 with a subtract node as seen below so that the opacity fades from 1.0 to 0.0 during the life of the timer.
When the timer has finished its full duration, it will stop sending update signals every frame and instead send one signal when it stops. This signal is the one you see going right off the screen into the next section.
Choose Spin Time and Spin
One way to cause the Animation Sequence to land on a random selection is to let it loop very fast for a slightly random amount of time. For instance, if it spins for 4.5 seconds it will definitely land on a different index than if it spins for 4.6 seconds. So we just choose a random number within a 0.25 range above or below your chosen spin time.
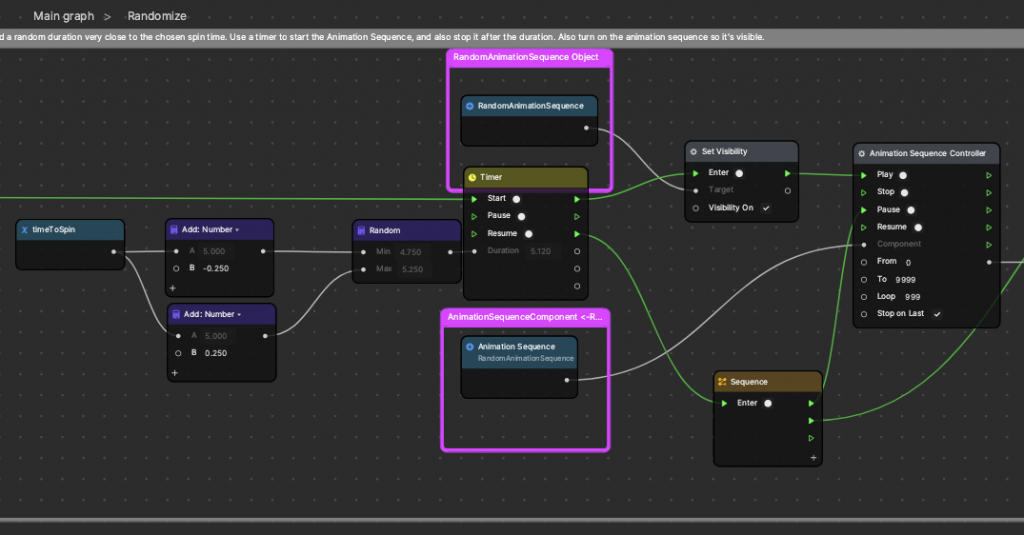
As a side note, you’ll see the random node generates a new random number each time that it’s referenced from another node. When the timer is started it will reference the random node once and save the value that was generated at that moment. It will use that value as it’s duration even though the input variable is changing constantly it is not actually being set to the timer’s duration.

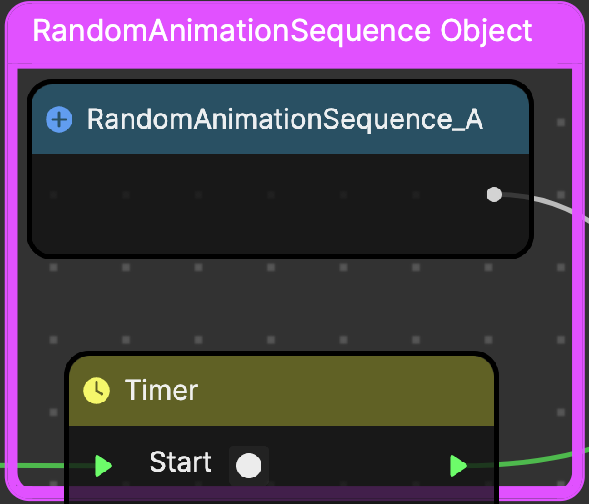
When the Timer starts, it sends a start signal to turn on the visibility of the RandomSequence object. Next, and within the same frame, the signal will continue on to Play the animation sequence which is set to loop at 100 frames per second to ensure higher random probability.
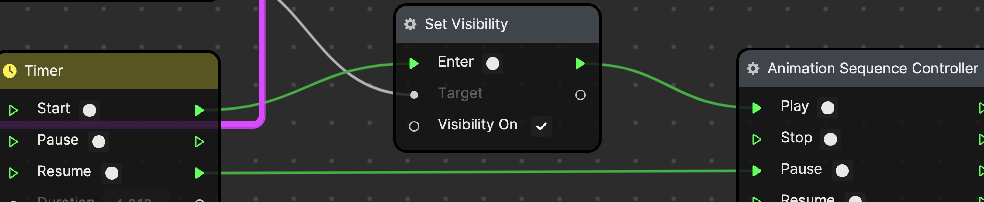
Once the timer finishes the full “spin duration” it will pause the animation sequence to land on whatever it is currently on. This will be your random answer to the title question! Upon receiving this pause signal, the Animation Sequence Controller node will send it’s own signal to the final section of this subgraph to signal that the randomizer is finished.
Use Two Randomizers
This section is catered to intermediate to advanced Effect House creators.
The following are some examples of when you would want more than one randomizer:
- Multiple results for multiple users.
- Multiple results for one user. (Which Planet am I from and which planet do I belong on?)
- Many other ideas you’ll come up with in your own creative way!
Duplicate
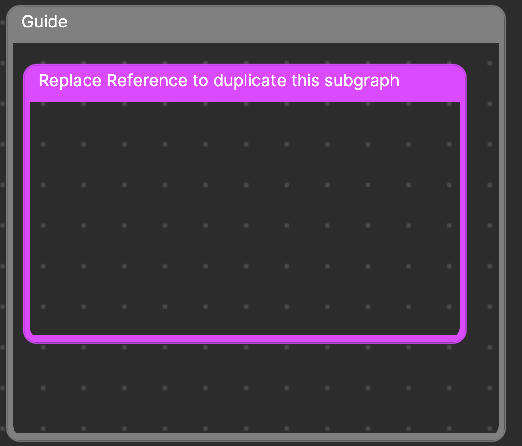
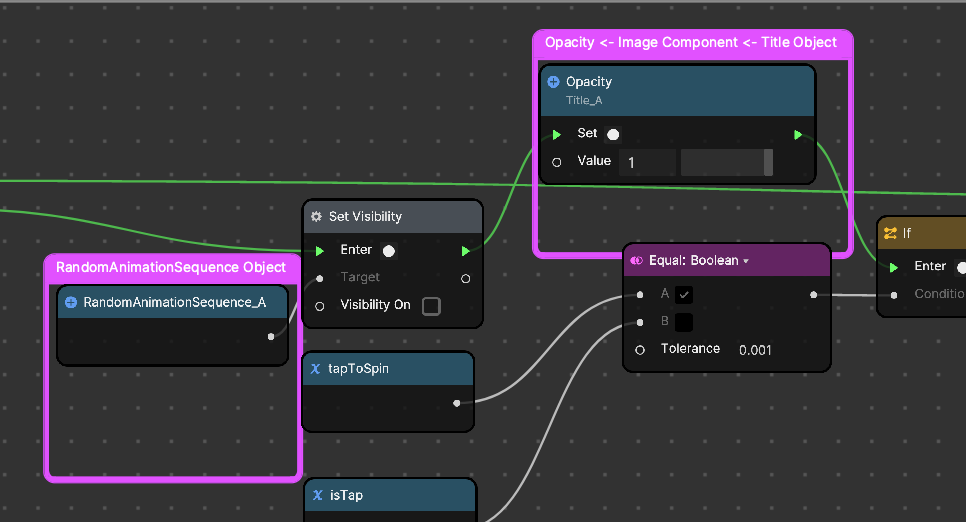
If you’ve been following along the deep dive, you may have noticed the pink boxes we’ve placed around some nodes.
These pink box comments are meant to highlight nodes that will need to be replaced when we upgrade this template to use 2 randomizers so that 2 people can use the same set of assets and get different results!
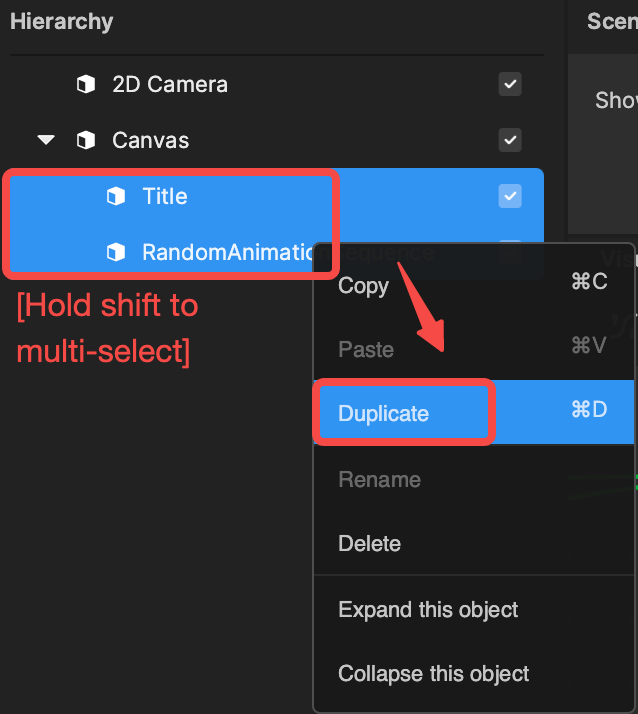
The first step is to duplicate the Title and RandomAnimationSequence objects that are in the hierarchy.
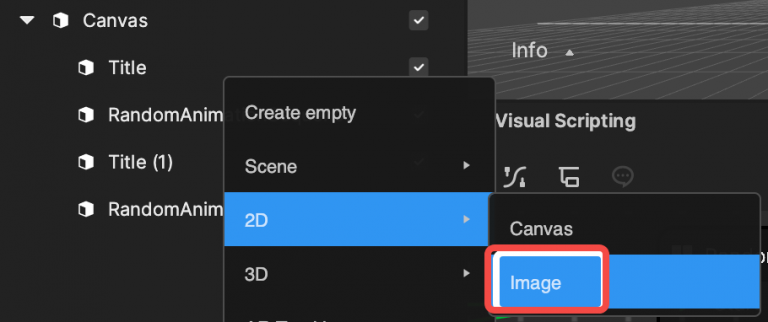
If you’d like to organize your hierarchy more, you can add a 2D Image object to your hierarchy instead of using the Add button [+] > Create Empty, since Create Empty will add a 3D object to your 2D canvas and the 3D Transform under a 2D parent is not officially supported.
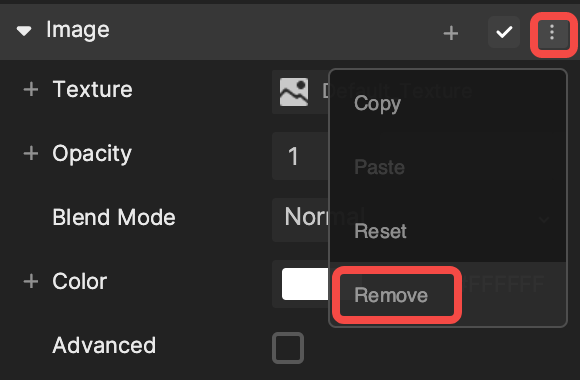
If you do this step, make sure to remove the Image component from these now-empty objects, since they’re only meant to hold other objects to improve organization and readability of your project.
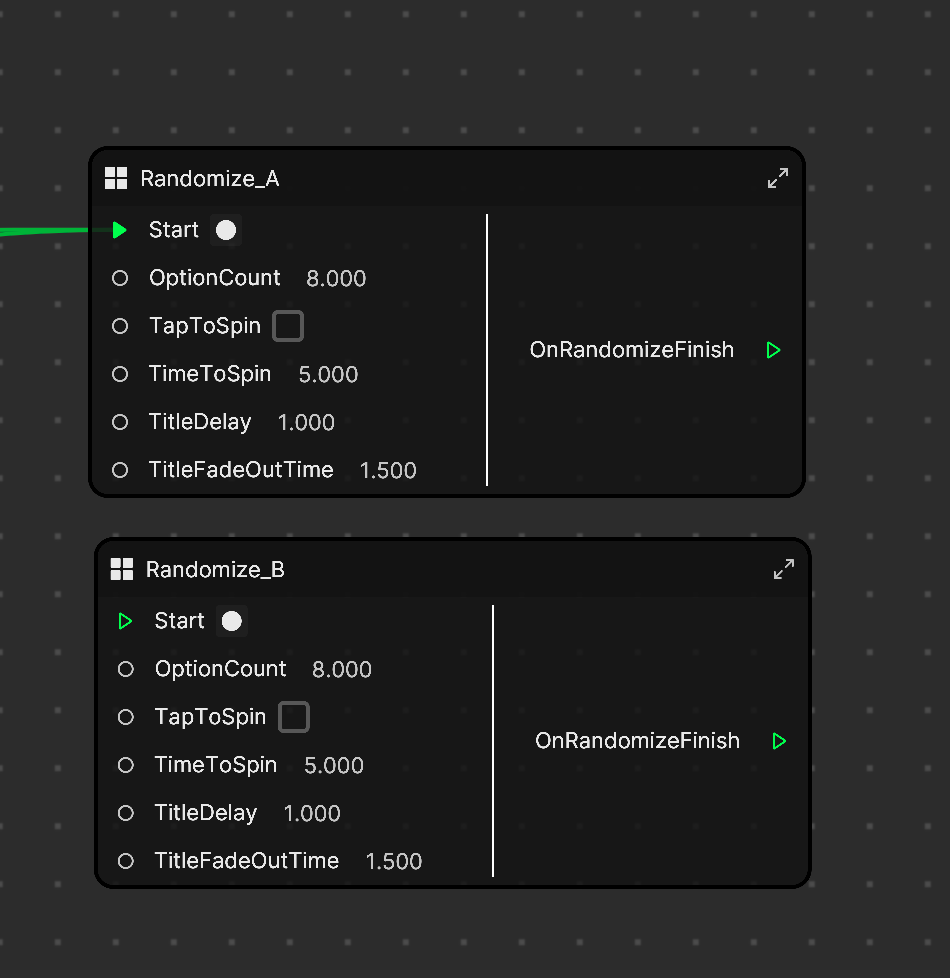
Select the Randomize subgraph next in the Visual Scripting panel and duplicate the subgraph. Rename it to make it more clear which objects it will be controlling.
Swap Visual Scripting References
When we use the term reference we mean that a certain node is referencing, using, or coming from a certain object or component in your project.
For instance, if we select an object in the hierarchy, and then in the inspector, we click the Add button [+] to generate a node like below:


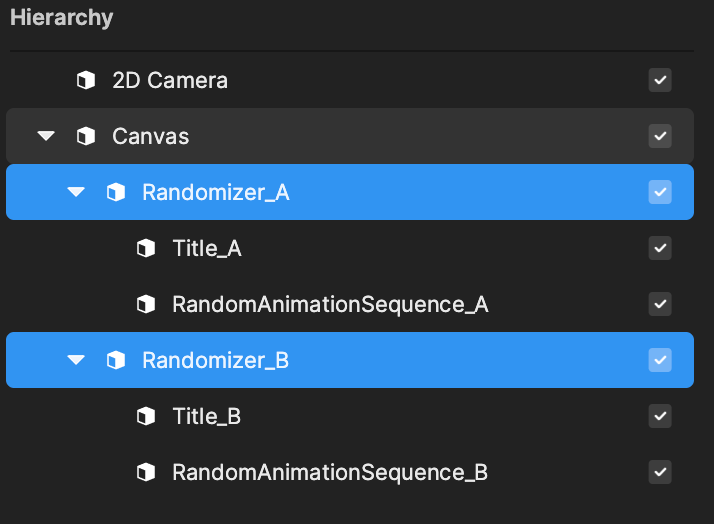
Then we can easily say that we’re not just “getting” any image, we’re specifically getting the image component from the Title_A object. The Title_A object is a specific reference here and so this node only effects that specific image.
If we want to duplicate the logic and Visual Scripting, then we’ll have to make sure that our duplicated subgraph is using nodes that reference our Randomizer_B objects instead of it just telling Randomizer_A assets what to do again.
Double-click the duplicate subgraph to dive inside.
Any of the nodes that have been marked with pink box comments will need to be replaced with references to Randomizer_B objects instead of Randomizer_A objects.
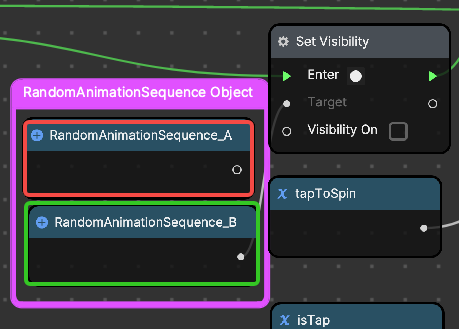
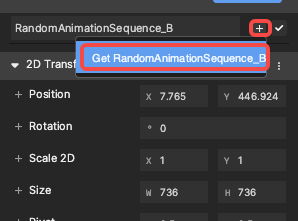
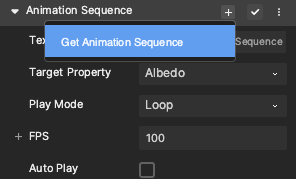
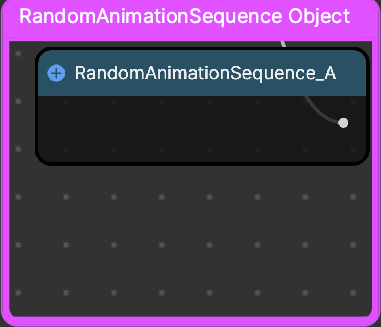
In order to replace the node on the left side of the above screenshot, select RandomAnimationSequence_B in the hierarchy and click the “get object” button at the top of the inspector panel on the right. Then you’ll replace the old node with the new one in the graph.
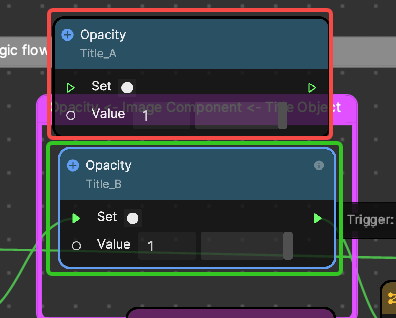
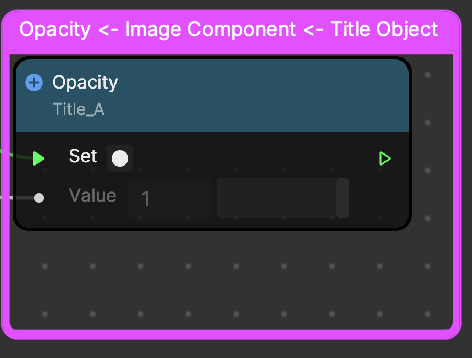
Next select the Title_B object in the hierarchy and then, in the Inspector panel on the right, you’ll find the Image component. Under the Image component, you’ll see the Opacity property. Click the Add button [+] and then Set Opacity to add a Set Opacity node to the subgraph.
Replace the node connections so that the new node completely replaces the old one.
Lastly, you can delete the old nodes when they have been replaced. I only left them in the above pictures to show the side by side new and old, but the final result should look like the following.
Continue Swapping References
You may notice that there are four more nodes to replace in the subgraph:
- Replace with “Set Opacity” of Title_B
- Connect both inputs
- No output connections

- Replace with “RandomAnimationSequence_B” get object node
- No input connections
- Connect only output connection
- Replace with “RandomAnimationSequence_B” get AnimationSequenceComponent node
- No input connections
- Connect only output connection
- Replace with “RandomAnimationSequence_B” get object node
- No input connections
- Connect only output connection

You’re almost there!
In the top left of the Visual Scripting panel, you can click main graph to go back to the top level graph.

Double-click the background of the Visual Scripting panel and add a Sequence node to your graph.

Plug the node in as seen below. The sequence node will take in as many execution signals as we want to feed into it, and whenever one of them is triggered, it will first execute the top signal which is going to Randomizer_A.
When that subgraph finishes it’s process within the same frame, it will send a signal to the Randomizer_B template.
The sequence node synchronously sends signals and waits for them to reach an end before sending the next signal. Note that it does not perform parallel computing, but it will always finish executing all outputs during the same frame that it was called.
That means that some asynchronous nodes, such as “wait for seconds” will be seen as and end to execution, which tell the sequence node that one signal is finished and it can continue to the next.
Dual Randomizer Example – 2 Answers
Click on one of the Randomizer object in the hierarchy and scale it down and position it how you like on one side of the user’s head.
Then in the Inspector panel, click the three dots on the 2D Transform component and select Copy.
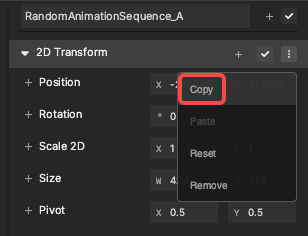
Next select the other Randomizer asset (B) and click the 3 dots on the 2D Transform component in the Inspector panel and click Paste. Then make sure to flip the negativity of the “X” value of the position to make it switch which side of the face it’s on.
At this point you could adjust the title however you want. You should hide one title by turning the object off in the hierarchy, or put the two titles in each of the spots where the randomizers will appear, but it really depends how you want to prepare your assets.

Dual Randomizer Example – 2 Users
If we instead want a different example where two users could each have a single randomizer then we should probably rewind the parts where we adjusted the placements in the “2 Answers” example above.
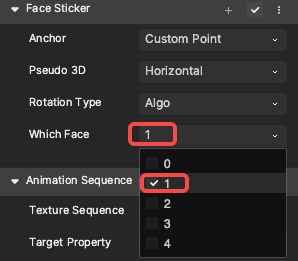
Instead we will select each of our objects in the hierarchy panel and find their “face sticker” component in the inspector. We will open the “Which Face” dropdown, and select 0 for our “A” objects, and 1 for our “B” objects. This means that one of the randomizers will stick only to “Face 0”, and the other will only stick to “Face 1”
Remember at any time to test your randomizer, you could just click the reset preview button.

You are now able to create some simple effects as well as have a deeper knowledge of Visual Scripting across a gradual set of instructions.