Keyboard
This MicroJam project was created using Effect House 2.3.0. The characters used in this project can be seamlessly applied to all versions of Effect House. However, to best replicate this project, it is recommended that you use Effect House 2.3.0 or an earlier version.
Introduction
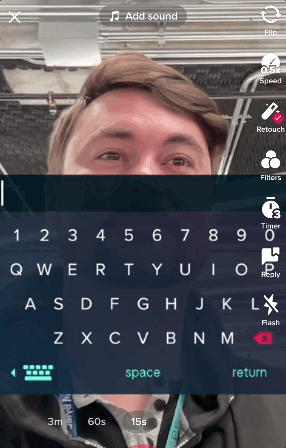
Welcome to the Keyboard Microjam project where you will learn how to create a keyboard that simulates a mobile keyboard and text fields. Effect House doesn’t natively have any text features built into the tool, so we’ve created this supplemental project as a way to simulate text using animation sequence objects, just like the MicroJam Scoreboard project.
Start by downloading the following Effect House project:
In this project, we’ll cover the following topics:
- How to use the keyboard and text fields in your project
- How each subgraph and technique works “under-the-hood”
- Modular design concepts
- What easing functions do and where to put them
- Interesting effect ideas for you to try
How To Use This Project
This section explains how an effect creator could use this project as a template to make effects that have a keyboard with simulated user-input text, by showing the “head text” example, and sharing some ideas for projects that have custom text. The project is set up in the best possible way for you to be able to use it without needing to be a master of Effect House visual scripting. If you’re interested in learning best practices and how to design subgraphs that are valuable and reusable, you should read through the rest of this guide to learn how the whole thing ticks.
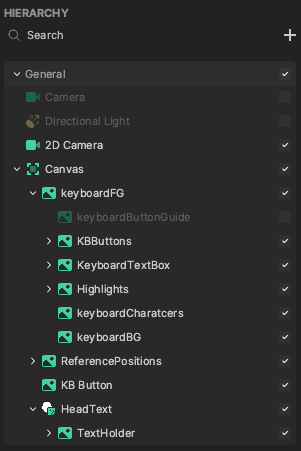
The first thing to understand is that you don’t really need to touch most of the project, you can leave 90% of it as is. The only area that you should be editing, if you don’t need to customize the keyboard in any way, is the HeadText object. It can be found in the image below at the bottom of the scene hierarchy.

The HeadText object is actually a Face Sticker object attached to the center of the user’s forehead. In the Inspector panel, the Image component of Face Sticker is disabled. This is because we just want to use the Face Sticker‘s ability to stick a 2D object to the user’s head.
This object is considered a parent object, meaning that its main purpose is to hold a group of “child” objects. Nested underneath it is the TextHolder object, which serves the same purpose as the HeadText object. Since a Face Sticker essentially pins a 2D image to one of the face points, TextHolder is used to offset the center of the text so it floats above the head instead of right at the eyebrow level. This is a lesser known thing about the Face Sticker object, so play around with the objects yourself, and get familiar with offsetting your pinned objects with parent objects.


When you select one of the character objects, you’ll see that they’re equally spaced apart at a width that allows them to all be “W” (the widest character) without overlapping. You can remove the HeadText object and move this TextHolder to somewhere else on the screen and put the characters wherever you want.

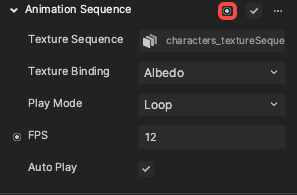
The characters are all just 2D image objects with an animation sequence attached. The Animation Sequence nodes have all of the textures for all alphanumeric characters, and we use Visual Scripting to set each one whenever the user types to show only the texture for the character that was typed. This means that you don’t need to even use these exact objects. You just need to use any object that can have an animation sequence attached. You can put animation sequences on a material or 3D mesh, or a 2D image.
If you do create new objects, instead of just moving the “TextHolder” or individual characters, just remember that you need to reconnect the Animation Sequence references for each Char object. This is done by clicking on the Pin to Visual Scripting button on each Animation Sequence and plugging it in where the current nodes are plugged in. Also, one last thing to consider would be if you need to update the CharWidth value in the CenterText subgraph, or if you even want to center text. Maybe just delete the CenterText subgraph if you don’t need it!
If you want to get more complex, you might test your skills by adding some extra logic in the ControlHeadText subgraph to dynamically shift the characters based on how wide they actually are. You could also create a new font and swap out all of the references to it. These changes are out of the scope of this project, but feel free to try them on your own as practice or a way to customize your design.
Now that you can see how to use these typeable objects, you can keep the keyboard as is and put some typeable text anywhere inside of your larger effect concepts! Make sure to take some time to fully soak in this project by diving into the rest of this guide to learn how all the parts work.
Hierarchy
The hierarchy for this project has a lot of parts, but each part serves its own simple purpose. When each part is explained, it’s not really as intimidating or complex as it looks.
| Part | Description |
|---|---|
| 2D Camera and Canvas | The classic 2D Camera and Canvas are the basic pieces that every 2D project has. Place any 2D images under Canvas if you want them to be rendered by the 2D Camera (and make sure they’re on the same camera render layer). |
| KeyboardFG | This is a parent object, meaning that it is mostly used as an empty object that holds other “child” objects. This is a classic way to organize complex 2D scenes so that a bunch of small pieces can move together as one. |
| keyboardButtonGuide | This is an object that we used to build the project and align all buttons carefully. We included this in the project to show you how you can create extra assets while building effects that have some utility value. |
| KBButtons | This parent object holds all of the keyboard buttons. There really are no complex buttons. They’re just images that have their opacity set to 0.0 so that we can plug their reference into the Image Tap nodes in Visual Scripting and receive events when the end user taps on one of them. |
| KeyboardTextBox | This is another parent object that holds all the characters in the top section of the keyboard. Each of the characters are animation sequences with all the typeable characters in their sequence. You can control which frame is shown, similar to how it was done in the MicroJam Scoreboard project. |
| Highlights | The Highlights object is a purely organizational parent object that holds all the various shapes of “highlight” images. To indicate that a key was pressed, one of these highlights is moved over the correct key and the blend mode is set to negative so that it flips the colors and creates the highlight effect. |
| keyboardCharacters and keyboardBG | keyboardCharacters is simply the image of the characters or buttons. The reason it is separated from keyboardBG is so that the user can control the opacity of the background without making the actual characters and buttons transparent as well. In TikTok and AR applications, it’s best practice to make the UI somewhat transparent. |
| ReferencePositions | This object holds empty keyboard objects that represent the positioning and scale of the keyboard in all its various states. The practicality of this is discussed in depth below, but in short, it lets you as the creator visually position where you want the keyboard to be when it pops up and hides back away. This prevents you from having to manually adjust those positions and scale value numbers deep in a subgraph. |
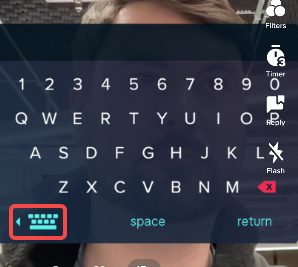
| KB Button | This button shows when the keyboard is off screen. Users can tap this button to show the keyboard. The logic for this button is in the Keyboard Show Hide subgraph. |
| HeadText | This is an example text box that works exactly the same as the text box at the top of the keyboard that was introduced above. This is an example of where the text goes when a user types, and hopefully prompts you as a creator to think of some interesting ways that the input-text can be arranged. Text can now go anywhere the animation sequences can go. |
Visual Scripting Walkthrough
Just like the hierarchy organization, the Visual Scripting panel has a lot of parts, but when we break them down, each subgraph is relegated to its own function. It’s important to note that separating and compartmentalizing anything into some functional purpose is almost always good practice, because when you need to update or share these functional building blocks, it’s easier to change them without breaking the functionality of other parts of your project.
The major subgraphs we’ll walk through in this Visual Scripting deep dive are:
- KeyboardTouchInput – Takes in all key presses and highlights which key is being pressed.
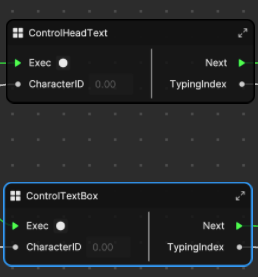
- ControlTextBox – Takes in key press events and types those characters into the text box objects.
- ControlHeadText – This is a duplicated version of ControlTextBox to control a second set of head-pinned characters.
- Cursor – Makes the cursor object move to the next empty space and blink regularly.
- CenterText – Shifts the text box so that the current characters are always centered.
- Keyboard Show Hide – Moves the keyboard on and off screen.
If you have any old projects, try separating the logic into subgraphs where each serves simple purposes. You can even export your subgraphs and begin to build a personal library of reusable building blocks, making future effect production easier than ever.
KeyboardTouchInput
To start out, the KeyboardTouchInput subgraph does exactly what it says—no more and no less. It handles the touch input whenever the user touches the keyboard. This includes determining which character was pressed and converting that into a “character code” that can be used in other subgraphs, and creating an event (green triangle output) for when a character should be typed. Some responsive design will also be handled by highlighting any of the keys while the user is pressing them. Responsive designs like this can make an effect feel magnitudes better for only a moderate development cost.
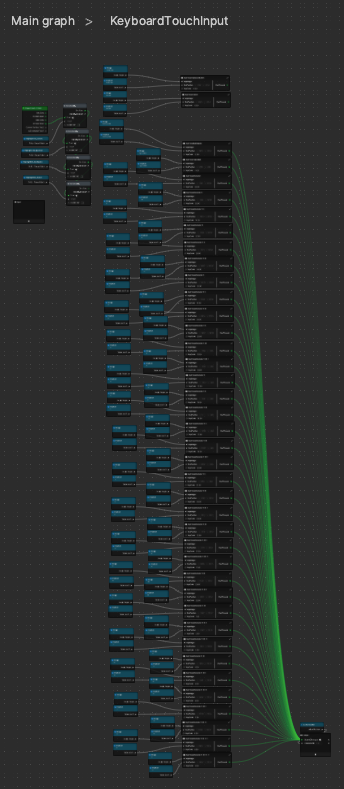
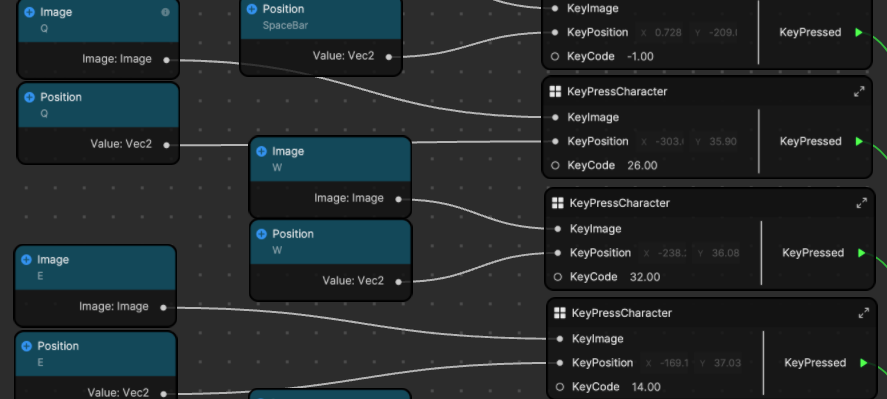
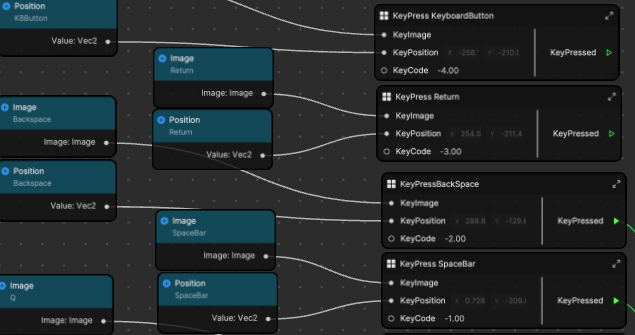
Above you’ll see two images—one of them shows how many nodes need to be connected just to track which button the user is touching. On the right, the nodes that are used for the three keys, “Q”,”W”, and “E”, are zoomed in on so that you can see what’s going on at the bottom level. For each of the keys, a reference node (Image) and a “getter” node (Get Position) are plugged in. The reference node refers to the the Image component for that key. Remember above when we mentioned that we need an invisible, but clickable box to receive touch inputs for each key? Those are the objects that we’re referencing with these nodes.

As mentioned before, each of the small subgraphs is pretty simple and straight forward. Below you’ll see that all we’re doing is waiting for the On Image Tap: Exec event to happen, and when it does, that means that the user must have tapped our invisible button that represents that keyboard key. When this happens, the Visibility of the highlight object is set to true. When the highlight object is turned on, the position of it is then set to the position of the key being pressed, which is passed into the subgraph as an input. After the highlight object is turned on and moved into place, the LastCharacter variable is set to the custom KeyCode, which is also a subgraph input.
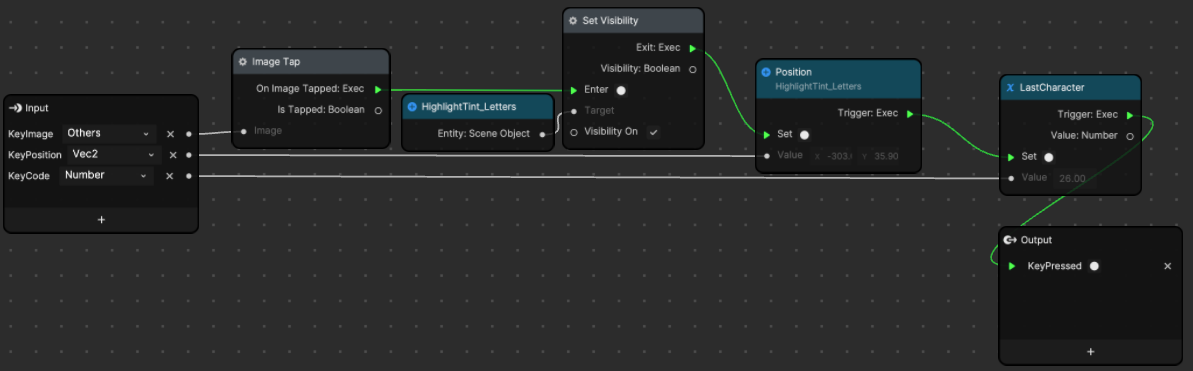
Take a moment to soak this in, because the logic is repeated for each key so that the one highlight object is turned on and repositioned by whichever key is pressed, instead of having a different highlight square for every single key. This means you can copy and paste this same subgraph 36 times and just change the input keycode and reference nodes to make each subgraph work for each key, without having to manually alter the subgraphs for each key. This saves a lot of time and effort.
Take a look at any past projects and look for groups of nodes that look the same. Practice by combining all of the groups of nodes into a subgraph and changing all of the variable parts into subgraph inputs. Getting good at this is an important step to mastering modular, reusable designs.
Another thing you need to handle in the KeyboardTouchInput subgraph is making sure that the highlights turn off when the user is no longer touching a button. Because the user could touch the screen with multiple fingers, sometimes it’s best to make sure to reset interactions whenever any touch ends. You can see here that whenever any touch event ends, we will turn off all highlights. This is the safest and best method for a single-touch system.
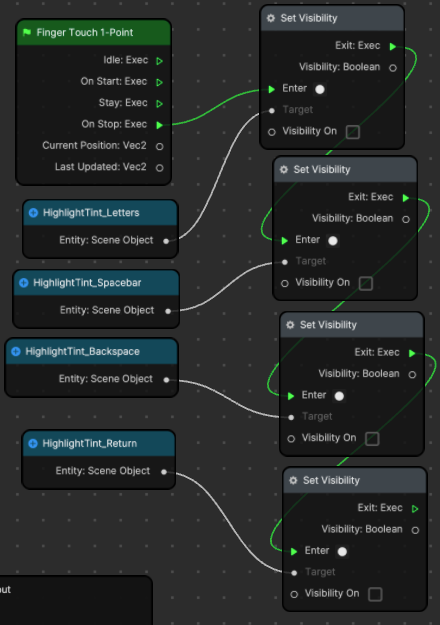
You may notice at the top of the subgraph stack that there are four subgraphs that handle non-alphanumeric buttons, and only the keys that affect typing will feed their events to the subgraph output. Note the negative keycodes. They are a way to give an ID that can be easily identified as a “non-typeable” character. These keycodes will be used in the next subgraph, even the -2 and -1.
Lastly you can look at the output. The event that happens whenever any key is pressed is simply passed along so that you can do something else with that event. The character ID is also outputted. This variable always holds the keycode or CharacterID of the last key that was pressed. So whenever a touch event happens, it will pass along only that CharacterID to the output of the subgraph.
ControlTextBox and ControlHeadText
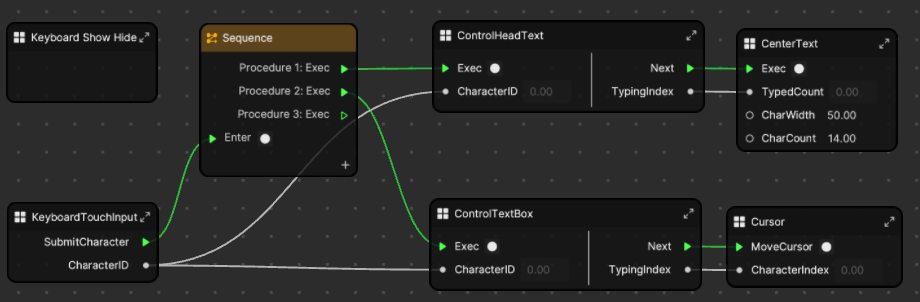
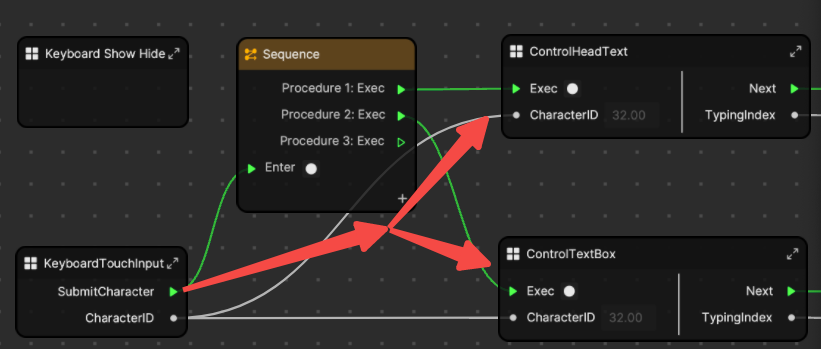
Now you understand that whenever any key is tapped, an event saves the related keycode in that key’s subgraph and then passes the event along with the keycode to the output of the subgraphs. You can see that the event then triggers the Sequence node, pictured below, so that it can pass the event to two more subgraphs. The Sequence node is just acting as a splitter to send one event to two different places. Note that it will happen in order, but it all happens so fast that it will appear to have happened at the same time.
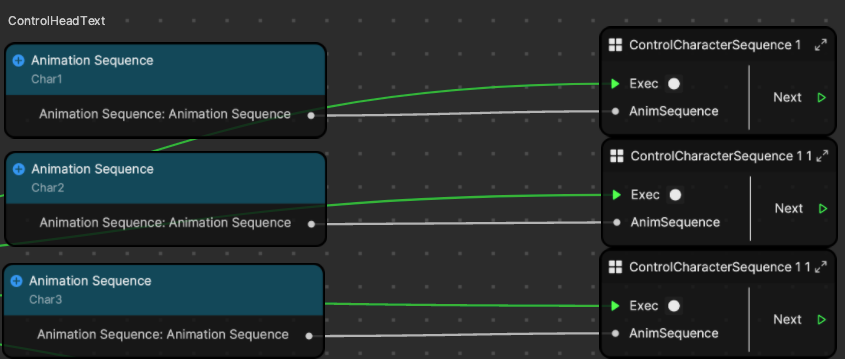
ControlHeadText and ControlTextBox are two subgraphs that are doing all of the same things. This is a great example of duplicate logic being easily copied and pasted using subgraphs. Below you can see that the subgraph isn’t very complex, but it also has a lot of reference nodes being input into subgraphs, just like our first KeyboardTouchInput subgraphs. Let’s walk through the logic and break it down to easily understand the different pieces.

Zooming in on the first half of this subgraph, you can see that the first thing we do is save the current character ID to a variable. This is a common practice for an Effect House subgraph where you capture and input a value that you want to use elsewhere in the subgraphs. If you save it to a variable at the start, you can use the “get variable” node for that variable anywhere else inside this subgraph without the connection lines stretching all over the place. It’s just a way to keep the subgraph neat and tidy. Next make sure that the character ID is not backspace (-2) and increase the counter value by 1. If it is -2, then we will decrease the counter and pass that -2 along to the typing phase.
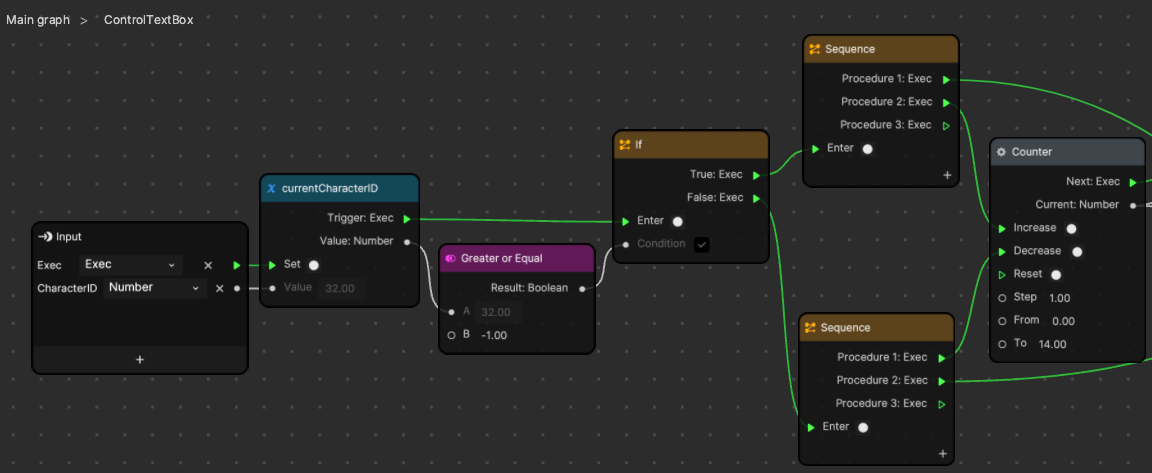
Take a look at the sequence nodes that are splitting the signal. This is a case where the order of the sequence node really matters. If you want to type a new character (not backspace), then the sequence node will first send a signal along to type, and then increase the counter to the new value. If you instead have a backspace, you will decrement the counter first, to move back by one character, so that you can set the previous character. The previous character is then set by making it blank, because we just backspaced over it. This is a clever shortcut which avoids more drawn out and tedious logic. Sometimes complex and clever solutions are not necessary because they are not as easy to modify for future designs.
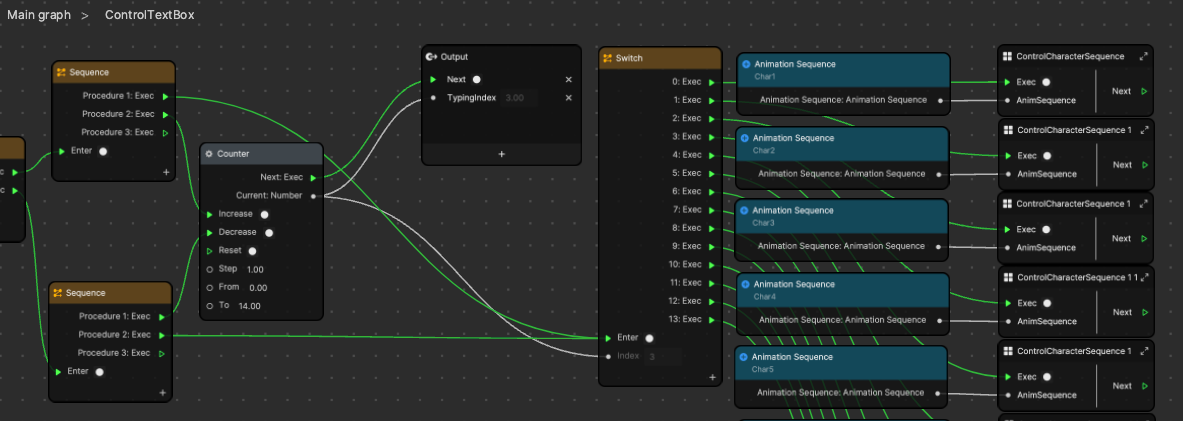
To reiterate, the first half of this subgraph is just branching between if we are typing a character or a backspace, and then updating the counter and passing the events and information along in a specific order. This second phase is just an array of subgraphs that each control one character in the text box at the top of the keyboard, and they take in a reference to the animation sequence. Notice that they don’t take in a character ID, and that’s because we stored it into a variable at the beginning of this subgraph. The switch statement uses the counter’s current value to determine which character we want to change.
Each of these subgraphs takes a reference node that represents the character’s animation sequence, not the Image or SceneObject like a lot of the more common reference nodes. This is the part of the project that uses the same technique as the Scoreboard MicroJam project.
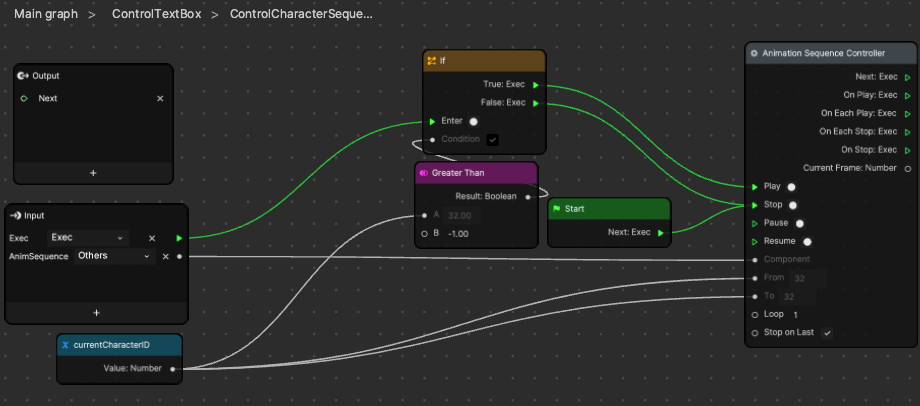
It may look familiar. We’re just updating the From and To inputs to the Animation Sequence Controller node, changing the range of textures that it will play, and then pressing play. This basically tells the animation sequence to continuously play, but it just loops over the same individual frame. To render a space, or erase the character, we trigger the Stop event to make sure the animation sequence isn’t playing and doesn’t render at all. This logic is just duplicated for each character.
As mentioned above, the ControlHeadText subgraph is an exact copy, and the only difference is that the Animation Sequence reference nodes are replaced by the ones from the HeadText object. This is so that we can also see the typed text appear on the user’s head! That’s it! The important parts of making a keyboard are as simple as that. At this point, it’s recommend to try to create a vertically-aligned text box on your own by copying the HeadText object setup. This will be a great way to solidify any knowledge you’ve learned from this project so far. Next we’ll show the subgraphs that do extra things like centering text, neatly hiding the keyboard, and moving around a blinking cursor.
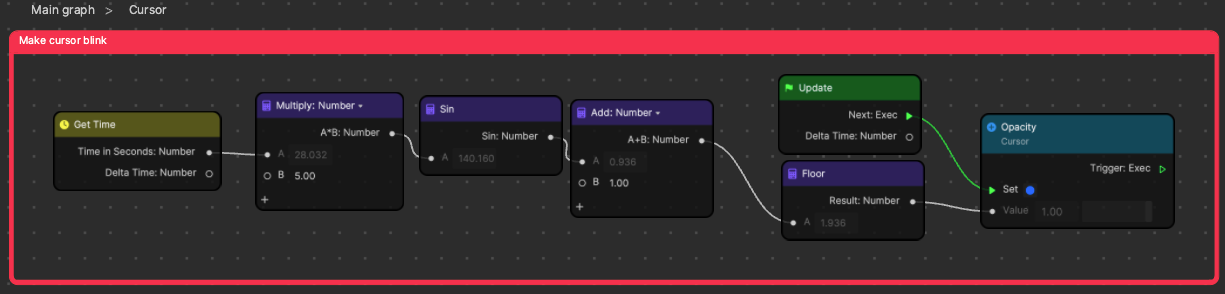
Cursor
The Cursor subgraph has two distinct parts. The first part just uses math, a sine wave, and a Floor function to create a steady blinking pattern that blinks between 0.0 and 1.0. We plug that into the SetOpacity for our cursor Image object to make it blink. Notice the 5.0 value in the Multiply node. You can change that to other values to make the cursor blink faster or slower.
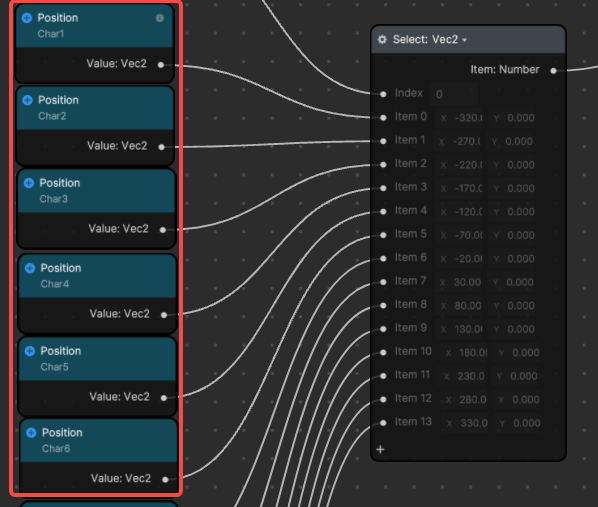
The second half of this subgraph will use the character index that was output from the ControlTextBox subgraph. This value just tells is which character object was last typed. We have a select node that then uses that character index to choose one of the GetPosition reference nodes. It moves the cursor to the position of the next character.
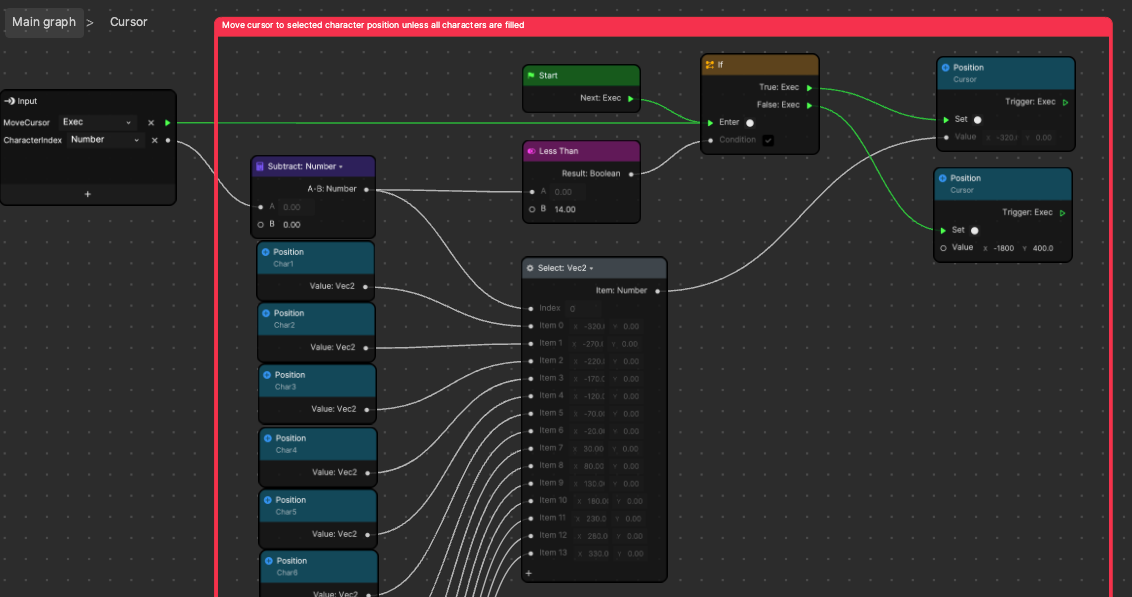
There are two interesting things to note. When we have already typed the max number of characters, 14, we can see that the If node will actually set the cursor’s position to a specific position (-1800, 400). This is just a position far off screen, so you can’t see it. The second interesting thing is that the cursor’s center is being placed on the character’s center, but then it is shifted to the side by the Pivot value. That way it’s always blinking on the right side of the character it’s centered on. This just simplifies the logic and makes it less likely that our math or logic fails.
We only added a cursor for the text box at the top of the keyboard because it doesn’t seem useful to have one on the head text box. If you make a different design other than the text following a head, then you could duplicate this Cursor subgraph for your other text box. If you do this, make sure to replace those reference nodes feeding into the select node inside the subgraph.
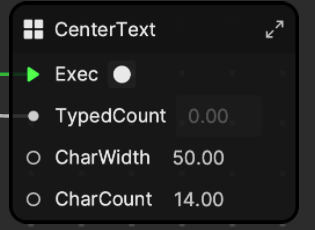
CenterText
The CenterText subgraph is the simplest subgraph in the project. It will shift the entire text box so that the typed characters are centered. This is perfect for the head text in this project, but we definitely don’t want the text at the top of the keyboard to center! This is a great example of how we could use the same output from our ControlTextBox subgraph to do two totally different things. This demonstrates how our subgraphs fit their functions really well and are very modular and reusable.
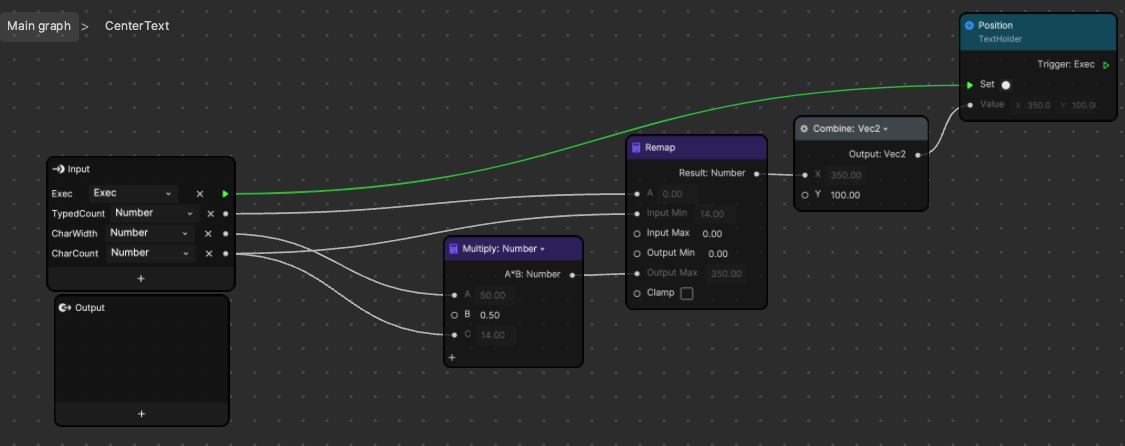
What’s happening in this subgraph is just math. The total number of characters is multiplied by the width of each character and then multiplied by 0.5. This gives you the width of the whole text both, cut in half. If you think about it this way, when all of the characters are typed, you want it to be perfectly centered. This means that it would not be offset at all, or offset by 0.0 pixels. If you haven’t typed anything, that means that you want the left end to be centered. Thus, you would offset the whole text box by half of its width. These are the two extremes of how much the box could be offset.
Now the Remap node is used as a convenient way to say when 0 characters are typed, give me the full offset; and when the max number of characters are typed, give me an offset of 0. If you put these numbers into the Remap node in the correct way seen above, then any value in between will work itself out through interpolation. This is one of those subgraphs that is all math, so it looks simpler than it is. Don’t feel bad if it seems like a lot to process.
Keyboard Show Hide

The final subgraph has a lot of information about best practices that can improve the look and feel of your designs. In this subgraph walkthrough, you’ll learn about dynamic visual references, smooth transitions with easing curves, state dependent UI, and you’ll also find a handy subgraph called ContinuousTransit. These could all be their own separate lessons, but we’ll stay concise and give the most useful information.
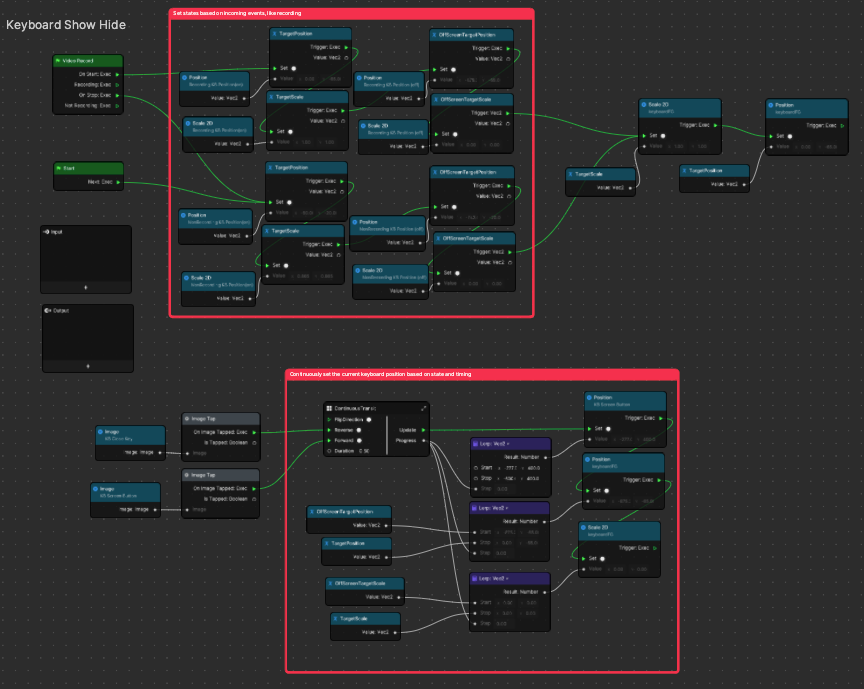
The upper section mainly updates the state of the keyboard. The keyboard always has somewhere that it wants to be. Instead of instantly turning it on and off, we smoothly slide it from where it is to where it needs to be.
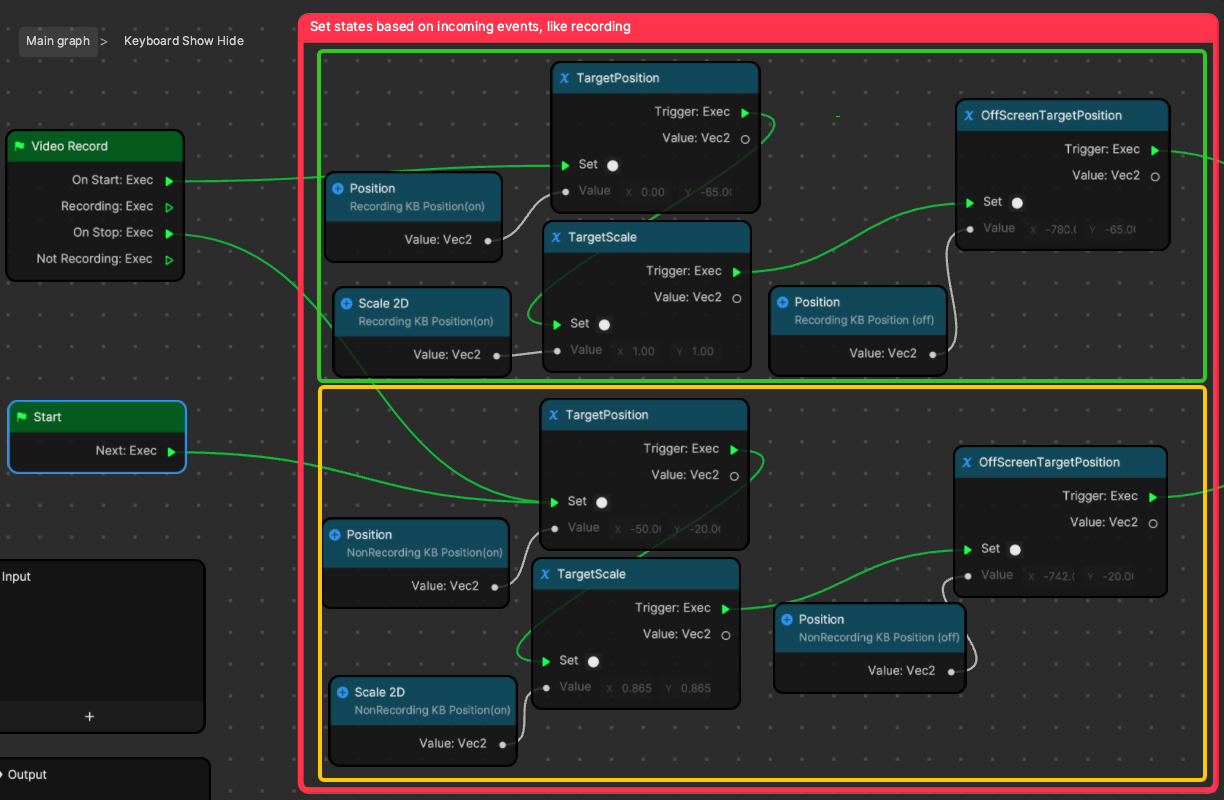
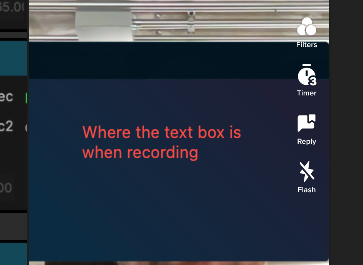
Notice the TargetPosition and TargetScale variables that we’ve created. These give us the place where the keyboard wants to be when it is on screen. We set them to different positions because we want them to be different when the user is recording, versus when they are typing before they press record. This is mainly because the UI blocking the screen is different when you’re recording and when you’re not, so we want to give them extra typing space when they don’t have UI crowding their view.
We can control these positions and size values in a really useful way under the ReferencePositions scene object. Instead of hard coding all of the positions’ x and y values, we can just reference some object that is in the same position and scale that we want our keyboard to be in. This way we can position our target visually and see where it will be. This is really nice if you, as the creator, want to change where your keyboard is coming from.
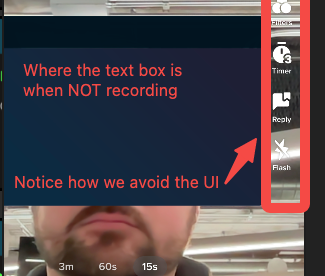
It currently slides in from the left edge of the screen, because that is where the NonRecording KB Position scene object is. Take a moment to enable some of these objects. See where they are and drag them around the screen to different places and then remember to click the Refresh button in the Preview panel. Notice how just moving these objects around changes where the keyboard comes from and where it goes to. This design allows you to easily create transitions with a visual representation of the start and end of the transitioning objects. It can also be really powerful if you can identify use cases for this, especially in templates that you make for yourself! In Effect House, make sure to play with the “recording” objects and not the “non-recording” objects, because in the tool on your computer, it will always pretend to be recording. Read below for more information.
When using Effect House, the Video Record node will automatically trigger the On Start event when the effect loads. On the other hand, when you’re using the effect on mobile, this event will only trigger when the end user presses the Record button. Just keep in mind that according to this node, you’ve “already pressed” the simulated “record” button as soon as the effect starts. This is really good to know before you start using this node for development and testing.
Now we have some target values for where the keyboard panel should be when it’s turned on and off, and even different targets depending on when the user is recording or not recording. The upper half of the subgraph did the logic to control what targets to use, and the bottom half of the subgraph now uses those target values to move the keyboard into the right place.
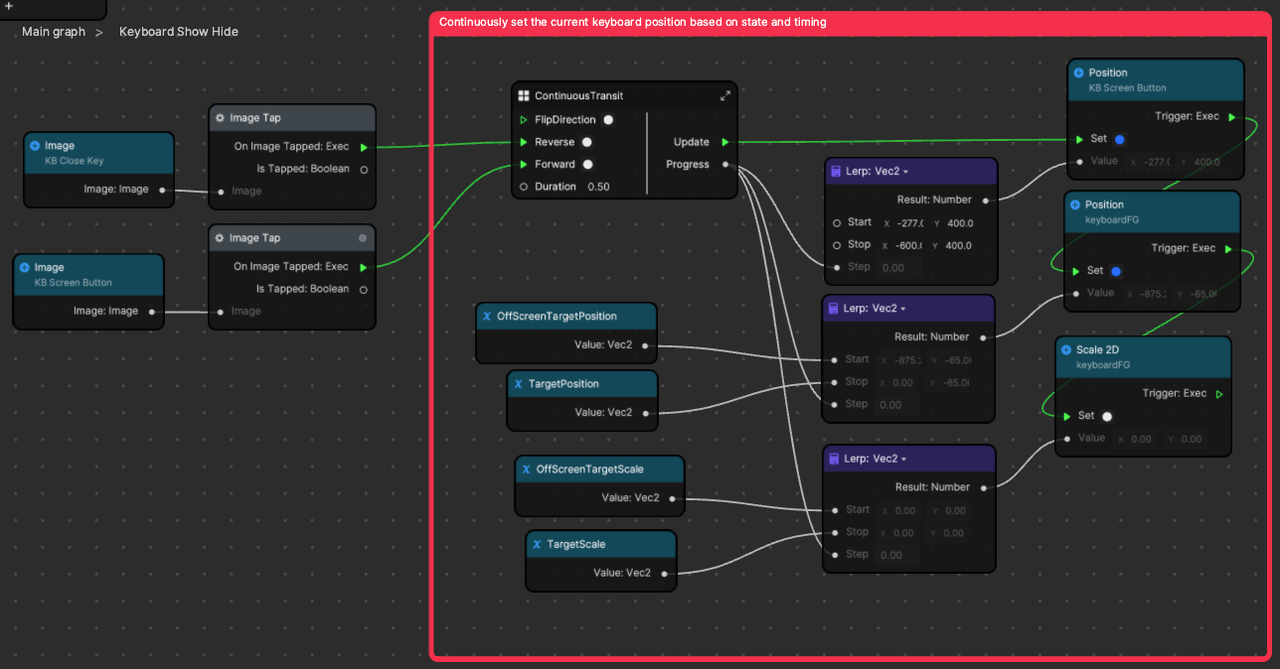
We’ll now break down this section by briefly talking about the image tap buttons on the left. We already explained above that the Image Tap node takes a reference to an image and sends a trigger when that image is tapped. So we have two buttons—one turns the keyboard on, and the other turns it off.
When these buttons are tapped, they control the ContinuousTransit subgraph. ContinuousTransit was designed as a way to make something more dynamic than the Transit by Time node. You can tell it to start moving backward or forward, and plug in your own easing function.
Instead of playing an animated timed transition from start to end, we’re always playing it, and we just change the direction that we want it to play. This has different use cases than the Transit by Time node and is not meant to replace it.
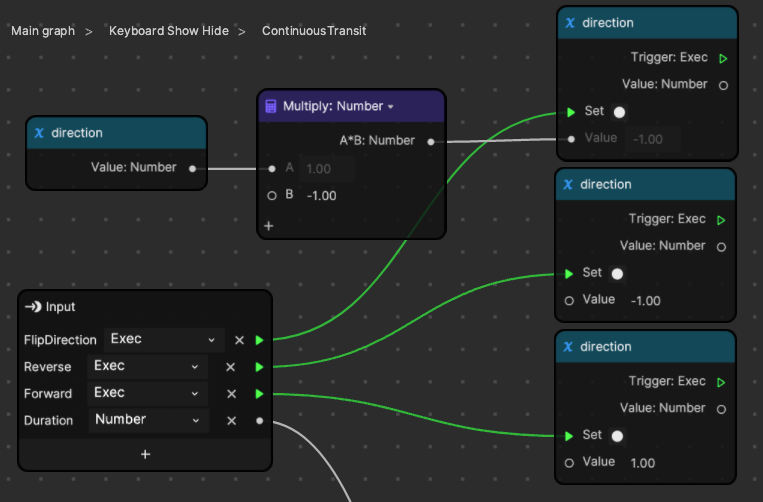
When the user sends a signal to Forward, it doesn’t reset the transition to the Start value and then play to the Stop value. Instead, it just changes directions, and continues from where it already was. Try plugging in a Screen Tap node into the FlipDirection input to see how it smoothly bounces back and forth each time you tap the screen.
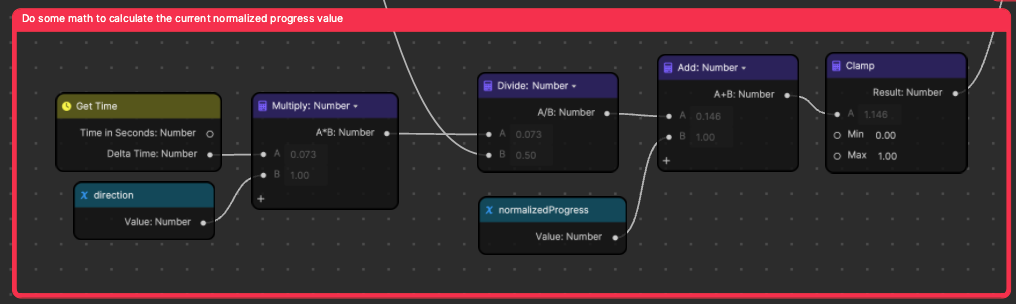
Just like the regular Transit by Time node, we want to output a normalized 0 to 1 value. 0 represents the beginning of the transition timeline, and 1 represents the end. This is done with math to make the transition last for the duration value that you input as a subgraph parameter.
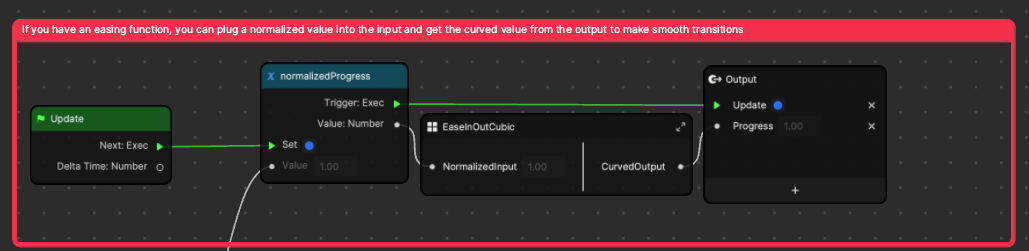
When we have the normalized output value, we want to save it so that we can use it in the calculations during the next frame. In this subgraph, an easing function has been added to turn the linear 0 to 1 value into a curved 0 to 1 value. The max and min of this value are still 0 and 1, but we get to them at different rates. This tiny addition gives us a really subtle, but beautiful smoothness to our transition.
If you look below, we’ve slowed down two versions of the keyboard transition. One uses linear time with no sort of easing function to power the transition. This means that at any point in the transition, it will be linearly placed. So if the full transition takes 1.0 second, then at 0.75 seconds, the transition will be 75% complete. This is a very standard way to do things, and there’s nothing wrong with it as it gets the job done. The most prolific designers and creators will often use easing functions to make this transition look smoother by curving that transitions so that it starts moving slowly and ends slow. The speed changes as the keyboard slides out, which is much more realistic compared to it instantly moving and stopping. This is subtle, but having eased transitions throughout your projects can really make the design feel much sharper.
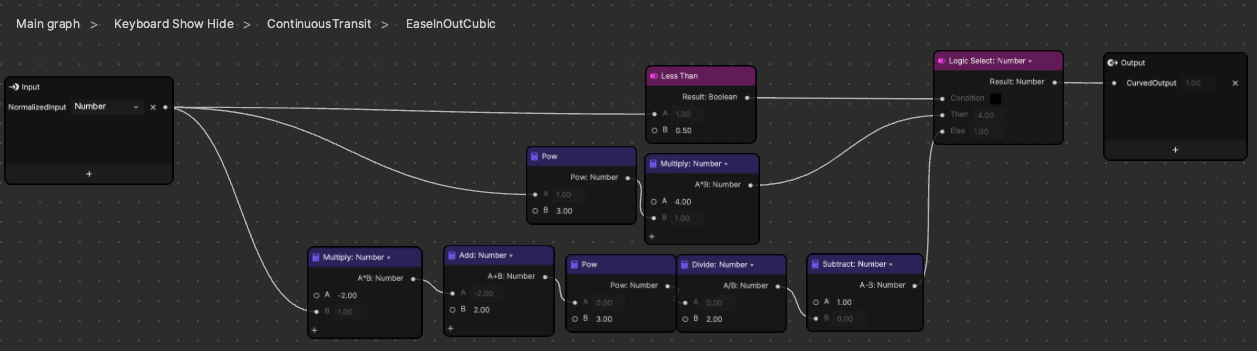
The logic to add an easing function is pretty simple once you have wrapped your head around using Lerp nodes to perform linear interpolation for transitions. The easing function subgraph is just a mathematical function, and you can find a lot of these functions on the web. You can find great resources online for testing when you search up “easing functions.” You can copy some functions that make different transitions you may want. This one just has a different function depending on if the normalized input value is above or below 0.5. This is called a piecewise function. Feel free to use this easing subgraph for a really default smooth curve, or make your own based on other easing functions.
Zooming back out to the Keyboard Show Hide subgraph, we can use this curved smooth value by plugging it into some Lerp nodes.
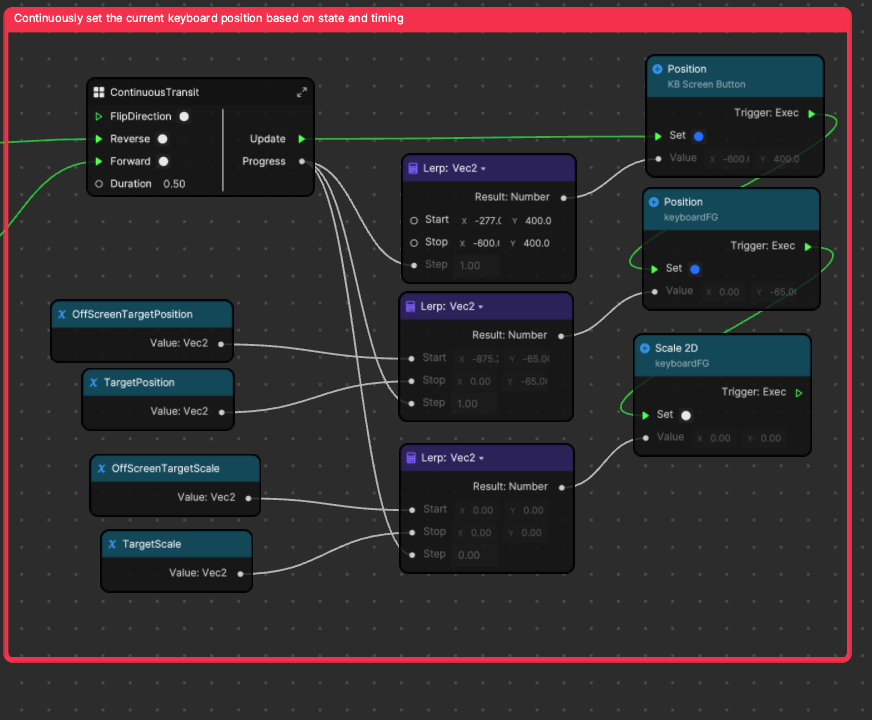
The Lerp nodes each take in an offscreen parameter and an onscreen parameter. Then our transit subgraph tells us to pick values between them based on 0 being the Start value and 1 being the Stop value, and interpolating between those to find the correct current value in between. We then take these position and scale values and apply them to the keyboard with some SetPosition and SetScale nodes.
Congratulations! The most complex and powerful subgraph has been explained, and isn’t as intense as it first seemed. Hopefully you take some extra time to go back over the parts of this guide that you weren’t sure about and do some of the practice suggestions to really improve your Visual Scripting skills.
More Project Ideas
Now that we’ve completed this project, try to complete the following exercises:
- Easy: Arrange the characters in a way that they form a circle around the user’s face.
- Medium: Make the characters dance around or flow in a wave like motion when the user raises their eyebrows.
- Challenging: Bake a 3D animation of planes being barfed out of your mouth and set the subgraph to type the characters into the materials those planes are using to make them barf pre-typed words out.
- Extreme: Improve the keyboard by dynamically changing each character width and position as they’re typed.
If you create anything with any of our MicroJam projects, please share it in the Effect House Discord channel and let us know what parts you used! We love receiving your feedback and seeing the amazing things you create.
Thanks for following along! Stay tuned for more MicroJam projects.