AI Graph Editor
The AI Graph Editor in Effect House allows you to combine multiple AI base models to create a single and more complex effect. Using a graph or node system, you can chain different models together, such as image to image (I2I), image to video (I2V), and motion driving models, to produce longer and more dynamic AI effects.
AI Graph Textures and standard AI Textures cannot be used together in the same project. If one is already in use, adding the other will trigger a prompt preventing it from being added.

Add an AI Graph Texture
To use the AI Graph feature, you first need to add an AI Graph Texture to your project. This texture acts as a player for your AI-generated content.
- Go to the Assets panel
- Click the Add asset button [+]
- Go to Texture
- Select AI Textures, then choose AI Graph Texture

Alternatively, you can open the AI Graph Editor directly by clicking the AI Graph button from the Tool Bar.

You can now start building your own AI Graph!
Configure the AI Graph Texture
Once you've added an AI Graph Texture, you can configure its parameters in the Inspector panel:
- Input Texture: Select the input image that will be passed to the AI models. By default, this is set to the Built-in Render Output. You can also use the Pin to graph option.
- AI Graph: Click this button to open the AI Graph Editor window.

AI Graph Editor
The AI Graph Editor is where you build your AI workflow by connecting different nodes. Its interface and interaction are similar to Visual Scripting.

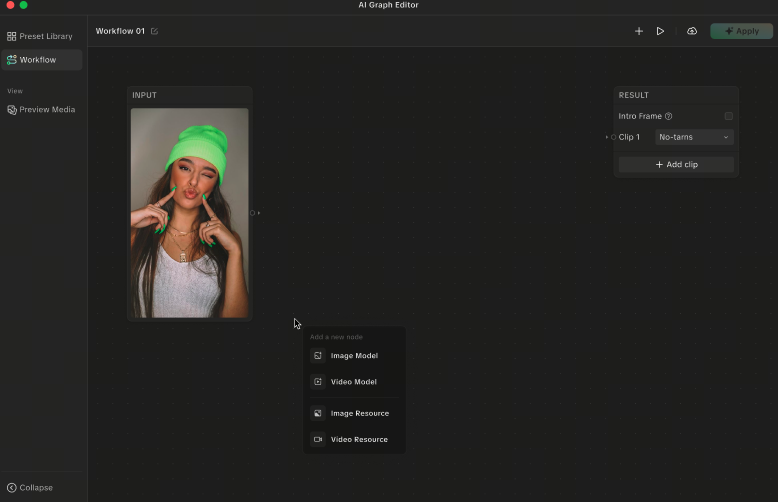
Add Nodes
To add a node:
- Go to the AI Graph Editor panel
- Click the Add button

- Choose a model
Alternatively, you can right-click anywhere in the graph, or click an output port on an existing node to view compatible options.
Input Texture Node
The Input Texture node is the starting point of your graph and is created by default. This node cannot be deleted.
- When you open a new AI Graph Texture, it displays the currently selected preview asset
- To change the preview image, select a different asset from the Preview Library

Image-to-Image (I2I) Node
The Image-to-Image (I2I) node generates an image based on the input texture.
- Drag an I2I preset from the AI Editor Preset Library into the graph
- Click Edit to open the AI Editor I2I window, adjust the settings, then click Apply
- The applied model name is displayed on the node
You can add a maximum of 5 image-to-image nodes.

Image-to-Video (I2V) Node
The Image-to-Video (I2V) node generates a video based on the input texture.
- Drag an I2V preset from the AI Editor Preset Library into the graph
- Click Edit to open the AI Editor I2V window, adjust the settings, then click Apply
- When using a Start/End Frame model, the node includes input ports for start and end frames that can be connected to I2I nodes
You can add a maximum of 3 image-to-video nodes.

Result Node
The Result node controls how the final output is displayed. It is created by default and cannot be deleted.
- Intro Frame: Optionally enables a video that plays before generation. This cannot be connected to other nodes and will render first.
- Add clip: Add multiple segments to define your output sequence. For each segment, you can:
- Connect it to an Input Texture node
- Adjust the display duration by dragging or entering a specific time
- Apply transitions from the Transition Asset Library
- Reorder: Drag and drop segments to change their order. The Intro Frame cannot be reordered.

Image Node
Use the Image node to upload images from your computer for use in the graph.
Uploaded images must meet the reference image parameter limits of the selected AI model.

Save and Re-use Workflows
Save your AI Graph configurations to revisit them later, make changes, and continue refining your effect. To save your workflow:
- Click Save Workflow.

- Enter a name for your preset. The first image of the preview results will be used as the cover.

- Your saved workflow will be added to the My Workflow tab in the Workflow Gallery.
When starting a new project, you can easily access your saved workflows from the Workflow Gallery, which also features a Trending tab for popular presets.